Showing posts with label Whimzee's. Show all posts

Tuesday, June 4, 2013

DIY Shadow Box with Studio Calico Wood Veneer Cameras


Sometimes inspiration strikes right there in the middle of the scrapbook store!
When I was in the store one day, checking out our new arrivals, this package of tiny little cameras from Studio Calico practically jumped out at me.  Being a HUGE fan of cameras, I knew I had to use them for something special.  With their unique shapes, I wanted to create something where I could see each one.  And being a designer who LOVES color, I wanted to make each one a bright, vibrant color.

256938a2afa079fef4db8a879030de3562c46813983726bc2c

So, as I sometimes do, I wandered the store, waiting for the idea to jump into my head.  Just being around so many papers, embellishments and creative products tends to inspire me.  I have the very best ideas in the store!  Try it sometime, I'm sure your scrapbook store can work magic too!

As I passed our display of Luminarte mists, it came to me.  I should use the mist on the cameras.  Over the last couple of years, I have taught workshops, designed projects for the store and written blog posts on the versatility of mists.  When I came up with this idea, I hadn't used the mists as paint very often.  So, I thought this would be a perfect project to venture into new territory.  Mist, whether Luminarte, Mister Hueys, or made by other manufacturers, comes in a multitude of colors and finishes.  For this project, I love that the Luminarte mists have a sparkly, metallic finish.  If you'd like a similar look using Mister Hueys, just grab the SHINE bottle and apply it over the top of the matte colors.  It will look great!


After coming up with a way to get my little cameras all colorful & sparkly, I thought the best way to display them would be to mount them in a shadow box.  I picked up an 9" x 9" shadow box at IKEA.  I liked the white frame so the cameras would really be the focal point.


With a rainbow in mind, I arranged my mists by color.

Then I opened the lid and used a brush to drip a little mist onto a regular sheet of printer paper.
The actual color of the mist is often different than it appears in the bottle.  I was also sure to shake the bottle vigorously before opening it.  The metallic flakes settle to the bottom of the bottle very quickly, so be sure to shake your mist often.


Next, I sorted through the veneer cameras putting them into little piles by shape and size.  I wanted to be sure to include a variety in my final product.  Being a big fan of symmetry and having a square shadow box, I decided to use 16 cameras in my design.  Originally, I had planned to use more, but when I laid out the cameras on a 9"x9" sheet of white paper, the white space between them was perfect with 16 cameras.  My original layout was approximate, I would use a ruler later when it was time to apply the photos to my mounting paper.


After letting my dots of mist dry, I chose the 16 colors I liked best and began to paint each camera.
I used a small paint brush to apply the mist, letting it sink into the wood veneer for a few seconds, then applying more, until the color reached a vibrant depth on each piece.

After applying a few coats of mist, I let each camera dry a bit so I could check the shimmer.  The Luminarte mists I used sparkle more as they dry, so it's necessary to wait until your project is dry to see if you like the amount of shimmer.  Apply another coat or two if your project isn't "shimmer-y" enough.

As I completed each camera, I placed them back onto my printer paper to see how the colors looked next to each other.


After all the cameras were painted and dry, I used a ruler to place them.  I started with the right column and placed the largest camera 1" away from the edge.  Since all the cameras differ in size, I moved up the right column, centering each camera in an area of space dictated by the largest camera.  As I measured the rows, I tried to keep the bottoms of the cameras in line with each other, as if they were sitting on a shelf.  I liked the look of this, except when I placed the tiniest cameras.  For those, I felt lining them up with the bottoms of the other cameras left too much space above them.  So, I moved the tiniest cameras up a bit centering them more in their spaces. (Feel free to message me if you would like a more detailed explanation of my spacing.  It was much easier to do in reality than it is to explain in writing!)


After placing the cameras, I used a pen to trace their "lenses" onto my printer paper.  If you're using different veneer shapes, you could trace outside the shape instead.


In order to attach my cameras to my mounting paper, I placed my printer paper with the circles down onto a light box.  Next, I placed my 9" x 9" mounting paper (Bazzill Basics Swiss Dot Cardstock in Salt) on top.  I used mini Glue Dots (about 2 per camera) to attach each camera over the circle.  I kept my ruler handy to make sure the bottoms of the cameras were straight.


After applying all the cameras, I placed the paper inside the shadow box...and VOILA!

A simple, vibrant, graphic piece of art!

I'm in the middle of designing some fun products to sell in scrapbook stores and on etsy!  My company is called Creatively Custom and I'd love it if you'd stop over and LIKE my new business Facebook page.  My first products will be custom Project Life style cards for high schools, complete with names, colors & mascots!  I'd love to know what you think of them.

Thank you!!


Check out my fun idea and TONS of other amazing ideas over at the link party on Today's Creative Blog!  Tuesday is 'Get Your Craft On' day!  You'll find SO many cool ideas there every week, you'll wonder why you hadn't found it before!  Oh, be sure to tell Kim (Creator & Diva of TCB) HI and that Julie from JulieChats sent you!

Today's Creative Blog

Monday, May 6, 2013

Teacher Appreciation Layouts - Layout of the Week

This week is a very important week in schools all across America!  It's Teacher Appreciation Week!  This week was a huge deal in my daughter's elementary school.  And it still is!  Even though she's moved on to  middle school and her brother doesn't start elementary school until next year, I was asked to pitch in during this special week.  I'm sure it doesn't hurt that I work our local scrapbook store.  Those volunteers know just who to ask when these projects come up!

One of the mom's at the school came up with the idea of having each child in the school (about 600) create a scrapbook layout for his or her teacher.  Some kids also created layouts for the "specials" teachers: music, library and technology.  In an effort to include the office staff in this fun project, a mom contacted me and asked me to design pages for the principal and the three ladies who work in the office.  Of course, I was delighted to help.  These ladies were part of my and my daughter's life for six years and will be a part of my son's life for the next six years!

When I thought about what types of layouts to create, I was looking for something simple & graphic, that I could reproduce pretty easily for four people.  I think that the teachers will be receiving albums full of pages from their students.  I'm not sure exactly how my layouts will be presented to the office ladies, but I think they would be perfect in frames to hang on the wall.

I am really excited that our store will be getting the retail version of Project Life very soon and so I thought I'd create a PL style layout for these projects.  I also have a few fun ideas that I'm going to start designing soon to sell in the store and on etsy.  I'll be back with details, once the products are ready for sale.  So I had some ideas floating around in my head that I wanted to try out.


Our store (Whimzee's Scrapbook Studio in Beaverton, Oregon) sells tons of custom paper for local schools.  We order our paper from Scrappin' Sports, and of course, my elementary school is one that we order.  Check with your local scrapbook store if you'd like to create a project like this at your school.  I'm sure they have a vendor who can create custom paper for them.


Our school colors are red and black, so I stuck with a red, black & white theme for the layouts.  I used American Crafts textured white paper and World Win non-textured black paper, along with stamps by Technique Tuesday and ink from Tim Holtz & Ranger.  The cute black chevron washi is from Glitz.  I used my Silhouette Cameo to create custom PL style cards for the pages too!


A parent provided me with the photos.  Most were horizontal, so for three layouts, the horizontal layout worked perfectly.  For the fourth layout, I used two vertical photos and turned the layout 90 degrees, printing and cutting my rectangles vertically.


These layouts were a lot of fun to create!  I think I'm going to use this idea as a Teacher Appreciation gift in the future!  Create a layout and grab a white or black square frame & you're set.  I even created cards for a 5th layout, so I can make one for my daughter with a couple special photos from her last day of 5th grade!


Check out my fun idea and TONS of other amazing ideas over at the link party on Today's Creative Blog!  Tuesday is 'Get Your Craft On' day!  You'll find SO many cool ideas there every week, you'll wonder why you hadn't found it before!  Oh, be sure to tell Kim (Creator & Diva of TCB) HI and that Julie from JulieChats sent you!

Today's Creative Blog

Friday, February 3, 2012

2012...Be Inspired, Get Organized, LEARN

Wow, it's sure been a while since I've blogged...maybe it's about a lack of time or maybe it's about a lack of inspiration...maybe it's a bit of both.


But, as I attempt my first Roundup (I'm inspired by Katie Nelson, just took a class from her at Big Picture Classes, check out the Roundup section on her blog for more info.), of January 2012, I took a few minutes to read through some emails I've been meaning to get to.  I had 5 emails from the Ali Edwards series 52 Creative Lifts that I had been waiting to read.  While my January photos uploaded to Costco, seemed like the perfect time to get to them.  Reading through these weekly emails, inspired me to head over here and write a post about what I'm up to this year.

First, I began January thinking about my One Little Word for 2012.  WAY back in 2010, I decided on BELIEVE and ACHIEVE for my word(s) :).  I set goals for myself that had to do with blogging, losing weight and working on my finances.  I have to say that, as is usually my habit, I began with a strong focus on my goals and LIFE got in the way.  When it was time for 2011, I had helped my finances by taking a 2nd part time job, but doing so had squeezed out time to concentrate on blogging or anything else.  It seems to take me quite a while to "right my ship" when I encounter a big change like this, so here I am in 2012, forcing myself to make time to be creative (that might even include some blogging here & there).  With Jake in preschool, even for only 2 mornings a week, I can do some of my second job (transcription) during the mornings and not just into the wee hours of the night.  Getting just a little more sleep sure helps with the creativity and motivation!

So back to that 2012 word....mine is LEARN!


One of my huge goals is to learn Photoshop!  I purchased two online classes at Jessica Sprague .com and now I have to make the time to go through them so I feel like I have a better handle on Photoshop.  I would LOVE to use it in my regular scrapbooking AND to get started with some digi scrapbooking (I bought a subscription to The Digi Game over at The Daily Digi last year and I'm SO excited about all the great digi items I get for only $7.50 a month).  I have used a few of my digi elements to create invitations and some other fun little projects, but I have yet to complete a real scrapbook layout!  So I really need to get to those PS classes! (I did make my LEARN tag with PS and a kit from the Digi Game, but it took me forever and I can't figure out how to just use the part I want and not a rectangle background...time for the classes!)

As a part of my effort to create enough time to LEARN in 2012, I thought I'd better get organized!  I have read Katie's blog for a few years and have always admired how she rounds up each month at the beginning of the next month and then moves on.  (Read how Katie explains Roundups HERE on her blog!)I took her Roundup Class in January, over at Big Picture Classes and it inspired me to design a Monthly Roundup Workshop at Whimzee's Scrapbook Studio, where I'm in charge of all the marketing, while also teaching & designing.  I wanted to share Katie's basic technique and help the participants form a sort of support group that will meet each month to create a Roundup layout and also discuss the different ways that we can incorporate Katie's technique in regular paper scrapbooking in many different forms.  I want to share the ideas I am finding on creativity, inspiration and organizing with the group.  So, I guess, here I am using my LEARN to teach and share too!

In the first couple days of 2012, LEARNing Photoshop was a major goal of mine, and then it was pushed slightly aside when I was the LUCKY winner of a Silhouette Cameo die cutting machine on The Today's Creative Blog!  I was SO excited to win, that organizing my scrapbook studio and making a space for my new toy on my crowded tables became a more urgent goal!  And, now that the Silhouette has arrived, LEARNing it's software has become my most pressing creative goal!  I am SO happy that the software is easy to use (I have previously used the Pazzles Pro software, so it may have come quicker to me that it might to others).  I LOVE being able to download cool designs right from the Silhouette website for only 99 cents!  I have used the $10 download card included with my machine to grab a few die cuts for my Roundup workshop and I'm excited to share them with everyone who attends!


Now that my studio is more organized, I find it's easier to run up here and cut a few shapes or finish a project.  (Another goal of mine is to finish some projects that are half finished and filling a box under my table...having that box empty at the end of 2012, would be an amazing accomplishment!)  I am also hoping that having things more organized will allow me to get started on a project I have been procrastinating since November.  I am creating a custom album for a friend, I think I my reasons for procrastinating are both emotional and then just plain procrastination.  This album is very personal to me, being a celebration of a close friend's life.  Brent died in 2003 and thinking about creating this album gives me feelings of joy, being able to honor someone who is so important to my family and feelings of sadness at the memories being in the past.  But now that I have the perfect space, I will press on and find joy in remembering someone so special.

I'm confident the book will turn out beautiful and hope that it will be the beginning of a new chapter for me, creating custom albums at home in my studio.

In order to keep my word, LEARN, foremost in my mind during 2012, I have signed up for the One Little Word class, taught by Ali Edwards, over at Big Picture Classes.  I signed up a bit late, so I'm still getting my book started, but I think that the little exercises aimed at getting to know my word and making it part of my life will be perfect lessons for this year!  I am excited at the idea of exploring my word a little bit each month!  I promise to share what I'm "learning" about my word this year.  I'd love to know what your word is for 2012 too!  So leave me a comment & we can chat! ;)

I've also decided that I need to LEARN to knit this year!  During January, I have been able to learn one stitch...the knit stitch.  I'm not pushing myself and I'm not sure how far I will get on this journey this year, but I'll keep you updated!

Friday, September 23, 2011

Layout of the Week: Halloween Headstone

Even though it seems like summer only just arrived here in Oregon, the calendar says it's time to get ready for Fall!  Never one to miss out on seasonal decorating, these extra large pennant banners just jumped right out at me during the EK Success Craft Fest this fall in Portland.

These large arched chipboard pennants are 10" x 16" and when flipped upside down it just screamed Halloween headstone!


I gathered some fun Halloween papers & embellishments, some new, some older...


I think I used all these papers, except the tiger stripe.  After laying everything together and deciding which to use, it just didn't seem to fit into the look I was creating.  For my first step, I used the Soot Ink Pad from Tim Holtz, rubbing it along the sides and over the enter front of my headstone.  Then I cut strips of paper and attached them with spray adhesive, before adding some fun embellishments like self adhesive strips, ribbon, twine, a tag from 7 Gypsies, punched bats and a piece of jack-o-lantern flair.  We're planning to use the Halloween Headstone as a fun place to attached little notes in our booth during this weekend's Scrapbook Expo.  After the Expo, I'm planning to add some orange glittered THICKERS announcing Happy Halloween!


Tips:

Sand double layer cardstock, such as Core'dinates, to add a distressed look to your Halloween projects.

Don't be afraid to give your tags a distressed look too!  Wad them up & rub with ink to give them that "just found in the haunted house" look.

Trim your patterned papers and lay them over another coordinating pattern.  This diamond pattern takes on a banner look when trimmed.

Punch a strip with your favorite punch and mount it over a thick ribbon for a custom embellishment!  The bats have also been sprayed with Luminarte black shimmer mist (difficult to see in the photo) for and added texture.

Supplies:
Paper Accents
Tim Holtz Ink Pad
Papers-Teresa Collins, Authentique Paper, Core'dinates
Various Ribbon, Paper Twine & Yarn
Tag-7 Gypsies
Spritz-Luminarte
Sticker Strips-K & Co.

If you're looking for other creative Halloween inspired ideas, stop by Today's Creative Blog for Get Your Craft On Tuesdays.  100's of creative types submit their creations each and every Tuesday, I'm sharing this project and I'd love to see yours over there too!


Monday, June 6, 2011

Party Favors the Kids Can Make...


If you're like me, you're getting tired of spending all the time and money to throw your kids wonderful birthday parties only to be left wondering what kind of fabulous gift you should spend even more money on to send home with each little party go'er...

Well, personally, I'm trying to move away from the party favor/gift bag craziness.  Last year for Delaney's party, we had a great American Girl Craft Party where the girls made their own favors as part of the party.  And the year before that, we had a Tie Dye theme for Delaney's party where the girls tie dyed a shirt and wore it home as their favor.  (Click HERE to see the mini album I made featuring all the fun of the Tie Dye party.)

This year, Delaney wanted to take three friends to dinner at Benihana and then back home for a sleepover.  Since dinner was going to be pretty expensive, I wanted to do some cheap little favors for the girls.  While I was thinking about my plan for the party, we got in some fun little tubes at the scrapbook store where I work.


The tubes are about $1 each at the store and are about 1 1/2" in diameter and 8" tall.


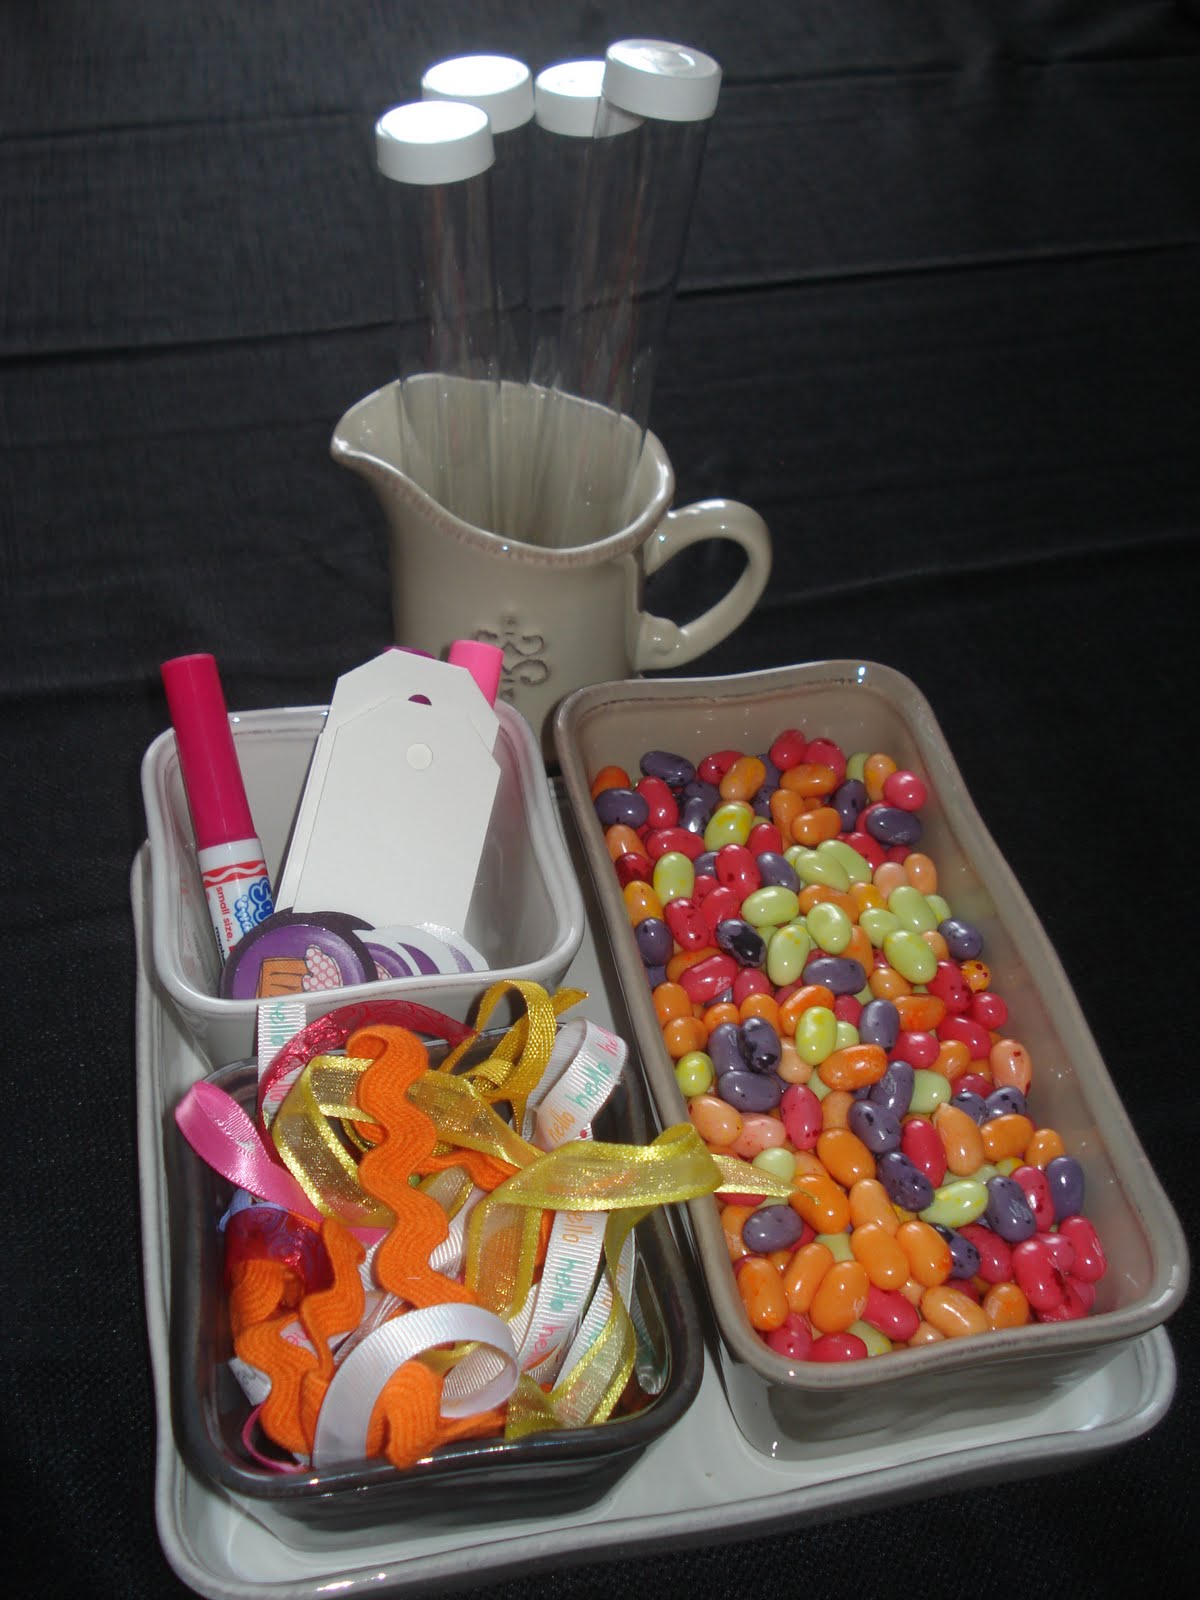
We gathered our supplies. (Of course I used my new favorite Willow House piece, the Riverstone Tapas Set...so useful, but I digress!)  Delaney wanted some fun bright colors for the tubes, so she chose Jelly Belly Jelly Beans in the colors she wanted (frankly the most expensive part of this project, you could choose any little candies that fit in the tubes).  Then we used some extra ribbons we had at home and a few little spools of $1 American Craft ribbon from the store.  I punched the tags with my large tag punch and printed out some cute cupcakes from a the Crystal's {Playground} elements pack, a digi scrapping pack I got over at JessicaSprague.com (I made the invitations from this same kit, I'll share them soon.)


Once Delaney had all her supplies, I left her alone to make up the favors while I finished cleaning the house.  I did have her let me know when she finished a step, so I could hurry in & shoot a photo or two.  Delaney's 10, but I definitely think that 7 or 8 year olds could do this project by themselves or as a fun activity during the party.

In preparation, we cut the ribbons in about 4" pieces and wrote the girls' names on the tags.

Then the fun began....

First Delaney filled the tubes with jelly beans.


Then she added the cap.


Next, she tied a few ribbons around the tube, adding a tag to the top ribbon before tying it.


Such a fun, simple & inexpensive party favor!  Give it a try for your next party...birthday, graduation, 4th of July, Halloween...the variations are only limited by your imagination!


My Birthday Girl had a great time with her friends & everyone left with a sweet little memory of the party!

Remember to join me over at Today's Creative for the "Get Your Craft On" link party every Tuesday!  If I'm not posting, I'm over there hanging out seeing what the creative ladies are sharing every week!


Todays Creative Blog

Friday, May 20, 2011

Layout of the Week - Quick & Colorful


Some projects are just for fun!  This is one of them.  I've always been wanting to try more of the fun tints on the Costco Photo Center website and this seemed like a fun photo to use.  I love the whimsical look of Andy Warhol's pop art and so does Delaney.  She took an art class last year where she got to create some very cool pieces of pop art!  Thanks to her, I have all sorts of fun, bright pieces around my home.

Since she turned 10 this Spring, I used this photo where a "10" appears to be coming out of her head...don't even remember where this was taken, but it's a fun photo!  Then I used the tints in the editting menu on Costco's Photo Center website to change the colors, saving a copy of the original and then going back to the original and doing it all over again for each color.  I printed each tint as wallets (you get 4 of the same photo, wallet size, for 39 cents...a GREAT deal, if you ask me!)

Next, photos in hand, I headed to Whimzee's to see what I could find.  I knew that my layout needed to be a simple one, with simple papers & embellishments.  I started this project with my ribbon chosen...we needed a sample at the store using this fun white felt flower ribbon from Creative Cafe, so I started with a couple pieces of it.  To add a little texture, I chose the white Bazzill dot paper with it's embossed texture.  Finally to mix in just a bit of color, I used some KaiserCraft rhinestones in colors that matched as closely as possible to my tinted photos.  I ended up with green, blue and red.  I was hoping to find an orange or gold rhinestone to match my sepia photo, but we didn't have any at the store.  So I used what I could find and spaced them out in the centers of the flowers with a few spaces in between.

For a simple layout design, I decided to arrange my photos "Warhol Style" in a square (I know it's a rectangle, but square just sounds better.)  I added a few rows of the ribbon and filled some of the flowers with the rhinestones & I was finished.  I love the look and the layout was super quick.  It's a fun design to use with any photos you have.  Just print out some wallets or crop your photos to wallet or small square size, grab your ribbon and you'll have a finished page!

I know some of you purists will notice I don't have any journaling...but I don't think every photo or layout needs journaling.  Sometimes just a photo or 4 photos tell the story!

Have fun scrapping!

Stop & visit me on Facebook, where I'm putting together a new page for the JulieChats Blog!


Tips

Use a group of 4 small photos and some ribbon or paper strips to create a simple, quick layout.

Try some tinted photos on your next project!

Don't feel like you always have to use tons of printed paper or lot's of color, sometimes neutrals & a little burst of color is all you need.

And DON'T worry if you don't want to journal every page!!!  It's YOUR page after all, there are no rules to scrapbooking!!!

Supplies

Bazzill Dot Paper
Creative Cafe Felt Ribbon
KaiserCraft Rhinstones
Costco Tinted Wallet Photos

Monday, April 25, 2011

Layout of the Week - Easter 10 Minute Mini Album


Wow, I can't believe I'm actually writing a post for a Layout of the Week! :)  I know it's been a while!  During the time I've been away, I've been very busy...working a few part time jobs, organizing & rearranging things around my house, being a mom & wife and also getting in a little creative time.

I thought you might enjoy a quick idea using some of those photos you took this weekend of your Easter festivities.  You can make this album as simple or fancy as you like!  Use just the 10 minutes I allotted for my first album like this or go crazy with tons of photos & embellishments and spend an evening creating a masterpiece to share with your friends.

I created this fun mini album a month or so ago, and thought I'd better get on the stick and share it with you!  To create this quick album, I used a template I designed a while back as a quick gift for my mom.  For that album, I chose to use some scraps from a fall layout and the extra wallet photos that come with the Costco wallet sheet (they print 4 for 39 cents). Check it out on the blog I write for the store HERE.

This time, the paper was my inspiration! I chose two papers from WeR's Peep Collection, the Easter Tags & the Easter Eggs.  All you need to create one of these small albums is a few wallet or trimmed down photos (all the same size), a piece of paper just a bit larger than each photo (I used a 1/4" border around all the edges) - plus one for the cover, a hinged ring and a few embellishments.  Mount each photo on paper and punch a hole in the corner with a regular round hole punch.  If you have some fun small coordinating embellishments, use them to add a little flair to a page or two of your album.  Stack all your pages with the cover on top and place them on the ring and close it.  Embellish your ring with a few small pieces of ribbon, if you like.

As always, I'm linking my creative post to the Get Your Craft On Tuesday post over at Today's Creative!  DON'T miss all the great links over there!  And remember to add yours!

Get Your Craft On Tuesday

Thursday, March 3, 2011

Layout of the Week - Me & U with Bo Bunny

Hi there! :)  I'm Julie and I have a problem....  OK, maybe it's not that bad, but I certainly haven't been a good blogger for...about a year now!  I guess for quite a while, I was in a creative funk.  Now I'm just so crazy busy that this is the first scrapbook layout I've really taken time to create for myself in months.  And in another amazing feat (for me anyway), I even shot a photo of it, uploaded it and Photoshopped it a bit for you.  So I'll share a little bit about it's story & then get back to my 4 part time jobs.  Yes, 4, no lying around here!

If you can remember way back when in this blog, I'm sure I've mentioned that I moderate an online community for the local scrapbook store where I work, Whimzee's Scrapbook Studio.  Well, right now, we have almost 600 project photos posted, so that's where I go to look for layout inspiration.  And just look what I found...


This fun layout was created by Kris, our online member with the most uploaded photos.  I love how she uses only half of the bracket die cut and gives the illusion of the other half by tracing its shape onto her background.  Such an amazing idea and also a money saving one.  Now, she has the other half of the bracket to use in another project.  I'll have to ask her what she did with that other half, or just check her project photos to see if I can find it!

Personally, I think "scraplifting" is the highest form of scrapbook flattery!  It says, "I love your layout so much that I'd use it with my own photos!"  It also gives those of us who are unpublished, the those warm fuzzy feelings of having people love us for our creativity! :)  So please, please use my layout (via Kris, of course) to create something for yourself!


For my project, I chose mostly Bo Bunny products from the Love Bandit line from Valentine's last year.  If you remember, I had another layout of the week, back then using this same collection, Little Love Bugs.  For my background, I chose Bo Bunny's Turquoise Dot paper from their Double Dot Designs Collection.  Such amazing colors and wonderful matching backgrounds, with just a touch of texture.  Now they are available in more patterns than just the dots!  When we were ordering for the store, we just couldn't decide, even after hearing from our loyal Facebook fans, and decided to order them all!  I hear they just arrived yesterday, so I'm heading down today to check out the yummy colors and patterns in person!

This is a very simple layout to create.  Just choose your background and a die cut shape.  Cut the shape in half and lay one half down on your background.  Then take the other half and a pen in a matching color and trace the die cut onto the background.  I loved Kris's idea of moving the background askew a few times and tracing it over & over.  Don't worry about your lines not matching up perfectly.  Just use a paper stripe or a page length sticker (or both, like I did) to cover up the edge of your die cut and the area where the lines meet its edge.  Then have at it!  Lay your photos and embellishments on top and play with them until you like the way they're arranged and get gluing! :)

Being a fan of a beat up or distressed look, I took a large brown Bo Bunny "U" and sanded it with some sand paper from the garage and then rubbed some brown Technique Tuesday ink all over it's surface.  Always being one to add extra texture, I had a piece of thin pink twine on my table (left over from creating samples for this weekend's workshop at the store), so I wrapped it around the "U" a few times and tied it in a knot.  For one more distressed item, I used a tag from Creative Cafe.  Now, I've had this sheet of tags lying around FOREVER, just waiting for the perfect project.  I HAD to have these tags, but was never sure what to use them for.  They look exactly like the tags that The GAP used to use on all their clothes, I worked there in college and they brought back lot's of fun memories.  I chose the brown tag that says "Just Because" at the top and in fine print "I Love You" in the center.  My love of distressing took over at this point and I remembered a previous layout where I took a new tag and made it look old in my, Children of the Corn layout.  So I wadded up the tag as much as I could and then rubbed the TT brown ink over the ridges, not too much, I still wanted to read the writing.  Then I punched a hole and added a small piece of the BB green dot ribbon.


Overall, this was a pretty simple project.  I gathered my supplies and then put it together in about 15 minutes.  So the next time you're looking to "scraplift" an idea, try looking online in one of the many scrapbooking communities like ours.  These communities are a great way to meet other scrappers, share ideas and ask questions.  Remember...all scrapbookers love to hear that you like their layouts & ideas.  So when you find something you love, be sure to leave a comment for the creator and if you want to use their photo on your blog, like I did, always ask permission first.  Thanks, Kris! :)

Tips

- Browse online scrapbook communities for layouts to "scraplift".
- Don't be afraid to use left overs from another project to create something totally new.
- Holiday collections aren't just for holidays...this collection was a Valentine's collection & I've used it here to showcase a fun summer photo of my kids.
- To get a distressed look, use your imagination & items from around the house.  Here I wadded my tag & sanded my chipboard before inking both.

Supplies

Papers, Stickers, Chipboard & Ribbon
Bo Bunny

Miscellaneous
Rhinestones by Kaisercraft
Tag by Creative Cafe
Ink by Technique Tuesday
Unknown...Sandpaper & Twine

Thursday, October 14, 2010

Welcome Back...Special Announcement from JulieChats

Welcome back to my blog!

After taking a break for summer and a major absence of creativity over the summer, I'm back.  I worked a crop at Whimzee's the other night and started working on a fun new banner project for my studio space.  I'll share it as soon as it's finished!

I'm not exactly sure of the reason behind my break from blogging.  I guess it started after my 40th Birthday Mexico trip with two of my closest friends.  Before that, I had been working very hard since January, at blogging, working at the store, volunteering at Delaney's school, house sitting for my neighbors and being a mom-wife-friend to those around me.  I was also forcing myself to complete creative projects in order to submit them for design team consideration.

Thinking about my "Words" for 2010, see post about that HERE, made me rethink what I was doing and how I was going about it.  My "Words" are BELIEVE and ACHIEVE.  After spending countless hours over about six months and not being chosen for any of the design teams I had submitted creations for, I thought I should reconsider what I was doing.

First of all, I love creating!  I love sharing my creations with friends, family and blog readers.  Also, not all of my creations are scrapbook pages.  I love creating beautiful things for my home and as gifts for others.  I love how the papers & embellishments originally created for scrapbooks can be used to create things that I enjoy seeing hanging on my walls and adorning my surfaces everyday in my home.

One day it occurred to me that no one was paying me to write my blog or create projects for it.  I knew that there were a few who would miss my posts, but I had to start thinking again about my goals for this year.  One of them was to make some money to contribute to my family's expenses each month. The more I thought about it, the more I realized that I needed to separate my creative projects from my desire to make money.  Being totally honest with myself, I had to admit that it would be very difficult (or next to impossible) to make much money as a scrapbook blogger.  I know that people do use their blogs to make money and I give lot's of kudos to them for their efforts.  But with all my other responsibilities, I didn't have the amount of time I thought I would need to devote to making my blog a money maker.

So while I took a "Summer Break" from my blog and enjoyed the long days at home with Delaney and Jake and also some summer travel, I thought about how I could help my family and get my "creative mojo" back.  I think that turning 40 this summer was also a part of my re-examination of my choices. 

Speaking of turning 40, I decided to throw myself a Willow House home decor birthday party.  I invited friends and had them skip the gifts and get something for themselves.  My gift was all the great free items I received as the hostess.  My consultant, Darby, is also a friend of mine from the scrapbook store and a mom at Delaney's school.  She's great at her business, starting out 7 years ago with Willow House's predecessor, Southern Living at HOME, Darby retired from teaching a couple years ago to concentrate on Willow House full time.  She's now a Director, inspiring a team of more than 40 women, and making a great living, even earning a couple free vacations each year.  So I listened when she suggested, nonchalantly, that I would make the perfect Willow House Design Consultant.


My love of home decor, design, color and creating, along with my retail background (I have sold so many pairs of jeans at The Gap, that it would make your head spin...along with 1,000's & 1,000's of pieces of scrapbook paper.) all combined with my desire to help out with the finances at home, all contributed to my decision to join Willow House as a Design Consultant.

Into my second month with Willow House, I'm very happy with my decision.  This job allows me to be home with my two year old, volunteer at school, be a good wife-mom-friend, make some money and even have some time left for my creative endeavors.  I'm still house sitting for the neighbors and working part time at the scrapbook store, so I'm a pretty busy lady.  But I'm now able to separate my desire to help out with the home finances and from my blogging and my creativity.

So, yes, I'M BACK!  I'm excited to create again and share some fun home decorating items with you!  So join me here at JulieChats, as I embark on a new journey in my life!  Of course, I welcome you to join me on Facebook, where I keep a Willow House Julie business page.  And also on my Willow House website.  I promise not to be one of those pushy sales people, but to share things that I think will help bring beauty, creativity, simplicity and organization to your life!  When you see something you like, you're able to order it on my website where the entire Willow House catalog is available for purchase, along with our bargain-priced outlet for those among you looking for a deal...I love a deal, so I'll be sure to share as many of those with you as I can!

I'll try to post some new ideas each week, check back here for posts to inspire your creativity and home decorating in the coming holiday season.  But I'm not going to push myself over the edge trying to be sure I post something each and every week, so if you'd like to receive an email reminder when I post something new, be sure to click subscribe to JulieChats over in the right side column of this page.

I look forward to sharing my creativity and passion for decorating with you!  Thanks for sticking with me through this long break!  I look forward to communicating with you through comments here and messages on my Willow House Julie page.  Let me know what you're interested in seeing here or things that you need help with around your home, I'd be happy to help!!!! :)

Thursday, April 8, 2010

Layout of the Week - Spring Mini Album Project & a Punky Sprouts Sneak Peek

I've been a little busy lately to finish any actual layouts to feature as my "Layout of the Week," so I'm sharing what I have been working on.  This Saturday I'm teaching a class at the scrapbook store where I work, Whimzee's Scrapbook Studio in Beaverton, Oregon....in case you're in the area & want to sign up!  I taught this class at Christmas and a few people asked me to do it again.  I thought a Spring theme would be fun for the little mini album.  You could use it for a great Mother's Day gift or maybe for a special friend's birthday.

This project takes 3 pieces of cardstock, up to 14 different patterned papers, a couple feet of ribbon, lot's of adhesive and TONS of patience.  In just a couple hours you too can have a fun little album with lot's of little doors to hide all your photos & journaling.

I hope you're in the area so you can sign up for my class!  It really is much easier to make the album with a little help from someone who's done it before.  The instructions are kind of confusing, but if you're handy, you can probably make one up from my photos.  Give it a try when you have a couple hours & want to try something new.

I've got to get back to my projects for this week, two Punky Sprouts albums.  I've been very excited about Punky Sprouts for a few weeks now.  I had the chance to crop with one of the owners, Doralisa, and we had so much fun that I left pumped to give one of her albums a try.  It's so fun to be able to share a local Portland area scrapbook manufacturer with all of you.  Keep reading for links to the Punky Sprouts site & Facebook page, so you can ask your local scrapbook store to carry these awesome albums!

Here are a couple sneak peeks at my first project, using Chatterbox papers & embellishments, along with some great Kaisercraft paint colors!

Here's a quick look at the pages included in the Punky Posh album....

I'll share my take on this great album concept next week!

Head on over to the Punky Sprouts site to check out all their great albums!  I'm working on Punky Posh and Prim & Punky right now.  Punky Sprouts is on Facebook too & looking for a few more fans, tell them Julie sent you!

Just a little reminder to join me over at my fellow Portlander, Ann's, Virtual Girls' Night Out.  Join the party, every Friday night!  Ann's got a great music video, a yummy drink recipe and lot's of fun bloggers to hang with!  Get & Give tons of comments and find more followers for your blog!  Of course, you can visit Ann anytime...it doesn't have to be a Friday for you to get a laugh out of her adventures!

I also hang out every Tuesday at Today's Creative's Get Your Craft On party.  Head on over to another of my Pacific Northwest peeps' blog to find a huge list of links to other creative blogs.  Kim features a new creative blogger almost everyday and the huge Get Your Craft On blog hopping party every Tuesday.


Hey all you Mom Bloggers!!!!  Don't forget to head on over & check out all the fun, prizes & friends at 5 Minutes for Mom's Ultimate Blog Party 2010!

Ultimate Blog Party 2010

Join me & enter to win! I'm hoping to win #6 The Double Stacked a lot of Love Necklace, #11 $100 Gift Certificate to Restaurant.com and #17 The Books Found Art and Real Women Scrap!!!! Wish me luck!!!!!!!!!!!

LinkWithin

Related Posts Plugin for WordPress, Blogger...