Showing posts with label girl. Show all posts

Tuesday, January 28, 2014

DIY Lego Valentine Hearts to Exchange


Jake will be six this week and he's obsessed with Lego's.  While helping him put sort his pieces the other day, I had a thought that it would be cool to go non-traditional for class Valentines this year.    It's funny how I sometimes get these bright ideas without actually realizing a million people have probably had this idea before.  Wouldn't it be cool to make little hearts out of Legos for the kids in Jake's kindergarten class?!?!  Of course, I tried to make one from scratch and shockingly, I am not the best Lego creator ever!  So, I went to my trusty Google, where I realized quite a few people have gone before me in this quest.  I found a few ideas and after trying them decided on this pattern from instructables.com.


Jake wanted to help, so we sorted through his red Legos and didn't have enough to make the entire heart red, so a few of our pieces were white.  We liked the shape and the combination of colors, so we decided to make them for Jake's class and a couple other friends.


Then my daughter Delaney & I made a quick trip to the mall.  Having a Lego store with a "fill your bucket" area was super cool for this project.  You pick a large or small container (They probably measure about a 16 oz for a large cup and 8 oz for a small cup, but don't quote me on that! Price is about $7.50 for the small and $14 for the large.).  Then fill your cup with bricks of all sizes & colors from bins that cover the back wall of the store.  The employees are super helpful and shake your container or rearrange the bricks for you, so you can fit a couple more.  The trick is to put in a few large bricks and fill the wholes with little ones.  We counted the pieces in our sample and then chose red & white bricks to create that shape.  We did end up with different bricks because of what was available in our store, but the final product will be the exact same shape.  We are making 22 Lego hearts, after a 50 cent deposit credit for reusing one of our own containers and putting a $5 credit from my Lego VIP card toward the purchase, our total ended up being around 70 cents each.  If you don't have a Lego store near you, I did check the Lego website and found that you can order individual bricks HERE.  I am not sure exactly which bricks are available or how much the little hearts would cost doing it this way, but it looks like a good option.  There are 157 pages of individual bricks to explore and you can narrow that number by entering information such as category and color.


After making some of the hearts, I looked around the internet and ended up combining a few of the ideas I found and adding a little touch of my own.  I searched for free Lego clip art and came up with some fun little minifigure faces and a stack of bricks.  Being a self confessed hoarder of fonts, I searched for a Lego font and came up with Legothick from Urbanfonts.


I used my trusty Photoshop Elements to come up with my design for the tags and some cellophane bags I use for my custom Project Life cards.  And we're all ready for Valentine's Day!


I had planned on using the same little minifigure head on all four of my tags but then I came across the cute little girl with the eyelashes & red lips and couldn't pass it up.  So the little girls will get a girl and the boys will get the little smiling face.  Jake loved the one with the sunglasses, so I put that one next to his name on all the tags.  Download the FREE printable tags for your Lego Valentines HERE!


Don't worry, if you're in a hurry or can't find the bricks to create the hearts for your Valentines.  This idea works just as well with a little bag filled with miscellaneous bricks.  Buy a bin at Target or just grab some from your kids' stash...chances are they won't miss a few (maybe...)!

Happy Valentine's Day!


Check out this post and tons of other great Valentine ideas over on InspirationDIY.com:

Inspiration DIY

And, of course, don't forget to stop by my friend Kim's link party for
all sorts of inspiration...Valentine & otherwise!

Find it over at Today's Creative Blog

Tuesday, April 16, 2013

Layout of the Week - Me & My Peeps

I know that no matter how hard we try to "keep up" with our scrapbooking, there are so many things in life that "get in the way".  Actually, it's all the amazing things we strive to record that "get in the way".  I willingly admit that I am YEARS behind in scrapbooking, if keeping up is measured chronologically....  I'm not sure when this "being behind" started.  Over the years, I have gotten less and less concerned with "keeping up".  The very first time I remember realizing that being "current" with my scrapbooking is not important was reading about the scrapbooking philosophy of Cathy Zielske.  Cathy was a big part of Simple Scrapbooking magazine and has a great philosophy of keeping things simple and following your own path as far as scrapbooking is concerned.  Read some of Cathy's idea's in a blog post about "Taking the 'Crap' Out of Scrapbooking".  After you read it,  you'll see some of the reasons why I'm not concerned with "keeping up" any more.

I love creating and scrapbooking is a way for me to create and working in a scrapbook store, doing this blog, teaching classes and giving advice are all parts of the creative process for me.  So, if you have always stressed about "keeping up" with your scrapbooking, take this opportunity to think about what it might be like to let go and concentrate more on being creative and telling the important stories.

But, as a nod to my family who loves to browse through their photos, I've found a way to combine my simple, non-chronological style with a new-to-me way to create a very simple, chronological albums.  I plan to continue using Cathy's philosophy of telling my family's stories when I create layouts.  I love the idea of choosing which stories I create whole page layouts for.  As far as regular, everyday life and creating albums that my family can sit and flip through, I plan to create a 2013 album using the Project Life system by Becky Higgins when it arrives in our store.  I love the idea of sticking my photos into divided page protectors, journaling on a card and having that be it...unless I decide to get creative with it, which I'm sure I'll do from time to time.  I love how I can stick a layout or two in between the divided page protectors whenever I feel like it.  Using the idea of combining both types of scrapbooking, I can cater to my philosophy of creating whole page layouts whenever I choose and also, please my husband and kids by providing actual books of their photos for them to look through and share.  (Yes, my husband has been known to comment "If you spend so much time scrapbooking, where are the scrapbooks?  I'd like to SEE our photos!")

I'm really excited about creating an album that combines the philosophies of both Cathy & Becky!  I think this will be perfect for me and my family.  They will have something to look at filled with their memories and I  will be able to create a fun, story telling layout whenever I find the perfect paper or embellishment...or inspiration strikes!

As far as those of you who really are keeping up :), I thought I'd share a layout I created a couple of weeks ago.  It's an Easter layout, so it's perfect, since you'll be working with this most recent holiday now.... ;)  And for those of us who are not so caught up, feel free to be inspired to create a layout for any Easter you have photos for!  That's what I did.  I used photos from a couple of Easters ago, since that's when Delaney created her "Peep Army."  Seeing this cut on the Silhouette Online store inspired me on this one.  I remembered taking photos of Delaney dipping tons of Peeps in chocolate and lining them up on a plate.  We all know there are times when a product or memory inspires us to create a page.  So, when I have time to go back & create a Project Life album for 2011, I can slip this layout in the Easter section.  Until then, I'll happily slide it into my family's album of miscellaneous memories...after it comes down off the wall at the store, anyway!

Here's some Easter inspiration for you...


For this layout, I used a bright, "Spring-y" paper with a pattern for my background.  The glazed & glittered paper from Best Creations gave a pop to my simple layout and perfectly matched my Peeps die cut.  When I saw the "Me & My Peeps" cut in the Sihouette store, I knew just which photos I had to go with it.  I cut the title out of some deep dark chocolate paper from American Crafts and found some super bright, non-textured cardstock in my stash to match the colors of actual Peeps.  I added an outline to the cut in order to have a place to mount the peeps and cut it from non-textured white cardstock.  After cutting the cute little Peeps, I inked the entire surface of each one with Versamark watermark ink and embossed with an old jar of embossing powder that says "turquoise sparkle" on the label.  I'm not going to lie, embossing the entire surface of the little guys was a challenge...I ended up with a couple burned fingers...but the overall look was worth my pain...cute little sparkly, sugared Peeps!

With such a large embellishment and four large photos, I decided on a step by step sort of layout, I put the photos on my layout in a clockwise fashion after mounting them on white non-textured cardstock, to help them stand out.  At this point, I thought my layout needed a little extra something...so I used one of my favorite stamps right now, the arrow from Technique Tuesday's "Awesome" stamp set to help guide the eye through my sequence of photos.


I ended up with a little extra space on the right side and decided to add a turquoise vellum tag stamped with the date of my photos as a finishing touch.


So, whether this layout inspires you to create pages for Easter 2013 or another holiday entirely, remember that however you choose to scrapbook your memories is the "right" way!  Really, the choices are endless...chronological albums, albums for each member of your family, digital albums, photobooks, Project Life, mini albums for special events...they are all ways of recording our memories to share with others!!!

Check out my fun idea and TONS of other amazing ideas over at the link party on Today's Creative Blog!  Tuesday is 'Get Your Craft On' day!  You'll find SO many cool ideas there every week, you'll wonder why you hadn't found it before!  Oh, be sure to tell Kim (Creator & Diva of TCB) HI and that Julie from JulieChats sent you!

Today's Creative Blog

Monday, June 6, 2011

Party Favors the Kids Can Make...


If you're like me, you're getting tired of spending all the time and money to throw your kids wonderful birthday parties only to be left wondering what kind of fabulous gift you should spend even more money on to send home with each little party go'er...

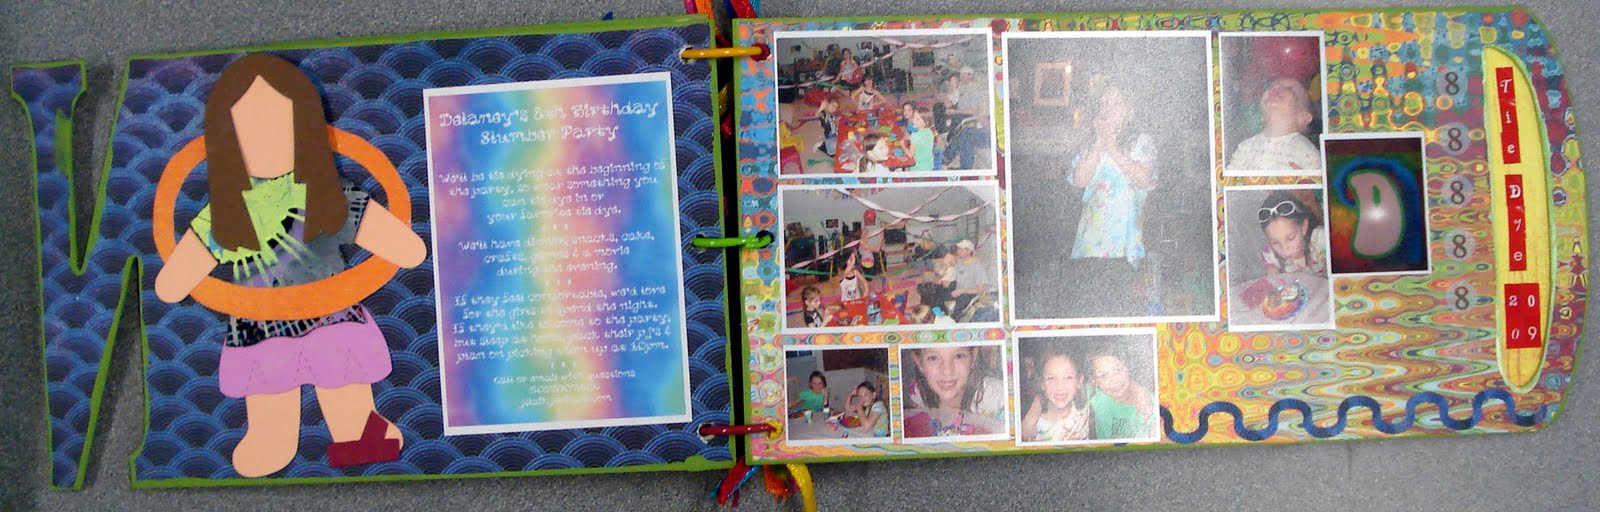
Well, personally, I'm trying to move away from the party favor/gift bag craziness.  Last year for Delaney's party, we had a great American Girl Craft Party where the girls made their own favors as part of the party.  And the year before that, we had a Tie Dye theme for Delaney's party where the girls tie dyed a shirt and wore it home as their favor.  (Click HERE to see the mini album I made featuring all the fun of the Tie Dye party.)

This year, Delaney wanted to take three friends to dinner at Benihana and then back home for a sleepover.  Since dinner was going to be pretty expensive, I wanted to do some cheap little favors for the girls.  While I was thinking about my plan for the party, we got in some fun little tubes at the scrapbook store where I work.


The tubes are about $1 each at the store and are about 1 1/2" in diameter and 8" tall.


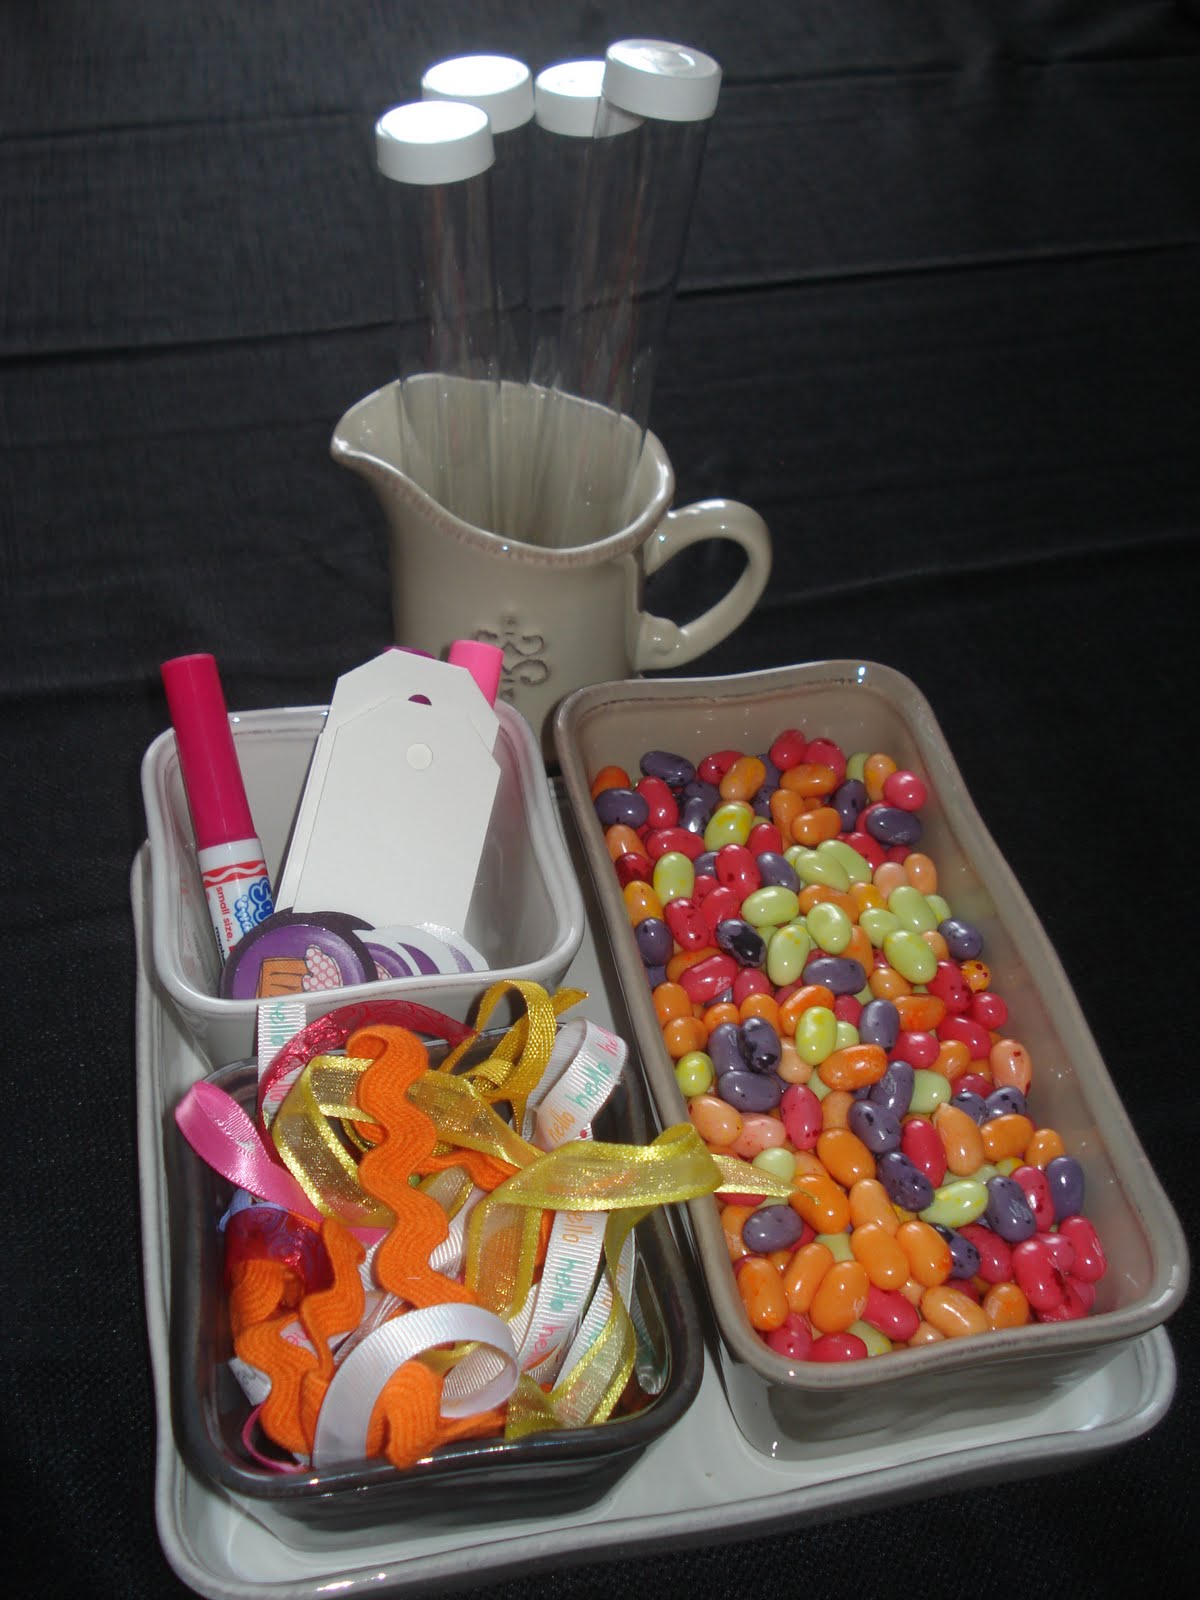
We gathered our supplies. (Of course I used my new favorite Willow House piece, the Riverstone Tapas Set...so useful, but I digress!)  Delaney wanted some fun bright colors for the tubes, so she chose Jelly Belly Jelly Beans in the colors she wanted (frankly the most expensive part of this project, you could choose any little candies that fit in the tubes).  Then we used some extra ribbons we had at home and a few little spools of $1 American Craft ribbon from the store.  I punched the tags with my large tag punch and printed out some cute cupcakes from a the Crystal's {Playground} elements pack, a digi scrapping pack I got over at JessicaSprague.com (I made the invitations from this same kit, I'll share them soon.)


Once Delaney had all her supplies, I left her alone to make up the favors while I finished cleaning the house.  I did have her let me know when she finished a step, so I could hurry in & shoot a photo or two.  Delaney's 10, but I definitely think that 7 or 8 year olds could do this project by themselves or as a fun activity during the party.

In preparation, we cut the ribbons in about 4" pieces and wrote the girls' names on the tags.

Then the fun began....

First Delaney filled the tubes with jelly beans.


Then she added the cap.


Next, she tied a few ribbons around the tube, adding a tag to the top ribbon before tying it.


Such a fun, simple & inexpensive party favor!  Give it a try for your next party...birthday, graduation, 4th of July, Halloween...the variations are only limited by your imagination!


My Birthday Girl had a great time with her friends & everyone left with a sweet little memory of the party!

Remember to join me over at Today's Creative for the "Get Your Craft On" link party every Tuesday!  If I'm not posting, I'm over there hanging out seeing what the creative ladies are sharing every week!


Todays Creative Blog

Friday, May 14, 2010

Layout of the Week - Our Peaceful Free Spirit

Sorry I've been away from blogging for so long!  I've been in a bit of a funk for the last few weeks.  Just a combination of coming back to the rainy weather from tropical Mexico, not getting enough sleep, lot's to do at work & school, mortgage issues (don't get me started on this one...) and wondering where my time would be best spent.  You know, those problems all of us have.  But this week I decided I was going to get out of my funk, start working out again and try to get back to my regular routine...at least until school is out for the summer and it all blows up in my face again!  The appearance of the sun here in Northwest Oregon definitely helped urge me along in my effort to get back to normal.  A little sun can do wonders for your mood!

So I'm back at the blogging gig!  And I have a layout to share with you that matches my newly sunny mood this week!  I create this one during my stint working at our National Scrapbook Weekend Crop.  I had been looking for the perfect papers & embellishments for these photos of Delaney we had taken at Sears.  She's wearing her favorite birthday outfit from her favorite store Justice.  She's really into t-shirts & skirts, bright colors, peace signs & a little bling.  We love how these photos turned out...just like a magazine ad!


Tips

Save money and create a beautiful double page layout by cutting a large die cut in half and placing one half on the inside of each page.  The great die cut effect is now part of both of your pages.

Add a fun embellishment by using die cut felt self-adhesive ribbon trimmed into pieces & added to your projects.

Try tearing & sanding your Core'dinations cardstock!  The inner layer of these great textured cardstocks comes in lot's of great colors that can be revealed by tearing, sanding & embossing.

Supplies

Little Yellow Bicycle Free Spirit collection papers & stickers
Core'dinations cardstock
Kaisercraft Fozz Felt Ribbon
Prima paper flowers
Boxer buttons

I shared this Layout of the Week...

with Today's Creative's Get Your Craft on Tuesday


and with the ladies at Ann's Friday Night Virtual Girls' Night Out

Photobucket

Friday, April 2, 2010

Layout of the Week - FRIEND chipboard mini album


I'm excited to share this week's Layout of the Week with you!  But first, I want to apologize for missing all sorts of blogging opportunities last week.  It was Spring Break here and we took Jake in to have hernia surgery on Tuesday.  We were expecting to be home that day, but our wise surgeon advised us to stay overnight in the hospital just in case the little guy needed some extra pain meds.  And thank goodness we did, those extra pain meds let him sleep through just a few of the MANY interruptions...I know that the wonderful nurses & residents have to check in on patients all night long, but boy, it sure would be nice if patients could get more sleep in the hospital.  So my schedule was thrown for a loop last week.  But I'm bouncing back this week, just like Jake...baby steps for both of us!  If you're in the Portland area & in need of an excellent Pediatric Surgeon, I highly recommend Dr. David Bliss.  He's done surgery twice now on Jake and he's a great listener, explains everything so even people who aren't medical geniuses (like he is!) can understand and he's saved the lives of countless preemies, infants, toddlers & kids!

So back to my project!  I created this mini album to celebrate Delaney's 8th birthday.  I did actually get it done a couple months ago, so she did get to see it before her 9th birthday!  I used Bo Bunny's My Word Chipboard FRIEND album and Basic Grey's Lime Rickey collection pack, plus a ton of fun embellishments to create a fun, bright colored album, perfect for Delaney's Tie Dye Slumber Party Photos. (Read all about our Tie Dye Slumber Party activities HERE.)

I used one of my favorite tips to squeeze a ton of photos into this small book.  I created photo collages with Costco's photo organizer program so I could cut them apart and put all different sizes of the tiny photos on my pages.  I love being able to create these collages and use so many photos in such a small format album.

Here are all the fun inside pages!


Of course, since it's Friday, you can join me over at Ann's for her Virtual Girls' Night Out!  I'll be celebrating mine by working the crop tonight at Whimzee's Scrapbook Studio in Beaverton...if you're in the area, call to sign up (we have a couple spots left) or stop by & shop, I'd love to meet you!  Be sure to check out our online community if you're in need of some extra inspiration, we have 300 project photos for you to enjoy!

Tips

Use Costco's photo collages to squeeze a few more photos into your projects!

Don't be afraid to mix it up with bright colors & patterns, it creates a whimsical page!

Use paint to coat the edges of your chipboard albums, it covers up any number of flaws in your (or my) paper cutting skills!

Supplies

Basic Grey Lime Rickey collection pack paper & stickers

Bo Bunny My Word Chipboard Album - FRIEND

So many embellishments...it would take a year to list them all, if you have a few you're wondering about, leave me a comment & I'll get you the manufacturer info.

Sunday, March 21, 2010

Happy 9th Birthday Sweet Delaney!


Happy Birthday Delaney!

My sweet, loving daughter turns 9 today!

I want to wish a very Happy Birthday to this wonderful, creative, athletic, intelligent, compassionate, thoughtful girl.  She makes a great daughter, big sister, friend, granddaughter...and so much more!

Your dad & I are so proud of everything you do!
And Jake, well, he says, "PLAY DEE DEE!!  PLAY DEE DEE!!"
:)

Have an awesome day and never forget how special you are!

PS-Kudos to Brooke at the Washington Square Sears Portrait Studio!  She took these wonderful photos of Delaney and so many more...of Jake also, even though it seemed we were pulling out all his teeth without anesthesia.  She somehow manage to make the phots look like they were both having a great time, not just Delaney!  So if you're in need of a photographer, give Brooke a call!

I'll share more photos & tell you more about Jake's fun Saturday in another post.
Wish us luck on Tuesday, Jake's having his second surgery for an inguinal hernia...first was at 5 weeks.

Friday, March 19, 2010

Layout of the Week - Family with Graphic 45 Papers & A Special Annoucement!


This week, as the sun shines outside here in Oregon, I want to share my family with you.  Dave, my wonderful husband,  is a sports fanatic who loves to play with his kids.  He managed to combine those this week...he got Delaney to fill out an NCAA bracket and then had Jake do one too.  Dave used blocks with the first letter of each team and had Jake pick his favorite of the two.  Yes, it took quite a while and Jake's bracket is full of M-named teams (his current favorite letter).  Poor Jake didn't fare well with Montana last night, but he still has a chance to beat his Daddy.  I keep telling Dave that knowing about sports really has nothing to do with winning with these tourney brackets.  On to Delaney, my beautiful, talented, creative daughter, will be 9 on Sunday.  Delaney is so well-rounded, she loves participating in all sorts of sports (those talents come from Dad), creating original, eye-catching art pieces and she's a "bit" of a perfectionist (that, I'm sorry, comes from me!).  She is thoughtful and loving, especially to her little brother.  So that makes Jake last.  Mr. Jake is now two and FULL of ENERGY!  He loves the movie "Cars," any every character in it.  We're missing Sally right now and he asks for "Yaddy" every chance he gets...I'm sure she's around somewhere, probably in one of Delaney's shoes.  We all love to hang out together and are very excited that the weather's warming up here!

So that's a bit of our story!  On to my layout...this design idea came to me a bit backwards.  Usually I have a photo and then come up with a layout.  OK, sometimes I have a paper collection that I love and take photos to go with it.  This time, I was inspired by a pile of mismatched Graphic 45 papers laying all over my counter while I was creating projects for the Graphic 45 design team call.  Seeing these papers, most are the backsides, reminded me of a patchwork quilt.  I thought & thought about how to combine them and came up with using a brown background and my favorite sepia tone photos.  I didn't shoot a new photo for this page, I remembered that my mother-in-law shot some photos of us when she was visiting in early December.  This one was almost our Christmas card photo, but it didn't quite make the cut.  We were very excited at the time, being huge Duck fans and having just attended one of our most exciting games ever...the Civil War win over the dreaded Beavers!  So we decided to have a Duck theme Christmas card.  Even though we didn't use this photo, we found some even more fun Duck photos of all of us.  My trusty sepia tone came into play because dark green and almost neon yellow don't exactly match the Graphic 45 color scheme.

Since I had been thinking of this project as a patchwork quilt, I searched the internet for patchwork quotes.  I found a few that combined the quilt idea with the family idea.  I didn't find one that fit my thoughts exactly so I made up my own.  I didn't want a big wordy journal box or title on this one, so I used photoshop to print my quote right on top of my photo.

For the patches, I cut my papers to 2 1/2" square and then used a ruler to gently fold the edges in 1/4" on each side.  I tore upward along these folds so the white would show on the edges.  Next I inked the edges with brown ink.  I used one little Hermafix square on the back of each square and placed them on the brown background, leaving an area in the bottom right corner for the photo.

This was my very first attempt at machine stitching on a layout.  I'm pretty excited with the results.  I had been planning to give it a try.  Dave put a table in the laundry room for my sewing machine and I dug the poor thing out of one of the "holes" or storage closets in the bonus room.  It had been in there more than 5 years.  I was surprised it worked at all.  I searched the internet for ideas on machine stitching and found tons of them.  So I experimented with an extra sheet of my background paper and extra little squares.  I adjusted the tension, stitch width and lenght, writing each of the number combinations next to that particular stitch on my sample sheet.  When I found one I liked, I used it.  I chose ivory thread for this project.

After sewing around the page twice, I decided to create my own embellishment for my title.  I cut a piece of patterned paper twice as long as my photo, tore it leaving a white edge, inked it with the brown and folded it into pleats.  I used the same straight stitch I used on the whole page to stitch my pleats together.  I went over the pleats twice.  Next I stitched down my brown ball fringe ribbon.  For the title, I inked the edges of the Graphic 45 letters with black and adhered them with pop dots.  To attach my homemade embellishments, I used glue dots.

I was very happy with how this layout turned out.  I loved machine stitching and can't wait to use it again!  Next time you're together with your family, shot a photo and remember to create a layout to celebrate these special people!

*   *   *   *   *   *   *   *   *   *   *   *   *   *   *   *   *   *   *   *   *   *   *   *   *   *   *   *   *   *   *
SPECIAL ANNOUNCEMENT!

I want to share some exciting news with my readers!  I am now a featured writer on the Oregon Women's Report website.  I am writing a series of fun, anecdotal stories about scrapbooking.  I'd love it if you'd stop by over there and read my first one!  I'm planning to post each article here also.  I'll post one in both places every two weeks or so.  If you're from Oregon or just interested in all the cool women writers on the site, sign up to receive updates from OWR in your inbox.  Thanks! :)

Don't Forget!  Join me at Ann's tonight for Virtual Girl's Night Out!  Stop by to join in the fun, meet lot's of great women bloggers (and sometimes some male bloggers too!), hop around the internet leaving comments and getting some for yourself too!

Tips

Of course, use sepia tone or black & white to help your photos blend with your chosen papers.

If you're looking for a new way to include journaling in your layouts, give photoshop a try!

Look at the backsides of your papers, they might inspire a layout all by themselves.

Think about creating your own embellishments.

If you've got a sewing machine, try machine stitching!

Supplies

Graphic 45 papers...from all different collections, most are the backsides.

Graphic 45 alphabet letters

Bazzill brown ball fringe ribbon

Dark Brown Ink - Cat's Eye ink pad

Ivory thread for machine stitching

Friday, March 12, 2010

Layout of the Week - Believe Achieve (my words for 2010)

I just have to say, I love this layout.  It isn't very often as scrapbookers that we create layouts about themselves.  At the beginning of this year, I read a lot of different blog posts about finding a word for yourself for the year.  The word would be your theme word, giving you something to focus on throughout the year.  I started to think about myself and all the things I've done in my life and the things I'd like to do in the future.  Being the mom of a two year old, it has been a while since I've thought about my own goals or even thought much about myself at all.  I was just starting to get back to thinking about me when Delaney turned 6 and was at the end of her year of 1/2 day kindergarten.  It was nice to look ahead at the things I could start to do for me once she started school full time in September of 2007.  And then suddenly my world was turned upside down.  I found out I was pregnant with Jake in June of 2007, just a week before Delaney was done with kindergarten.  It was quite a shock after about 5 years trying to conceive and then coming to terms with our being a 3 person family.  I still can picture the look on Dave's face when Delaney & I told him we'd be having a baby.  I'll tell you more of this story another time, but suffice it to say, shock doesn't even come close.  So my thoughts took an about face, away from what I wanted to do with the "rest of my life" and toward raising another little one.

As I was reading these "word of the year" blog posts in January, I thought maybe I should think about me a little sooner this time and not wait until Jake was going to be in first grade...for goodness sake, I'll be 43 by then.  Here's my first Believe Achieve blog post.  And the thought of turning 40 this year also added to my eagerness to make plans that were mine alone.  For years, I've been involved in scrapbooking in some way, working on albums at home, helping my friend with projects, working at Whimzee's, writing my blog.  I also began another of my efforts at being healthier and losing weight this year.

Being someone who isn't short on words, I couldn't narrow my choices down to just one.  For my 2010 words of the year, I chose Believe and Achieve.  I chose them even before I walked into Jake's room to get him up from his nap and saw those exact words stenciled on a plaque on the wall in his room.  Dave chose it at a baby boutique when we were shopping for bedding & decorations for his room.  It hangs over his crib and someday we'll explain to him what they mean...right now, he just enjoys pointing out that there is an "A" on the sign.

These words are important for me to remember this year, because I have a few goals for myself.  I want to expand my blog and find a sponsor or two (if anyone has any suggestions, bring 'em on!) and I hope to be chosen for a Design Team of some sort in 2010.  I also want to continue with my efforts to work out, eat healthier and by doing those things, lose some weight.  One more important goal, for the whole family really, is to make smart money choices.

I think that I am moving toward all these goals, but I do have to remind myself everyday, that I have to Believe in myself and make efforts in order to Achieve them this year.  I created this layout to highlight my words and remind myself everyday of what I am working toward.  I challenge you to find a theme word or two, even three or four, who's counting.

In creating a layout that highlights my words, I wanted to use some of my favorite products.  The papers are from Lily Bee and the embellishments are from all sorts of places.  I wanted to show contrast in this layout.  Not only am I a mom and wife, I also have personal and professional goals outside of my family.  These goals will benefit my family in many ways, but they are my goals.  I chose to create contrast in my layout by placing the rhinestone "BELIEVE" on a distressed piece of corrogated cardboard.  The rhinestone title also contrasts nicely with the slick orange "ACHIEVE."  I created depth by using a cardboard circle covered with word filled paper.  I used pop dots to raise my photo above the background.  Again highlighting my words, I used Photoshop to print them on my photo.

I love this photo of me.  I asked my friend, Pandra, to shoot a photo of me to send in with a design team application.  I was planning on changing & doing my hair first, but she just got out her camera one night when we were hanging out with friends.  They started telling jokes & I couldn't keep a straight face.  It just all went downhill from the very beginning....  This first photo was the best of the bunch!  Thanks P! :)

Tips

Think of a theme word for the year & remind yourself of it everyday!

Create a layout or project highlighting your word and place it somewhere you will see it everyday!

Don't be afraid to create contrast with by using totally different embellishments in your layouts.  Rhinestone & cardboard...glitter & slick plastic.

Have a friend shoot some photos of you and create a layout that shows your personality or how you felt that day!

Supplies

Patterned Paper - Lily Bee
Rhinestone Title - Kaisercraft
ACHIEVE & 2010 - THICKERS by American Crafts
Paint - a variety of craft paints

This post shared on Today's Creative!  Be sure to check them out for links to all things creative and the best features of creative blogs on the internet!


Tuesday, October 27, 2009

Layout of the Week - I Love Your SMILE!


I was so excited to see the challenge handed out by the ladies at the Ella Publishing blog. They were looking for layout submissions with the title, "I Love Your Smile." That was the only criteria, just use that title. I think karma brought me to this gleeful photo of Delaney. For the past couple weeks, I've been designing baby layouts for my next beginning scrapbooking class, so I had a pack of photos of Jake when he was first born right there on the table. When I saw this page call, I flipped through the photos to see if any of them fit the title. And boy, this one jumped right out at me. This is THE happiest I have ever seen Delaney in a picture. It was taken, probably by Dave, just after Jake was born. We gave her this great I'm the Big Sister t-shirt and she was so excited, she put it right on. She was over flowing with joy that her little brother, whom she had waited so long for, was finally here! It brings tears to my eyes to look at it, when I think of how happy she was.

Her reaction to the photo, while I was creating this page, cracks me up! She looked at it and asked if it was taken when Jake was born. I said yes and that she was so happy. Being 8 1/2 now and having her brother be almost 2, she said, "I love him, but I don't know if I'm that happy about him now....he did cry a lot and...you know, mom, he's Jake." So that makes this picture that much more special to me, what a beautiful innocent smile, so excited that her baby brother is finally here. Unbeknownst to this sweet little girl are all the things about babies that aren't so fun, the SCREAMING (you have to know Jake to know I'm NOT kidding), the wet & poopy diapers, the hitting, throwing & destroying, etc. Of course she is still the happiest big sister in the world, when her little guy says her name, "Dee Dee, Dee Dee" or when he walks up to her, tilts his head, puckers his lips, closes his eyes, and cranes his neck toward her just hoping for a kiss.

Those are all reasons that this photo makes me a very happy mom! I hope you all create layouts showing something that makes you happy!

As far as the layout, I used the Cricut to cut the circles, placing my matted photo inside the largest circle to draw attention to it. I placed the title around the circle, also in an effort to draw attention to the photo. I chose journal strips for this page because a journal box might draw attention away from my photo. Inside the strips is my jounaling, "a girl was never so happy to have a little brother." I think that all the elements of this page help draw attention to Delaney's photo. I think it's important for her to have some pages in her album commemorating her brother's birth that show her reaction. He will have tons of blue pages showing all the exciting happenings after he was born and big sister needs a little attention too!

Tips

Try mixing chipboard styles when creating your titles. The mix will give your layouts a whimsical look.

If you aren't happy with the color of your chipboard, so ahead & paint it. Here I painted chipboard with both paint and glitter glue.

Don't be afraid to add other embellishments to your chipboard. Here I added ribbon, rhinestones & stickers to my chipboard shapes.

Supply List

Basic Grey June Bug collection papers
Admiral: used the back side
Park Bench: used the back side
Picket Fence: used the back side

Prizm light & medium pink textured cardstock

Pink Metallic Ribbon

KaiserCraft Basics: Rhinestones - light & dark pink and Rhinestone strips - pink

Creative Cafe pink chipboard shapes

Circle shapes all cut with the Cricut

"I" - Tim Holtz Grungeboard harlequin alphas

"your" - American Crafts THICKERS hat box plain chipboard

"SMILE" - Die Cuts with a View foil chipchatter uppercase - pink

Mrs. Grossman's casual alphabet stickers

American Crafts Memory Marker pen - soft black

Paint
Scrapbook Shades by Li'l Davis Designs - marshmallow

Ranger Adirondack Brights Acrylic Paint Dabber - raspberry

Wednesday, October 14, 2009

Layout of the Week - Fall Leaves


These pages commemorate one of Delaney's favorite Fall activities, jumping in the leaf piles. Every year, Dave heads out to blow & rake the leaves in our backyard. He piles them up & puts them into the yard debris bin so they can be hauled away and turned into mulch. And it never fails, Delaney runs out into the yard, yelling for him to wait to put them in the bin until she gets a chance to run & jump into the piles. Of course being a mom who is always thinking of the laundry & stains that will be created by her kids' adventures, I remind her to run upstairs & put on some old clothes so I won't have to spend hours getting the wet leaf & dirt stains out. Then I grab my camera & head outside with her. I sit behind the leaf pile shooting tons of photos, so that I'll be sure to get some great action shots.

For the layout, I had a couple things to take into consideration. First, I was given sample sheets of the Shades of Autumn collection from Reminisce to create a sample for the store and I wanted to use as many of the patterns in my layout as I could manage. Next, I wanted to include as many photos as I could and still have the layout look balanced. Since this was one of my first forays into using many mixed patterns on a layout, I chose a neutral background for them. And then chose to use strips of the patterned papers so everyone could see how they worked together. Strips of paper are one of my favorite simple layout techniques. You can adhere them in a jumble manner, like I did here or place them in horizontal or vertical stripes or perpendicular to each other in the corner of your layout. I placed mine in a jumbled way to echo the way leaves fall into piles with colors and shapes all jumbled together.

With so much going on in my layout, I chose to mat my photos in a mix of neutral fall colors pulled from the patterned Reminisce papers. I used stickers from the Shades of Autumn collection on both pages. For a some extra texture, I added ribbons from American Crafts. And for one last embellishment, I placed four square bronze brads on the floral ribbon on the right page and one under the column of stickers on the left page.

For me, this is a fun layout, with a lot going on! And that's just how I feel about Fall, so many fun things going on to enjoy & photograph! So grab that rain jacket & scarf (some of you probably need ski jackets & snow boots too...) and don't forget your camera!

Tips

When shooting photos of the kids jumping in the leaves, try sitting down & stabilizing your camera by leaning your arm on something steady, like a tree, rock or even just your leg. If your camera has a setting for action, use it, if not, just use your auto setting. Next, focus the camera on the pile of leaves & send the kids running toward you, pressing the shutter when they reach the leaves. Try this a few times and you should end up with some fun photos.

If you're new at mixing patterns on your layouts, choose a few patterns from one collection and find a neutral that is common among the patterns and use it as your background.

Using strips of the patterns on your layout allows you to showcase a few patterns without having them overwhelm the photos on your page.

For an added embellishment, place brads on your ribbons.

Supply List

Shades of Autumn paper collection from Reminisce
dark brown cardstock from Prizm
ribbons from American Crafts
bronze square brads from unknown source

Monday, October 5, 2009

Layout of the Week Basic Grey June Bug


The bright colors & bold patterns of June Bug jumped right off the shelf & into my basket. At first, I wasn't sure what type of layout I would design with them, but I knew I had to have them. When I set the papers out on the table in my studio, I moved them around thought about their patterns. After some thought I decided that these great bold patterns deserved a bold layout.

I chose Cabana, the navy paper with the white plaid design as my background. Next I wanted to use some of the large flowers from the Fresco print. I decided to use the flowers in two corners of the paper. And instead of cutting a strip or square from this paper, I chose to trim around the flowers and leaves, to help them stand out from the background.

With all of the patterns in this layout, I wanted to include a nice solid that would help divert some of the attention to the photos and away from the design of the page. The June Bug collection didn't have the paper I was looking for, so I decided on Lime Cooler from the Lemonade collection. I used Lime Cooler as journaling strips and the first mat behind my photos. Photo mats are typically created in the shape of the photo set on them. I kept with this idea for the second mats behind my photos, although I mounted these mats and twisted them a bit. Then I veered away from the idea of a traditional photo mat when I included the circles behind my first two layers of photo mats. I liked the idea of using the circle pattern of the Chicken Pox paper, cut into a circle as my non-traditional spin on a photo mat.

When I finished this layout, I was happy with how it turned out. But I really thought it was still missing something. Normally, at this point, I would wander around the store or dig through the stash in my studio to find the perfect embellishment to finish a layout. This time I felt that the strong graphic colors, pattern and design could easily stand on their own. And I really liked the idea of creating a great layout on a budget (5 sheets of paper), without the addition of pricier designer brads, rub ons or stickers. I had used the thin end of my Zig Writer to journal on the strips and realized that its thick end would create the perfect final embellishment for my page. I used the Zig Writer's thick end to draw an edge around my trimmed flowers and non traditional photo mats. After creating this edge, I was very excited with my final product.

This was a fun layout to create and lead to a long list of tips that will help others create similar layouts! I can't wait to use my idea of outlining a layout with a pen on another project soon!

Oh, and I forgot to mention the story shown in the layout. These photos are from Delaney's very first gymnastics performance. She was nervous, but very excited to perform with her team before our local professional soccer team's game this summer. I only have these two photos because I was video taping the performance with my camera. It was important for me to create a memorable layout for this memorable occasion.

Tips

If you're nervous about mixing patterns on one layout, try using patterns gathered from one collection.

Remember to include at least one solid in the mix to use as a mat for your photos. You want people to pay attention to both your design and your photos.

When adding a bold pattern to your layout, use just a portion, trimming around the items you want to include.

Use small strips of your solid as journal strips. This is especially helpful when you want to include a little journaling, but don't have a "book" to write for the page.

Add some non traditional shapes to your mats for an original look.

Save money, by using a thick black pen to outline portions of the graphic papers in your layout. You can choose which items to draw attention to, and let others fall into the background.

Supply List

Basic Grey, June Bug collection
Cabana
Chicken Pox
Fresco
Tea Party

Basic Grey, Lemonade collection
Lime Cooler

Zig Writer pen, black

Monday, September 28, 2009

Layout of the Week Relaxing in the Hammock


In our family, the hammock is one of our favorite places to relax. These photos were shot on the 4th of July a couple years ago. It was very hot, over 100 degrees. After our morning neighborhood parade, Delaney & our neighbor girl painted their nails, then relaxed in the shade waiting for them to dry. I shot some photos and was very excited about these ones.

When I combined the bold striped pattern of the hammock in the photo and the bold patterns of the fun Creative Cafe papers, I had to rethink my plans. The colors in the photos and the papers coordinated well, but the combination took the focus of this page away from my subject, Delaney. I loved the photos, so I reprinted them in Black & White. I was very happy with the result.

I chose these papers because they all have at least a little red, white or blue in their patterns. It was fun to add the multi color star ribbon from American Crafts. I like how the combination creates a subtle look for this 4th of July layout. Subtlety is not usually a trait I see in my layouts. Most of my 4th of July layouts are "in your face" red, white & blue with fireworks, stars & glitter. It's so nice to expand the horizons of my creativity. I did use my typical m.o. of combining lot's of patterns on this one though. I didn't want to change all of my habits on one layout, it was nice to just change it up a bit.

Go ahead, try something outside your comfort zone on your next project!

Tips

Try printing your photos in Black & White when your papers have bold patterns or a combination of patterns.

Try a subtle approach on your next holiday layout. Use colors to convey your holiday message without using holiday themed papers.

Supply List

Creative Cafe Papers, Buttons, Chipboard Shapes, Rub-Ons, Felt Words & Tag

American Crafts Ribbon

Monday, September 21, 2009

Layout of the Week Apple of My Eye


If you've never been apple picking in September in Oregon, you've really got to try it. Delaney was three on this particular apple picking trip. One of the ladies in our mom's group set this trip up as a photo opportunity. She recommended we dress the kids in denim & white shirts, which is always a great combo when you're having photos taken. I probably shot a few hundred photos on this outing. At the time, my digital camera had to be changed from color to black & white and then back again. I did shoot a few color photos that day, but my most favorites, as usual are the black & white ones. There is just something I love about removing the distraction color creates and just concentrating on the subject. Of course I thought I had the best subject in the whole wide world, my daughter!

The large photo on the left page is the best photo I've ever taken of Delaney. It may be the best photo I've ever taken, period. There is just something about her holding out the apple toward the camera to show me the bite she took out of it, the look on her face and the dappled sunlight. When I first had these photos printed, I sent them to all the family members & gave them to a few friends. I even had the friend of a friend ask me if she could have one just because it was such a great photo. Now I didn't do anything special to achieve this photo, there was no coaching or retrying over & over again with the pose. It isn't posed at all, I just happened to click the shutter at the perfect moment. I guess I could say it was meant to be, but I'm pretty sure that good photos come from taking TONS of photos. It probably just boils down to math. The probability that you will take a good photo rises along with the number of photos you take. So keep clicking that shutter & you're bound to end up with a great photo for your next layout!

I shot so many photos that day, I couldn't just use one on my layout. My other favorites are shown on the right page. I love the sequence of three verticals. I just told her to show me her favorite apple & she came up with the poses all on her own. Now, the one in front of the barn was set up by mommy. I do like to plan things from time to time (ha ha!), and having the big barn in the background while the little girl with her bucket of apples stands in the foreground tells the story of the day and helps create the feeling of being there on the farm with her.

I love the red apple paper combined with these black & white photos. You don't have to see a red apple in the photos to know that those apples are red. The red apple diecuts seemed to be perfect backgrounds for my white Sizzix letters. And I was very happy with my decision to use my Creative Memories square punch to punch the scrap paper and leftover photos from this layout to create an eye catching grouping.

This is one of my favorite layouts that I've created in the last few years.

On your next project, use squares of left over paper & photos to create an almost free eye catching element on your layout.

Wednesday, September 16, 2009

GNO - with Delaney at the Miley Concert

This is so cute, I just had to share! Miley Cyrus opened her concert tour in Portland on Monday night and Delaney & I were there. I must say it was a great show, lot's of cool stuff, including a red Harley descending from the ceiling & Miley riding on it over the crowd singing "I Love Rock N Roll"...took me right back to the 80's. It was a fun Girls' Night Out with our friends! If your daughter's a fan & you get a chance, you should definitely go! (One little disclaimer though, Delaney's 8 1/2 & loves Miley latest CD, which has some really rockin' music, I'm not sure if the younger only Hannah Montana music fans would have quiet as much fun, but I did see tons of littler ones there.)

If you go, get there early so you don't miss a chance to have your girl's photo taken with Miley. It's sponsored by Walmart, as is the whole tour. The girls get to put on some jewelry & grab a mike then they stand in front of a green screen for their photo. Then the ladies at the computer put your girl in her choice of venues with Miley, either her dressing room, her tour bus or her on stage. (Usually the girls can only pick one, the line was 30 minutes long, but since there was a mix up & they put Delaney in the wrong venue, they took an extra photo of her.) You get a little lanyard with an email code & some photos of Miley on it, so you can look up your photo & share it at home. This is all FREE, which is awesome, considering the t-shirts are $35!!!! Of course I still bought one for my little Miley fan, but really, they could still make a ton charging 1/2 that!

So here's my little angel in her rock star moments!

Powered by PromoPix.net


Powered by PromoPix.net

Wednesday, September 2, 2009

Layout of the Week - Kraft Kuts Girl Layout


I take photos of everything! Since joining yearbook in junior high, all my friends & family could count on me to always have a camera (sometimes 2 or 3) ready at a moment's notice.

I think it's important to have photos that capture what our every day lives are like. so this day, I shot tons of photos of my kids on their swings. I ended up with one great shot of each kid. that's why I love digital cameras - take tons of shots and only keep the best ones!

I chose the papers for this layout without knowing which photo I'd use. I just knew I loved the Kraft Kuts Floral bracket paper. Then I chose some solid cardstock to match and used silver nail heads as accents.

Because the paper has such a beautiful bold pattern, I chose just one photo for this page. I wanted to end up with as many of the flowers showing as possible. that's how I chose where to place my photo.

For journaling, I thought I'd try the strip technique. I had seen it a few times in other people's layouts and liked how the little blurbs of type looked on the strips. I needed a change from being the one doing all the writing on my pages, so I "interviewed" Delaney about her swing for this page. It was fun to hear her opinions & comments.

And in the spirit of trying something new, I had my photo printed with a pink tint for this page. If you've read many of my posts, you know I have my photos printed using Costco's website. On their site, you have the option of having your photo printed in all sorts of tints. I'm a big fan of sepia and black & white photos, so I usually stick with those, but I decided to branch out for this page. Since I don't trust the computer screen when it shoes me what a color will look like, I had my photo printed in color, black & white, sepia & the pink tint. Yes, I do tend to go a little overboard (I have been called a perfectionist....). I wanted to be sure the pink tint wouldn't clash with my papers. I was pleasantly surprised & love how the pink tint adds that little something special to this layout.

Tips

When you really love the pattern of your background paper, use just one photo on the page. This lets the pattern share center stage with your photo.

Use strips of paper for your journaling. They let you write down quick thoughts instead of feeling like you have to write paragraphs for your page.

Interview your kids for your journaling. It's fun to look back & see what they were thinking or what liked when the photos were taken.

Go "outside the box" when printing your photos! Try something new, go with sepia or black & white if you always have your photos printed in color. Or go wild, like I did, and try having your photos printed with a tint.

Supply List

Fancy Pants Kraft Kuts Collection Floral Bracket die cut paper
Cardstock in Gold
Cardstock in Pink & Green
Silver Nailheads from Mark Richards
Tinted Photo printed in pink at Costco.com

Tuesday, August 18, 2009

Layout of the Week - My Birthday


Delaney loves to cook! For birthday last year, she decided she & Dad would bake me a birthday cake. The cake was a first for both of them. I stayed completely out of their way. they baked, frosted & decorated my chocolate cake with chocolate frosting all by themselves. They even took photos of each other as they went.

They were both pretty proud of their creation and I of them. We all had a HUGE laugh when we realized the frosting on top was thinner than the flour on the bottom of the pan!! Just so you know, we've had a "grease & flour the pan" lesson since, stressing the need to dump the excess flour out!

All in all, it was a great cake & a great birthday for me!

In designing this page, I wanted to include all the photos Delaney & Dave had taken of each other during the cake making process. Lately I've been working with the "less is more" philosophy with my layouts, trying to lower the number of photos I use on each page, thereby letting the very special ones stand out. But this time, I just couldn't leave any out. So, I decided to print all the photos of my bakers as wallets. I'm sure I've mentioned it before, but I really do love the fact that I can easily choose to print any of my photos as wallets, 4 for only 13 cents, on Costco's website.

With photos in hand, I made a trip to Whimzee's. (Whimzee's Scrapbook Studio, down the street in Beaverton, where I work part time...check out the blog I write for the store, Whimzee's Girls Online...but I digress....) Right there in the front of the store was a new collection that had just arrived, it was perfect. It seemed that Early Bird from Cosmo Cricket had jumped right off the shelf & into my basket. This collection is kitschy & retro, bright & full of pattern, all things I love in scrapbook paper. The cute tags & sayings would be just right with my birthday cake photos. I found two pieces of Bazzill's swiss dot paper to match, dark red & butter (these probably aren't their real names). Loving ribbon the way I do, I loved the way the dark red twill from Creative Cafe reminded me of apron strings. And since I've been caught up in an inking frenzy lately, I grabbed a dark red ink from Studio G's $1 line. Never being happy with just a couple embellishments, I added some mini buttons from our bulk embellishments on another visit to the store.

While I was working on this layout, all the ladies at the store reminded me that I should be very thankful for my wonderful family. They couldn't believe that my husband, first of all, baked a cake with his daughter and second of all, remembered to take photos for me as he did it! Thanks honey! And thanks Delaney for coming up with this great present for mom! :) I love you both!

Tips

I haven't used my corner rounder in a long time, but I had a feeling that rounded corners on my papers would go nicely on this layout. I used my old Creative Memories rounder for the tags, but I wanted a larger curve on my larger paper pieces. Not having extra money in my budget right now to go out & buy a cool new tool, I looked around my work area and found something that would work just as well. For the rounded corners on my larger paper pieces, I flipped them over and traced the curve from the lid of an acrylic paint bottle onto the paper and cut along the line with my scissors! Another MacGyver moment for Julie! I do kind of come by it naturally...you should see what my dad can do with a pocket knife & duct tape!

One more tip...if you're looking for a way to create a cohesive look on your pages, try inking the edges of your page elements. Here, I used a dark red ink to ink the edges of almost everything on my page, including the background papers. Try it sometime, I love the way it brings everything together and gives my pages sort of a "worn" feel.

Supply List

Cosmo Cricket Early Bird Collection: Elements, Ribbon Sandwich, Sunrise & Apron Strings

Bazzill Swiss Dot dark red & butter yellow

Studio G ink dark red

Mini Buttons unknown manufacturer

LinkWithin

Related Posts Plugin for WordPress, Blogger...