Tuesday, April 28, 2009

Layout of the Week


For this week's layout, I chose a variety of items from around the store, some brand new and some older. For my background, I used Class President from American Craft's Teen collection. This paper has a big, bold, colorful diamond pattern. I know many people shy away from this type of paper in their layouts. This is exactly why I wanted to use it. I think boldly patterned papers can bring a great pizazz to your layouts. I look at the bold pattern and choose my favorite colors to highlight in my layout. In this one, I chose the pink, black & white.

After making that decision, I walked around the store looking for papers & embellishments that were pink, black or white. I didn't make it far. In the same paper collection, I chose the white background, pink dot pattern of Pop Quiz, another of the papers from American Craft's Teen collection. I was in need of some black & white accents, so I chose the floral pattern Chick Flick from LUXE's Classic Black Collection. I used both sides of this double sided paper as accents behind the matting of my photo. One side is predominantly black and the other is white.

In addition to showing you how to showcase a bold pattern in your layouts, another goal of mine with this project was to use some embellishments left over from previous projects. I know that everyone is trying to save money right now, so I decided to use some of the THICKERS Vera Accents I had leftover from last week's project. The Vera Accents are vinyl die cut shapes. They are versatile and can be used in so many projects. I used my black accents left over from last week and also opened a pack of the Vera Accents in Taffy for this project. The flowers & flourishes from the Taffy pack help bring a little "girly" to this page. Another leftover on this layout are the letters. I opened this package last Fall, for a Halloween layout. These letters are also THICKERS, they are Daiquiri black vinyl letters. I love how THICKERS give my pages an added dimension, without making them overly thick in my books.

I haven't had a chance to get a print of the photo I'm planning to use on this page, but I wanted to share this layout right now anyway. With so many bright colors, I'm going to print my photo as a 5 x 7 in black & white. The photo is one of Delaney & two of her friends cuddled together in a restaurant booth, just before we headed out to the Hannah Montana movie on opening day. The girls are so excited, I just love the photo. With the bright colors that I often use, black & white photos are my savior. No matter what color people happen to be wearing or what colors are featured in the background of my photos, black & white always brings everything together. People's faces stand out with black & white and everything in the photo seems softer. In this particular photo, the girl's clothing matches my layout perfectly, but the background of a Red Robin restaurant just clashes with all I have going on...so black & white it is!

I only have one photo of Delaney and her friends, so I wanted to really set it off by using three mats behind it. For the mats, I have chosen Passion Fruit cardstock from World Win Papers' Caribbean Colors collection. This paper has no texture, but it appears it has one, the bright pink has a spotty surface, almost as if someone has dropped water on it. Behind the Passion Fruit, I used a Black & a White from World Win's regular selection of cardstock.

For a final touch on this layout, I used Kaisercraft Black Rhinestones. These rhinestones are a bargain at $1 for a pack of 60. I used 4 of the large ones to set off my photo and two smaller ones as the centers of my flowers.

I hope you enjoy this layout and my tips. Please let me know if there are certain techniques that you'd like to learn more about. I can feature them in a future edition of Layout of the Week.

I also plan to use the leftovers from my Taffy THICKERS and Kaisercraft Rhinestones in a future layout. I think it's very important to get your money's worth out of your scrapbooking supplies by using up those leftovers.

Friday, April 24, 2009

Crazy Hair Day!

TGIF! We had a fun morning around here today! It's CRAZY HAIR DAY at Delaney's school. This year, she asked me to buy her some colored hair spray, she really wanted pink & I also got her a sparkly silver spray. We woke up early & got started on her hair creation. I thought everyone would enjoy a little fun on their Fridays, so here's how the CRAZY HAIR turned out....


I wanted to share the fun hair with Dave, who heads out to work in the wee hours of the morning...pretty sure the hair won't look quite like this when he gets a chance to see it this afternoon!

And I couldn't leave without showing the back of this gorgeous do....


One more thing....all you bloggers out there, be sure to swing on over to my local girl Ann's & participate in tonight's Virtual Girls Night Out! You'll get a chance to check out some really cool blogs & meet some new friends when they stop by to check out yours! Personally, I can't wait to see what tonight's drink is...hopefully it's full of caffeine, this getting up early to style hair has got me yawning already...10am BTW. :) See you at Ann's!

Monday, April 20, 2009

Layout of the Week


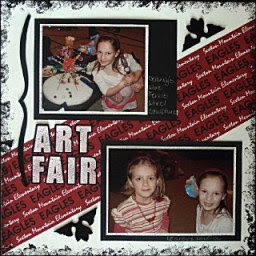
On a recent visit to the store, I noticed a much anticipated order had arrived. We finally had in stock custom paper for the local elementary & middle schools from Scrappin' Sports. We have carried custom paper for all the local high schools for a while now, and I love it too, but since I have an elementary aged child, this paper is particularly exciting to me. So I grabbed a sheet for my stash and started thinking about what to use it for. When I came across a couple photos from Delaney's school art fair in February, I knew what to use the Sexton Mountain Elementary School paper for. Since this layout is for the Delaney's art fair, I tried extra hard to use some crafty techniques in this layout.

I used a non-textured 12 x 12 sheet of white paper for the background of the page. Next I used scissors to cut a diagonal chunk (none of my paper trimmers will cut 12 x 12 on a diagonal...something to add to my wish list....)being sure to include just the words in the design that I wanted to show. I liked the white print of the school name showing on both the top & bottom of my piece. On my white mats and Quickutz (Diesel font with matching shadow) letters, I used a tooth brush and black & red acrylic paint to spatter paint the paper. After the paper dried, I mounted them on black backgrounds. I used a silver gel pen to write captions on the black photo mats. The black embellishments on the page are Vera accents by THICKERS. After putting all my elements on my page, I thought it needed something more. For the finishing touch, I took a paper towel, scrunched it up & dipped it into my black paint. I used the paper towel to "sponge" black paint around the edge of my layout.

I'm really happy with the way this one turned out. I like all the creative flairs, especially for an art fair layout showing the awesome wire Ferris wheel sculpture that my 2nd grader designed from scratch and created with just a little help from Grandpa, Dave & me. She was very excited for me to create a special layout for one of her projects.

Friday, April 17, 2009

Don't Miss Ann's VGNO

Photobucket


Meet me at Ann's for cocktails & figure out your Librarian Alter Ego, mine's Cookie Anitacocktail....couldn't be more perfect! Leave me a comment & share yours!

Have an awesome weekend, we've got sun in the forecast here in Portland and we couldn't be more excited! I could tell what weather freaks we are here...my boss told me that she was afraid to jinx the upcoming warm weather by ordering a HOT coffee today...everyone else in line was optimistic, ordering theirs ICED and she wasn't going to be the ONE who let us all down...even though it was 50 degrees & raining!

Enjoy! :)

Monday, April 13, 2009

Layout of the Week - Delaney @ 8


OK, I'm a little late getting this posted...should have done it last week. You know how life goes, lot's of stain removing, grocery shopping, blah, blah, blah. So maybe I'll be really industrious & get two in this week, not promising anything though!

With all the Jake layouts I've been doing lately, I wanted to make a special one for Delaney. All the photos were printed at Costco. We had the photos taken at Sears & I bought the CD so I could print my own photos. I used Costco's photo organizer program to create the collage. You really should check out this program, it allows you to gather your photos and then drag them into place on a collage template. They offer quite a few templates, this is my first experiment with their collages. After dragging your photo into place, you can zoom and then move it around in the space for just the right cropping. You can also flip your photo, so it's going the right direction. DO be sure to check that your photos are all facing the direction you want them to, before you print them or send them to Costco. On Jake's collage, I forgot to turn one of the photos before I sent it to Costco for printing. Then I didn't even notice it wasn't facing the right way, someone from Dave's office pointed it out to him! When I went back into the program to flip it, I wasn't able to figure out how to do it. I think I have to drag & crop all my photos into a new template & print it again. Just a tip, in case you get a little carried away or distracted, like I do, when you're creating something new!

For the layout, I printed the collage as an 8 x 10 and the left side photo as an 8 x 8. The background paper is a zebra pattern called Dress Code from American Crafts' Teen Collection. The pink is a Prism Metallic named Desire. The white is a texture that I thought resembled a zebra pattern from World Win. I love the zebra ribbon from Creative Impressions. And if you're looking for the letter stickers, they come on a 12 x 12 sheet from Reminisce. The little ribbons on the left side, are a collection of different black & white ribbons from the shelves at Whimzee's.

I love how the zebra paper looks with Delaney's black & zebra top from Gymboree. When I took a look at this finished layout, I knew I had to make one for Delaney's friend. Her room has just been painted....zebra on the bottom half and bright pink on the top. I haven't seen it yet, but I know that this paper combo will look perfect in a shadowbox in her room.

If the photo you'd like to use with this paper combo doesn't quite match...maybe the clothing isn't black & white or the background is busy, just have your photo printed in black & white. I love how you can change your photos on Costco's site, even after you upload them. You can try them in other color combos too...blue & white, pink & white, green & white and more. If you don't have a Costco near you, they can mail you your photos. 4 x 6 prints are only 13 cents and my favorite 8 x 8's are $1.49.

I'll try to get this week's layout finished & posted this week. That's the goal anyway. I hope you enjoy this layout. Let me know what types of information would be helpful to you and I'll try to incorporate them in my future Layout of the Week posts.

LinkWithin

Related Posts Plugin for WordPress, Blogger...