Monday, December 9, 2013

December Daily 2013 with the Heidi Swapp Believe Memory File Album

I'm SO excited about Christmas this year!  And a big part of that excitement is about my December Daily album.  The December Daily album process was conceived by the talented scrapbook designer, Ali Edwards.  I'm a huge fan of Ali's memory keeping and love the idea of documenting each day during December leading up to Christmas.  Last year, I gave this process a try and quickly got off track.  I am horrible at the journaling part of my scrapbooks and December Daily 2012 was no different...in fact, I'm confessing to you now that I just finished the journaling for my 2012 DD this week (yes, in December of 2013...).  OH, well, I guess it's just good that I finally finished that project.  I'll share it in the next week or so, as I am very happy with that album and its design.  In 2012, I kept my DD very very minimalistic and this year, I've gone crazy with fun holiday embellishments.

This year, I chose the beautiful Believe Memory File Album from Heidi Swapp.  This album is perfect for my love of mixing patterns and page types in my mini albums!  The album comes bound and filled with all sorts of shapes and materials for it's pages.  Pages include patterned paper and acrylic in several shapes including banners, tags, brackets, pages with die cut frames and so much more!  At first, I thought I would take the album apart and reorder the pages.  But, in an effort to stay simple, I left the album "as is" and I am SO happy I did.  The album is perfect, so why waste time rearranging that I could spend embellishing!  My only purchases for this DD were the Memory File Album and a pack of Believe ephemera.  I gathered all my green, red, black & white, "holiday-ish" embellishments...ribbon, twine, die cuts, stickers, tags, washi, my stapler and my Story Card Dies & stamps from Technique Tuesday.  I am adhering my photos in a few ways this year, washi, staples and of course, adhesive.  All my adhesives are from Plus Corp.  I love how easy their dispensers are to use and that they have economical refills.  I use permanent adhesive.  I find that you can lift and rearrange your items, even with the permanent adhesive, if you move quickly.  I have the permanent tape and dots from Plus in two widths, this makes it simple to adhere both large and small pieces, quickly.  I put everything in a couple small containers and leave them on the kitchen counter, so I can pull together a page quickly and move on to the next day.

Just a note about my photos.  I shoot all my photos for this project with either my Android phone or my iPad.  At the end of the day, when I find the photos I want to include, I edit them in the Rhonna Designs App.  (I use the app on my iPad, so I email my phone photos, so I can access them on my iPad for editing.) I love square photos, so almost all my photos are square.  I sometimes add some of Rhonna's clip art to my photos, usually 2 or 3 for each day.  For one photo, I have been adding a white square and some type to show the date in this format 12.three.2013.  I just like how that looked and I like having the writing on my photos.  I have kept the square and white type to have some consistency to each day in my album.  I also share all my photos on Instagram.  It's a super fun way to meet other scrapbookers and photo lovers.  My Instagram name is @juliechatsblog in case you want to check out my photos.  I also found a fun contest that Heidi Swapp is having during December this year.  The contest is called #heidiholidayfotofind  She is giving out a "clue" for each day's photos.  You shoot a photo with the clue/theme for the day and use that to hashtag your photo when you put it on Instagram (a hashtag is just the number sign (#) in front of the word, no spaces, so people can search to see other photos with the same hashtag).  It's fun to join in this game (Heidi is also giving away cool prizes!) and meet other's participating each day.  I am printing my photos at home, so I can stay as caught up as possible.  I lay my photos out in Microsoft Publisher.  Publisher makes it easy to put guidelines in and line up my photos, so they are the same size from day to day.  I print my photos on my HP7650, using matte 8 1/2 x 11 photo paper from Staples.  Usually two or three days worth of photos fit on one sheet.  I've been using regular scissors to cut my photos before putting them in my album.

I should get to sharing all the photos of my album so far, through Day 5.  I'll share the next five days soon!


Day 1:  I positioned one of my photos to show through the die cut tag and added the numbered star for my date and a small acrylic holly piece adhered with a staple.  I added an arrow created with a Story Card Die from Technique Tuesday. (These dies are versatile and can be used for Project Life, cards, traditional scrapbooking and many other projects.  I use mine with the Epic 6 machine from Lifestyle Crafts)


 On the back side of the tag, I added a second photo, both are adhered with red washi.  On each page, I am stamping the date with the Christmas Date Stamp Roller from Smash.  I'm also adding the "clue" from Heidi's 
#heidiholidayfotofind with a stamp I've had forever from Provo Craft.  It's a huge roller stamp that you can use to spell out words.  I have one with a large font and one with a smaller font where you can spell out longer words.
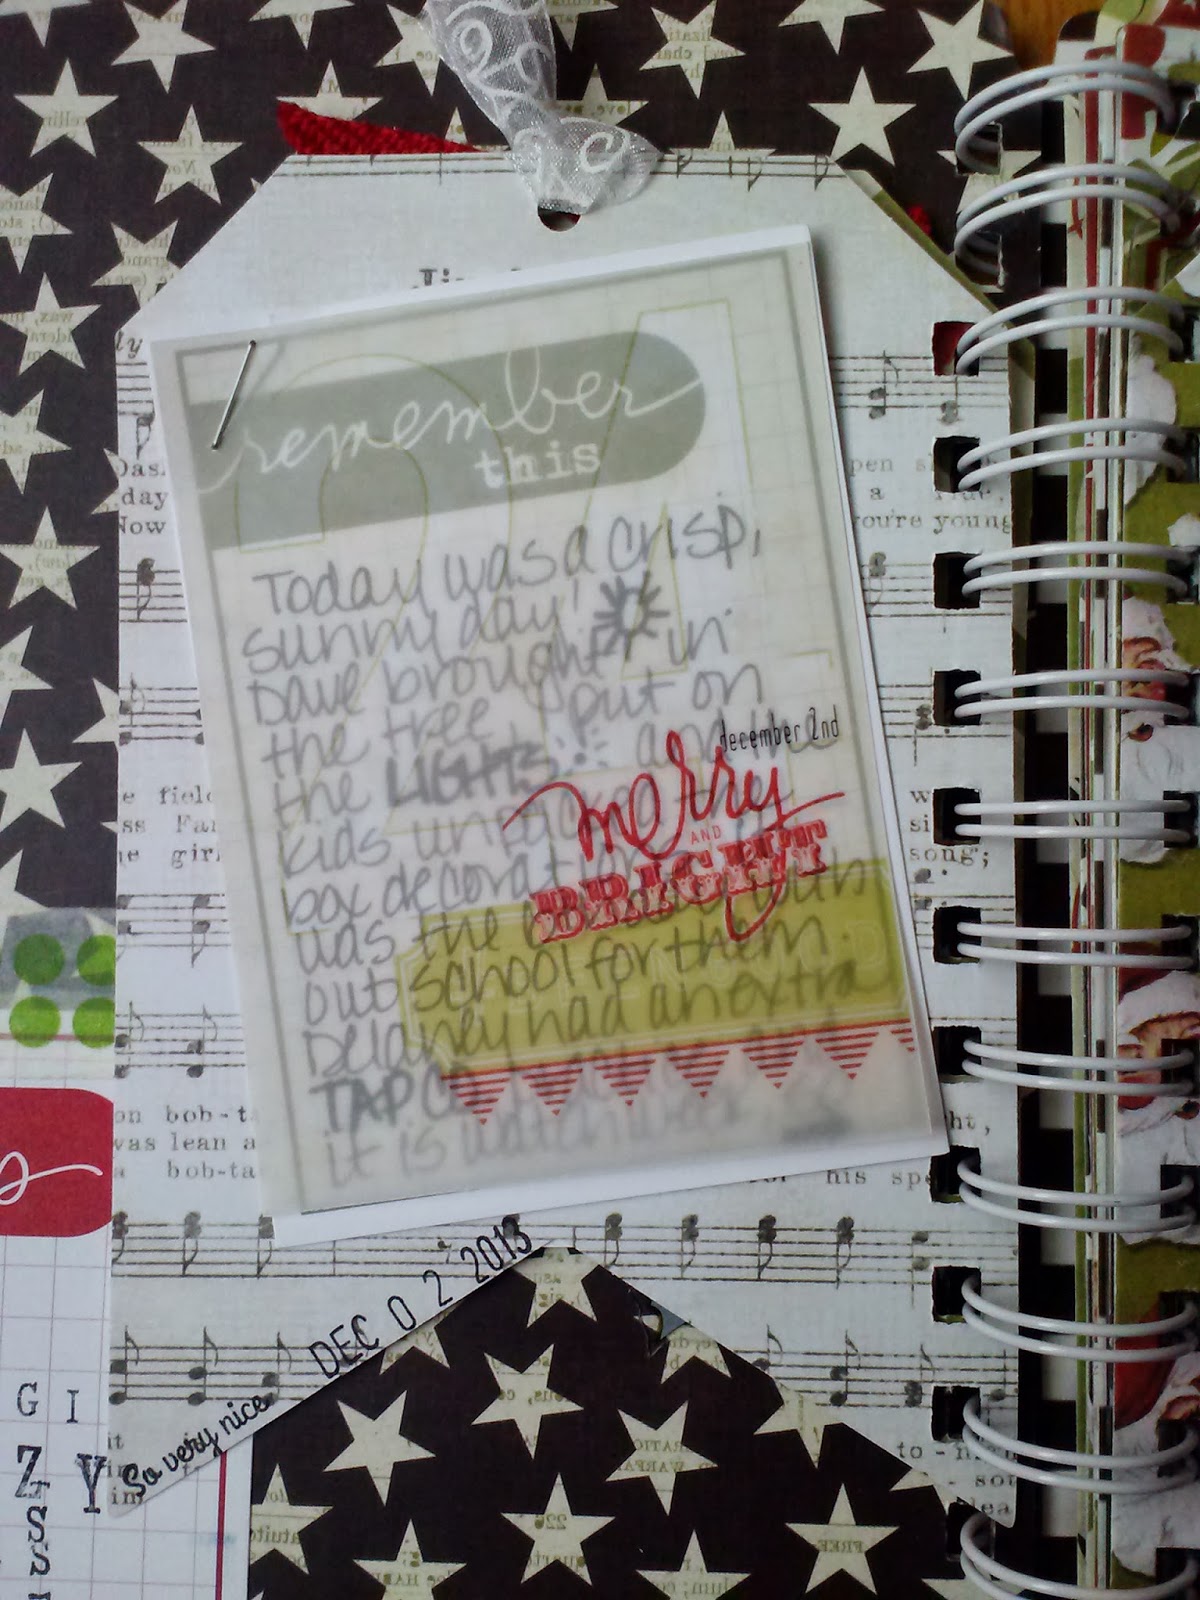
 I was excited that Heidi designed these cool Christmas Countdown cards and offered them as freebies on her blog this year.  I printed them on vellum and I'm using them as overlays for my journal cards this year.  My journaling is done on the Remember This Story Cards by Ali Edwards for Technique Tuesday.  I jot down my day's journaling on the front and then onto the back and then put the overlay on top of the card and staple both into my album.  Here's the LINK to the first set of overlay Countdown Cards from Heidi!  I'll give you the link to the next set when I get to Day 7 in my album (they're being released 6 at a time).

Day 2:


 I'm using the overlay on my journal card for each day of the month.  They are adhered with a staple!  Super Simple!


 I had three photos to include today and a pretty small tag on which to include them.  So, I started at the bottom, and adhered each of them with washi, one on top of the next, so you can flip each one up to view the next photo.


Day 3: 


I love the acrylic page for Day 3!  Under the acrylic page, I added two photos, a nice little graphic tag from Chic Tags and some fun embellishments.


Day 4:


 The Heidi die cut vellum banner from the ephemera pack looks amazing on this page!  I also added the Merry Christmas piece and my date star to this one.
 Even my washi had a 4 today! This page layout offered a lot of space for me to add a little tag from Chic Tags and washi tape.

Day 5:


I used a little ribbon, some sequins and a puffy silver star trimmed from a yard of metallic trim I found at the fabric store.  I adhered everything with Glue Dots.

I hope you enjoyed seeing my take on the December Daily album for 2013 using Heidi Swapp's Believe Memory File Album!  Such a fun way to document this festive month!

Join me back here soon for the next "five days of Christmas"!


Tuesday, June 4, 2013

DIY Shadow Box with Studio Calico Wood Veneer Cameras


Sometimes inspiration strikes right there in the middle of the scrapbook store!
When I was in the store one day, checking out our new arrivals, this package of tiny little cameras from Studio Calico practically jumped out at me.  Being a HUGE fan of cameras, I knew I had to use them for something special.  With their unique shapes, I wanted to create something where I could see each one.  And being a designer who LOVES color, I wanted to make each one a bright, vibrant color.

256938a2afa079fef4db8a879030de3562c46813983726bc2c

So, as I sometimes do, I wandered the store, waiting for the idea to jump into my head.  Just being around so many papers, embellishments and creative products tends to inspire me.  I have the very best ideas in the store!  Try it sometime, I'm sure your scrapbook store can work magic too!

As I passed our display of Luminarte mists, it came to me.  I should use the mist on the cameras.  Over the last couple of years, I have taught workshops, designed projects for the store and written blog posts on the versatility of mists.  When I came up with this idea, I hadn't used the mists as paint very often.  So, I thought this would be a perfect project to venture into new territory.  Mist, whether Luminarte, Mister Hueys, or made by other manufacturers, comes in a multitude of colors and finishes.  For this project, I love that the Luminarte mists have a sparkly, metallic finish.  If you'd like a similar look using Mister Hueys, just grab the SHINE bottle and apply it over the top of the matte colors.  It will look great!


After coming up with a way to get my little cameras all colorful & sparkly, I thought the best way to display them would be to mount them in a shadow box.  I picked up an 9" x 9" shadow box at IKEA.  I liked the white frame so the cameras would really be the focal point.


With a rainbow in mind, I arranged my mists by color.

Then I opened the lid and used a brush to drip a little mist onto a regular sheet of printer paper.
The actual color of the mist is often different than it appears in the bottle.  I was also sure to shake the bottle vigorously before opening it.  The metallic flakes settle to the bottom of the bottle very quickly, so be sure to shake your mist often.


Next, I sorted through the veneer cameras putting them into little piles by shape and size.  I wanted to be sure to include a variety in my final product.  Being a big fan of symmetry and having a square shadow box, I decided to use 16 cameras in my design.  Originally, I had planned to use more, but when I laid out the cameras on a 9"x9" sheet of white paper, the white space between them was perfect with 16 cameras.  My original layout was approximate, I would use a ruler later when it was time to apply the photos to my mounting paper.


After letting my dots of mist dry, I chose the 16 colors I liked best and began to paint each camera.
I used a small paint brush to apply the mist, letting it sink into the wood veneer for a few seconds, then applying more, until the color reached a vibrant depth on each piece.

After applying a few coats of mist, I let each camera dry a bit so I could check the shimmer.  The Luminarte mists I used sparkle more as they dry, so it's necessary to wait until your project is dry to see if you like the amount of shimmer.  Apply another coat or two if your project isn't "shimmer-y" enough.

As I completed each camera, I placed them back onto my printer paper to see how the colors looked next to each other.


After all the cameras were painted and dry, I used a ruler to place them.  I started with the right column and placed the largest camera 1" away from the edge.  Since all the cameras differ in size, I moved up the right column, centering each camera in an area of space dictated by the largest camera.  As I measured the rows, I tried to keep the bottoms of the cameras in line with each other, as if they were sitting on a shelf.  I liked the look of this, except when I placed the tiniest cameras.  For those, I felt lining them up with the bottoms of the other cameras left too much space above them.  So, I moved the tiniest cameras up a bit centering them more in their spaces. (Feel free to message me if you would like a more detailed explanation of my spacing.  It was much easier to do in reality than it is to explain in writing!)


After placing the cameras, I used a pen to trace their "lenses" onto my printer paper.  If you're using different veneer shapes, you could trace outside the shape instead.


In order to attach my cameras to my mounting paper, I placed my printer paper with the circles down onto a light box.  Next, I placed my 9" x 9" mounting paper (Bazzill Basics Swiss Dot Cardstock in Salt) on top.  I used mini Glue Dots (about 2 per camera) to attach each camera over the circle.  I kept my ruler handy to make sure the bottoms of the cameras were straight.


After applying all the cameras, I placed the paper inside the shadow box...and VOILA!

A simple, vibrant, graphic piece of art!

I'm in the middle of designing some fun products to sell in scrapbook stores and on etsy!  My company is called Creatively Custom and I'd love it if you'd stop over and LIKE my new business Facebook page.  My first products will be custom Project Life style cards for high schools, complete with names, colors & mascots!  I'd love to know what you think of them.

Thank you!!


Check out my fun idea and TONS of other amazing ideas over at the link party on Today's Creative Blog!  Tuesday is 'Get Your Craft On' day!  You'll find SO many cool ideas there every week, you'll wonder why you hadn't found it before!  Oh, be sure to tell Kim (Creator & Diva of TCB) HI and that Julie from JulieChats sent you!

Today's Creative Blog

Monday, May 6, 2013

Teacher Appreciation Layouts - Layout of the Week

This week is a very important week in schools all across America!  It's Teacher Appreciation Week!  This week was a huge deal in my daughter's elementary school.  And it still is!  Even though she's moved on to  middle school and her brother doesn't start elementary school until next year, I was asked to pitch in during this special week.  I'm sure it doesn't hurt that I work our local scrapbook store.  Those volunteers know just who to ask when these projects come up!

One of the mom's at the school came up with the idea of having each child in the school (about 600) create a scrapbook layout for his or her teacher.  Some kids also created layouts for the "specials" teachers: music, library and technology.  In an effort to include the office staff in this fun project, a mom contacted me and asked me to design pages for the principal and the three ladies who work in the office.  Of course, I was delighted to help.  These ladies were part of my and my daughter's life for six years and will be a part of my son's life for the next six years!

When I thought about what types of layouts to create, I was looking for something simple & graphic, that I could reproduce pretty easily for four people.  I think that the teachers will be receiving albums full of pages from their students.  I'm not sure exactly how my layouts will be presented to the office ladies, but I think they would be perfect in frames to hang on the wall.

I am really excited that our store will be getting the retail version of Project Life very soon and so I thought I'd create a PL style layout for these projects.  I also have a few fun ideas that I'm going to start designing soon to sell in the store and on etsy.  I'll be back with details, once the products are ready for sale.  So I had some ideas floating around in my head that I wanted to try out.


Our store (Whimzee's Scrapbook Studio in Beaverton, Oregon) sells tons of custom paper for local schools.  We order our paper from Scrappin' Sports, and of course, my elementary school is one that we order.  Check with your local scrapbook store if you'd like to create a project like this at your school.  I'm sure they have a vendor who can create custom paper for them.


Our school colors are red and black, so I stuck with a red, black & white theme for the layouts.  I used American Crafts textured white paper and World Win non-textured black paper, along with stamps by Technique Tuesday and ink from Tim Holtz & Ranger.  The cute black chevron washi is from Glitz.  I used my Silhouette Cameo to create custom PL style cards for the pages too!


A parent provided me with the photos.  Most were horizontal, so for three layouts, the horizontal layout worked perfectly.  For the fourth layout, I used two vertical photos and turned the layout 90 degrees, printing and cutting my rectangles vertically.


These layouts were a lot of fun to create!  I think I'm going to use this idea as a Teacher Appreciation gift in the future!  Create a layout and grab a white or black square frame & you're set.  I even created cards for a 5th layout, so I can make one for my daughter with a couple special photos from her last day of 5th grade!


Check out my fun idea and TONS of other amazing ideas over at the link party on Today's Creative Blog!  Tuesday is 'Get Your Craft On' day!  You'll find SO many cool ideas there every week, you'll wonder why you hadn't found it before!  Oh, be sure to tell Kim (Creator & Diva of TCB) HI and that Julie from JulieChats sent you!

Today's Creative Blog

Monday, April 22, 2013

Layout of the Week - My Happy Place

Most of my layouts come straight out of my own mind.  I usually get inspired by my photos or new papers & supplies at the store.  But from time to time, I see a layout I just have to "scraplift"!  There are just some layouts that appeal to me so much, I have to honor them by recreating them, with a little Julie-spin.  Lately, I've been getting a lot of inspiration from Instagram.  I stumbled across the Chic Tags blog just this way.  After seeing the fun creations from Chic Tags on Instagram, I've been checking their blog for inspiration.  And a couple of weeks ago, I found a layout that begged me to recreate it!  Created by Kasia, who lives in Turkey, the "Today was Awesome!" layout had me smitten!


I love everything about this layout!  Now, someday, I really do plan to recreate this layout in the colors that Kasia used.  But, in this case, I had already chosen papers & photos and just needed to use this layout for its design...as more of a sketch or plan.

Being obsessed with color, I chose to add my Julie-spin by creating a layout full of bright colors, letting Kasia's overall page design guide the placement of my elements.


To start, I hand trimmed my dotted paper and used my sewing machine to stitch it to one of my very favorite colors of cardstock, Ruby from the Vintage Collection of Core'dinations.  I liked the idea of continuing the dot theme, so I searched the Silhouette Online Store until I found the Linked Welded Rings cut that I could duplicate, rotate and weld to create a background similar to Kasia's.


I cut it in a dark teal, Stargaze from American Crafts.  Then I went back and deleted out the center of all my circles and cut that in white to create a background.  I love using the Luminarte Mists from Splash of Color (previously Creative Imaginations), so I used a paint brush and water to wet the white background and then dripped four colors of the mist onto the paper.  I let the white pieces dry before adhering them to the circle pieces.


Next I gathered some tags & other embellishments, some old, some new to give my page a graphic look similar to Kasia's. I chose some stickers from the Fancy Pants kit, along with a couple Technique Tuesday stamps and my SMASH date stamp.


I love how my page turned out, with tons of color and lots of layers & textures.  If you're having trouble layering your embellishments, just remember to lay everything down and move it around a lot until you like the result.  THEN start from the bottom adhering the back pieces first.  Adding pop dots to a few of your embellishments gives some depth to your creation, just be sure to pick only a few.  Everything doesn't need to be "popped up"!

I hope this "scrap-lift" shows you how you can use your inspiration layout as a sketch and think of its design elements in your own way to create something original that shows a little bit of you!

Check out my fun idea and TONS of other amazing ideas over at the link party on Today's Creative Blog!  Tuesday is 'Get Your Craft On' day!  You'll find SO many cool ideas there every week, you'll wonder why you hadn't found it before!  Oh, be sure to tell Kim (Creator & Diva of TCB) HI and that Julie from JulieChats sent you!

Today's Creative Blog

Supplies:

Paper:
Core'dinations Vintage Collection Ruby
Fancy Pants Down by the Shore: Colorful Days
American Crafts Textured Cardstock: Stargaze
Colormates Non-Textured Cardstock: Light Heritage White

Stickers:
Fancy Pants Down by the Shore: Sticker Fundamentals

Tags:
Peterson Arne: White & Yellow Mulberry
Creative Cafe: Together

Stamps:
Technique Tuesday: Awesome and Studio AE: My Life
K & Company: SMASH Date Stamp

Ink:
Versamark Watermark
Tim Holtz Distress Ink: Walnut Stain
Splash of Color Luminarte Radiant Rain Mists:
      Bashful Blue
      Ginger Peach
      Key Lime
      Sunburst

Embossing Powder:
Ranger: Rich Red
American Crafts: Zing in Cricket

Misc.:
Scrapbook Adhesives: 3D Foam Squares
Yellow Thread


LinkWithin

Related Posts Plugin for WordPress, Blogger...