Showing posts with label craft. Show all posts

Monday, June 6, 2011

Party Favors the Kids Can Make...


If you're like me, you're getting tired of spending all the time and money to throw your kids wonderful birthday parties only to be left wondering what kind of fabulous gift you should spend even more money on to send home with each little party go'er...

Well, personally, I'm trying to move away from the party favor/gift bag craziness.  Last year for Delaney's party, we had a great American Girl Craft Party where the girls made their own favors as part of the party.  And the year before that, we had a Tie Dye theme for Delaney's party where the girls tie dyed a shirt and wore it home as their favor.  (Click HERE to see the mini album I made featuring all the fun of the Tie Dye party.)

This year, Delaney wanted to take three friends to dinner at Benihana and then back home for a sleepover.  Since dinner was going to be pretty expensive, I wanted to do some cheap little favors for the girls.  While I was thinking about my plan for the party, we got in some fun little tubes at the scrapbook store where I work.


The tubes are about $1 each at the store and are about 1 1/2" in diameter and 8" tall.


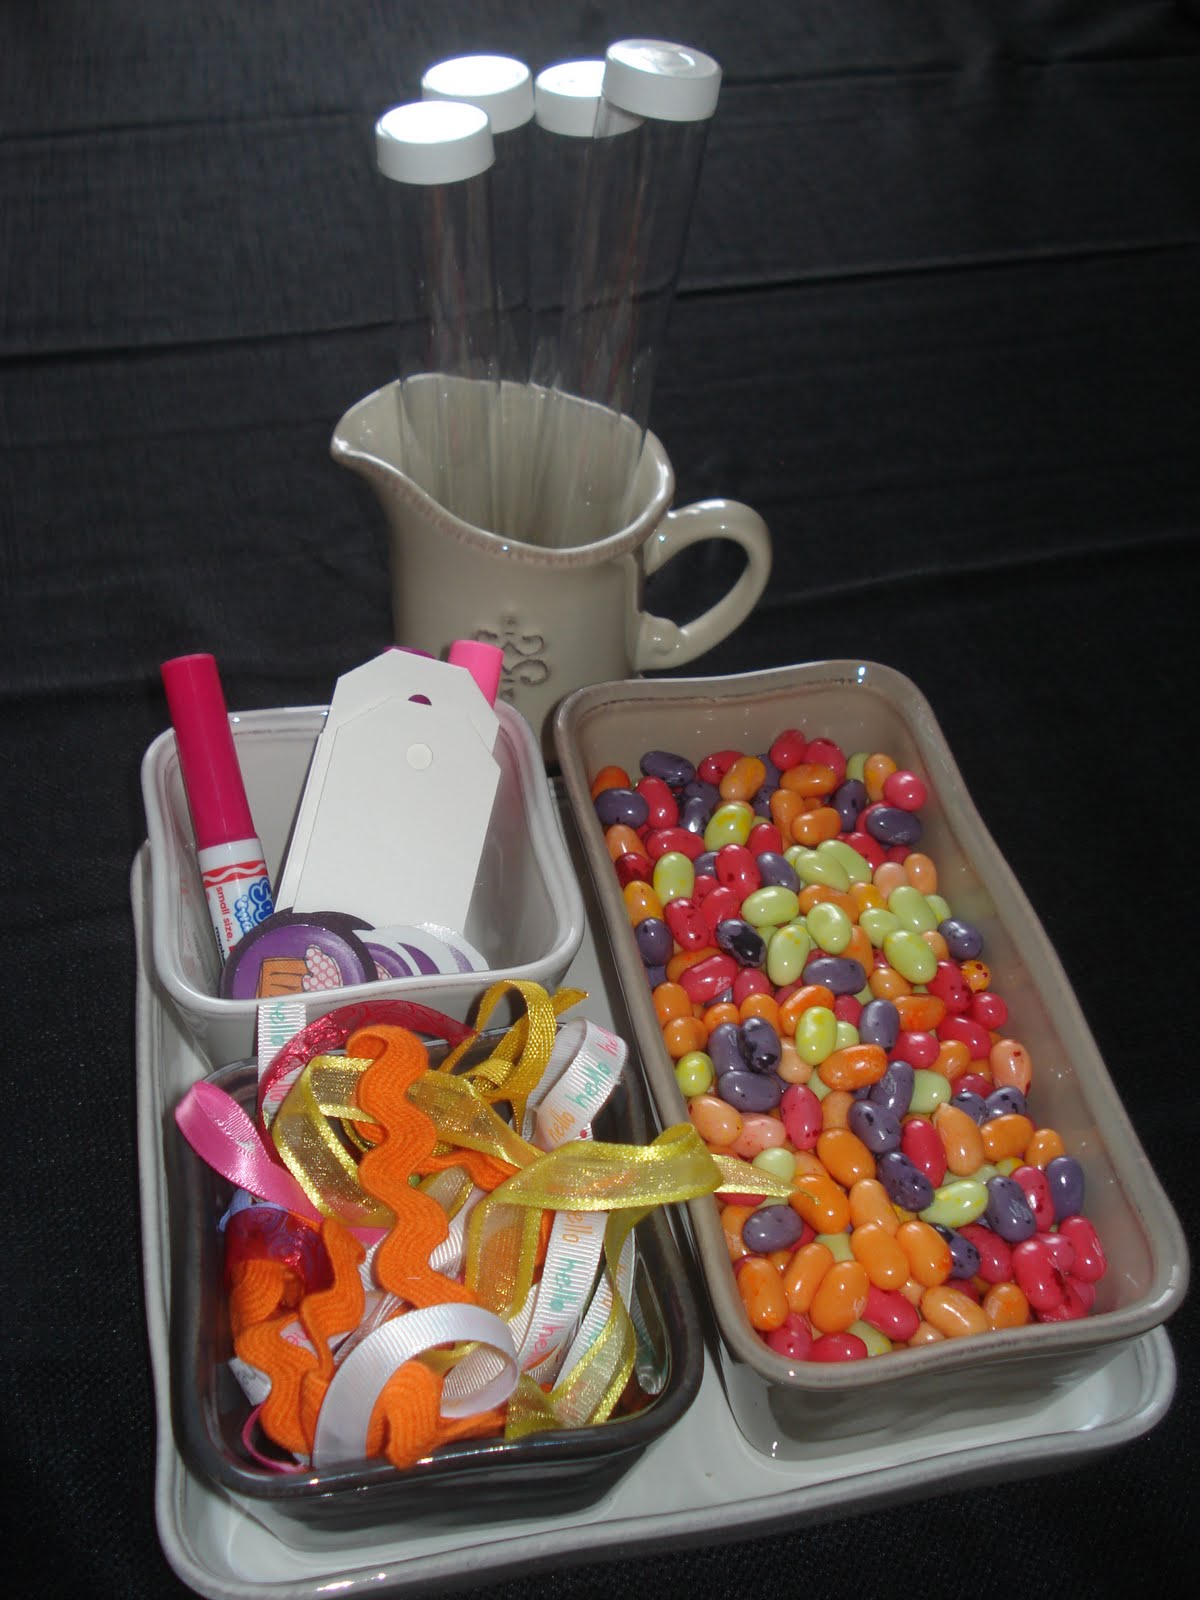
We gathered our supplies. (Of course I used my new favorite Willow House piece, the Riverstone Tapas Set...so useful, but I digress!)  Delaney wanted some fun bright colors for the tubes, so she chose Jelly Belly Jelly Beans in the colors she wanted (frankly the most expensive part of this project, you could choose any little candies that fit in the tubes).  Then we used some extra ribbons we had at home and a few little spools of $1 American Craft ribbon from the store.  I punched the tags with my large tag punch and printed out some cute cupcakes from a the Crystal's {Playground} elements pack, a digi scrapping pack I got over at JessicaSprague.com (I made the invitations from this same kit, I'll share them soon.)


Once Delaney had all her supplies, I left her alone to make up the favors while I finished cleaning the house.  I did have her let me know when she finished a step, so I could hurry in & shoot a photo or two.  Delaney's 10, but I definitely think that 7 or 8 year olds could do this project by themselves or as a fun activity during the party.

In preparation, we cut the ribbons in about 4" pieces and wrote the girls' names on the tags.

Then the fun began....

First Delaney filled the tubes with jelly beans.


Then she added the cap.


Next, she tied a few ribbons around the tube, adding a tag to the top ribbon before tying it.


Such a fun, simple & inexpensive party favor!  Give it a try for your next party...birthday, graduation, 4th of July, Halloween...the variations are only limited by your imagination!


My Birthday Girl had a great time with her friends & everyone left with a sweet little memory of the party!

Remember to join me over at Today's Creative for the "Get Your Craft On" link party every Tuesday!  If I'm not posting, I'm over there hanging out seeing what the creative ladies are sharing every week!


Todays Creative Blog

Monday, July 13, 2009

Layout of the Week - HOME


OK, I know you can see that this isn't technically a layout! But it's the project I managed to finish this week. Sometimes I just feel like doing something "outside the box". I was looking for something to hang above the mirror in my foyer and these Rusty Pickle chipboard letters jumped right out at me. Alright, that isn't quite how it happened, when I was at the store one day, Twila said, "Hey, Julie, why don't you take these home & do something cool with them!" I did think of where to hang them right away, it just took me a while to get to the project.

I'm going for kind of a Fall pallet downstairs in my home. Dark red in the family room, a pretty gold in the nook, a great color from Devine called ginger in the dining room and aspirations of a nice caramel macchiato type color in the kitchen & foyer. I say aspirations, because in August we'll have been here 5 years and it's still the same "builder's off-white" as the day we move in. Well, at least we've painted most of the rest of the house. And if the foyer's walls weren't 2 stories tall with a huge staircase, it would probably be painted by now too. I guess I'm waiting for one of two things to happen #1 we have enough extra money to hire a painter or #2 our overworked friend Jeff, takes pity on us and does yet one more "honey-do" job for us! Jeff has been doing "honey-do" projects for us for years. Outside of simple painting & yard work, home improvement projects aren't Dave's (or my) strong suit. So when it comes to balancing a ladder on one step & a couple phone books, Jeff's our guy! Don't laugh, I've seen him do it, in the stairway of our last house. I was the one standing there, mouth dropped open, with the 9 & 1 pushed on the phone just waiting to push the other 1. There was Dave, pushing against the ladder while it balanced on one step & the phone books, while Jeff perched on the very top on tip toes, perfectly edging the wall up to the ceiling.

It's awesome to have friends who'll risk their lives for you....but I digress! This cute wall hanging will perfectly match my caramel macchiato walls, in the event that Jeff feels like risking his life again for us sometime in the future!

So, to be sure it matches, I chose papers from Bo Bunny's Beautiful Life collection. This collection is a great combination of Fall colors: browns, reds, oranges, greens. I used copper acrylic paint on the edges & backs of the letters. I thought about tying them together with ribbon, but I liked the more rustic look of thick twine. For embellishments, I used some paper leaves I had in my scrap room. I'm not sure who makes them, they were shared with me by a friend who thought she could never use all that were in the jar she bought them in. For the final touch, I used a couple of the matching stickers from Bo Bunny's Beautiful Life collection. I mounted the stickers on copper metallic paper and tore it around the sticker's edges, just to cover up the adhesive on the back.

Right now, my HOME wall hanging is hanging in a door way at Whimzee's. So maybe that will give me time to bribe Jeff with some ice cream...to come over & paint the foyer!

Supply List:

Rusty Pickle Chipboard set H-O-M-E

Bo Bunny's Back to Basics Beautiful Life Collection papers
H-Life Stripe (I used the back of this one.)
O-Collage
M-Leaf
E-Blessed

Copper Metallic Acrylic paint from Tulip

Paper Leaves (not sure of their manufacturer)

Bo Bunny's Beautiful Life Collection stickers

Thick Twine (not sure of its manufacturer)

I'm also thinking that I might print some tiny sepia tone photos of the family & hang them on the letters too, but that's a thought for another day! Enjoy your week!

Monday, August 11, 2008

My Latest Experiment in Papercrafting


I wanted to share my latest project with you. I created this clock from a Colorbok kit I purchased a while ago at Tuesday Morning. I wasn't too excited about the papers that came with it. They were very old fashioned and not too colorful. So I looked through my huge collection of scrapbooking papers and came up with this Anna Griffin print. It looked nice and seemed perfect for my mom's sewing room. I gave the clock to her as a birthday present last weekend. She loved it! Instead of the one photo shown in the sample, I used two photos, one of my kids and one of my nephew. It will be nice for her to be able to look at it & see all of her grandchildren. The kit came with the clock and its parts and also the ribbon, rub ons and embellishments. I was especially happy with how the photos turned out. I am a beginner using Photoshop, but after a few hours I figured it out. I finally got the result I was looking for, aged, with a canvas like texture. Now I can't wait for another chance to try out what I learned on this project.

LinkWithin

Related Posts Plugin for WordPress, Blogger...