Showing posts with label family. Show all posts

Monday, February 17, 2014

Family Love Layout - Layout of the Week


This week I'm sharing another layout I created Plus Corp's CHA booth at the Winter 2014 show.  When I saw the new Vintage Camera Decorative Roller Stamp from Plus Corp., I almost jumped up & down!  I LOVE anything with a camera on it!  I immediately knew which paper I wanted to combine with this awesome stamp.  The Camera Bag paper from October Afternoon's Travel Girl collection was the PERFECT paper to complement the camera stamp.  Once I had the stamp and my paper, I headed to Whimzee's Scrapbook Studio (the LSS where I work here in Beaverton, Oregon).  I knew that we would have some great solids to coordinate for my layout.


When I first started planning this layout, I didn't know which photo I would use, only that I just HAD to make a layout with this super cute camera stamp.  I started to consider photos and realized that we had just had our family photos taken right before our Disneyland trip.  I have a friend who is an AMAZING photographer and a teacher too (in her spare time...ha ha!)  If you're in the Portland-Vancouver area, please consider her for your family and senior photos! Check out her website Stacy Major Photography.


I decided to use my shiny silver metallic paper as the background and layer gray and aqua on top of it.  I mounted my photo on a black matte and placed it on a horizontal strip of gray textured paper.  Next, I rolled my Decorative Roller Stamp with its cute cameras across a piece of textured white cardstock from American Crafts.  I really like the vintage look the textured cardstock gives to this stamp.  What would normally be a solid black impression is distressed using textured paper.  I worked at getting the stamp straight by laying my paper down next to a ruler and making every effort to roll my stamp perfectly along the ruler.  I think it took about three tries to create a camera strip to my liking.  And, just in case you have one of the Decorative Roller Stamps from Plus Corp. and are unhappy with the impressions you get at first, be sure to grab a piece of printer paper and roll the stamp around until your image is clear and perfect.  The images on the stamps I used did not come out perfectly on the first try.  Some black ink was printed in between the cameras and other images on the other stamps I used for my projects.  After rolling them around on printer paper a few times, the images began to come out perfectly clear with no black ink in between. To create a focal point, I used a vertical strip of the camera paper behind my photo, tearing and distressing its edges by rolling them back & forth between my fingers.  

Even though we are wearing gray and white in our photos, I decided to print my photo in black & white for this layout.  I really love the look of black and white and it looked perfect with the palette of aqua, gray and silver I chose to go with my October Afternoon paper.  I used my SMASH date stamp next to my photo, so we'll remember when we had this fun family photo shoot.  After stacking and adhering my papers, I used my sewing machine to machine stitch aqua, gray and white thread in a combination of zig zag and straight stitches.  I like the effect the stitching adds to my project, it coordinates with the vintage look of my camera stamps stamped on textured paper.  It also contrasts with the shiny silver paper and bold sans serif  Bebas font I used for my title.  Last summer, it seemed like everyone on the internet was hashtag (#) crazy, so I thought it would be fun to use one of the hashtags I use on Instagram as my title.  I used my Silhouette Cameo to cut the title.  #familylove is a hashtag I try to use on all my family photos, so I will be able to easily find them when I want to share them.


For embellishments, I chose a couple groupings of sequins and one tiny wood veneer camera from Studio Calico.  I painted this camera just like the cameras I used in my Wood Veneer Camera Shadow Box blog post.  I used pewter mist from Luminarte as paint, read about it in my shadow box post.

This was another fun chance to create with a brand new product.  I have some more projects created for Plus Corp.'s booth at CHA and I'll share them soon!  In case you missed last week's post, I shared my Disney Carsland Layout using another new roller stamp from Plus Corp and 2014 winter release stamps from Technique Tuesday.

Sharing this project over at 
So much fun over there, be sure to stop by & check out all the great St. Patrick's Day & Easter theme projects!


Wednesday, February 12, 2014

"Say Cheese" Disney Carsland Layout - Layout of the Week


A few months ago, I was asked to create some layouts by Plus Corp. for the Winter 2014 CHA show.  I was really excited to have a chance to work with Plus Corp's brand new Decorative Roller Stamps and Decorative Tapes.  The stamps I used were so new, I had one of the only sets in the US to play with!  Fun Fun!  With 12 roller stamps and 12 decorative tapes to choose from, I just had to grab some recent photos and use my imagination to create some super fun projects.  My very favorite project is this layout featuring a photo of our family with Lightning McQueen.  Our August trip to Disneyland and California Adventure was AMAZING!  And I was SO happy that I purchased the Disney Photo Pass CD full of our trip photos.  Knowing ahead of time that I would probably want to buy the CD, I was sure to have our photo taken by the Disney photographers every chance we got!  I love the CD and all of our photos, but I do wish that there were more photographers and photographers with every character we met.  It was strange that our photos with Mickey & Minnie in Toon Town had to be taken on our cameras.  It would have been nice to have professional ones with these characters.  But, all in all, I was very impressed with the quality of the photos and excited at the opportunity to reprint my photos many times, in any size I want!


This photo is from our very first day in the theme parks.  My little guy, Jake, has always been obsessed with the Cars movies and their characters, so of course, Lightning McQueen was at the top of his list of characters to meet.  To this day, he still tells everyone who will listen that Lightning McQueen lives in Disneyland and that he met him!  Such a fun memory!  We had just about every photo shot with our whole family and then again with just the kids.  I wanted as much versatility as I could get for my projects later.

For this layout, I looked to the photo for my color palette.  Bright red, electric yellow and black are classic Disney colors and help me show off Lightning too!  Putting them on a white background helps them jump off the page!  Textured white cardstock from American Crafts is my go-to white paper, it's a perfectly bright white and cuts like butter on my Silhouette Cameo.  To give my white background a more custom look, I used a paint brush to splatter acrylic paint onto the paper.  The black & yellow paints are regular acrylic from Kaisercraft, but the red is DecoArt Ultra Gloss Acrylic Enamel (usually used for painting glass).  I love how the red splotches are SO shiny!  I looked through my stash and the local scrapbook store where I work to come up with supplies for my layout.  Polka dots always make me think of Minnie and Disney, so I choose some polka dot elements in my color palette and grabbed my Mickey outline punch and Disney castle punch (I bought those years ago in Disneyland).


I arranged my elements on the page and balanced them out with another little cluster down in the bottom right corner with a little tag & some washi and a castle.


The new black honeycomb roller stamp from Plus Corp. was the perfect thing to mimic tire treads going across my page.  I used colored pencil to few in a few hexagons here & there.


For my title, I used the brand new "Say Cheese" stamp set from Technique Tuesday.  I stamped "cheese" with Versamark ink and embossed it in glossy red.  I used a couple of the hashtag word stamps from the set around my page, stamping them onto tags I cut on my Silhouette Cameo.  I inked the top tag in red before stamping it to help it stand out from my page.

This is one of my favorite layouts ever!  It was fun working with the new roller stamps from Plus Corp., along with the 2014 "Say Cheese" stamp set from Technique Tuesday too!  Stay tuned to this blog next when I share another Plus Corp. CHA sample!

Tuesday, January 14, 2014

December Daily 2013 with the Heidi Swapp Believe Memory File Album Days 6-15


As always, for me, creativity is messy!
I got to work catching up on my December Daily today.  I have all the photos edited and uploaded and most are printed.  All but a couple journal cards are written on.  Pretty good, since I'll be sharing my 2012 December Daily soon (just finished it in December 2013).  So, you see why I'm so happy with how much I have done this year!  I keep my supplies in a couple little bins and a ziplock bag.  I chose everything to match my Believe collection from Heidi Swapp...red, lime-ish green, black, white, and some gold & silver thrown in for good measure...stamps, ink, ribbon, twine, stickers, washi, whatever I could find in those colors went into the little containers or baggie.  Then I knew it wouldn't be too difficult to throw together a few pages when I had time.  Of course, my time didn't free up until the second week in January.  But, I think that's how it is for a lot of us.  We're so busy with family, friends, parties, making gifts, cleaning house, etc. during the holidays that these projects can easily get tossed into that box of 1/2 finished projects.  I did really try to keep up on the photos this year though, so at least I'd have the photos to go by when the time came around.  So, here's what I have for days 6-15. I get to work on the rest and be back to share soon!


I'm continuing to use the cute little countdown cards that Heidi posted FREE on her blog this year as overlays, printed on vellum, topping my Technique Tuesday Story cards. I love seeing all the Christmas prettiness on my pages before seeing the handwritten cards. And maybe people will have to stop & look around a bit before they find the journaling.


I added a cute little word grain tag to this one! And I love the die cut, so my photo from Day 7 can peek through.


The 7th was a fun day! My daughter, Delaney, teaches a monthly kids class at the scrapbook store where I work, here in Beaverton, Oregon. She has a great time! Then after, we snuck out for some Christmas shopping & lunch, just us girls.


I added some sequins and silver ink to give this page a little flair. I attach my sequins with mini glue dots. Wet glue might work too, but I design these pages quickly & move on to the next...no time for glue to dry.


I'm having fun using Heidi's little ephemera pack in this album!  It's SO nice to have all my embellishments ready & waiting in a little baggy! I poured all the ephemera into a baggy and separated the black number stars, just so it's easier to find the number I need for each page without going through the entire bag!


What goes with December more than a blinking Rudolph nose...


Or a neon green wig!?
For the main embellishment on this page, I used one of Heidi's Freebie tags I had printed from last year. I trimmed it and adhered it to my very favorite red...Kisses from the Vintage Collection by Core'dinations. Then I left a little border and trimmed around the tag. Kisses matches tons of reds from many designers and adds just the right amount of texture to my projects even without sanding or tearing it.


We had the tiniest dusting of snow late at night on the ninety...it just so happens that was the week Delaney's dance studio was holding secret practices until 10pm every night for flash mob at Zoo Lights Saturday night. So, she had to make a barely visible snow angel in the driveway before going to bed with her clothes on inside out while praying for a snow day!


This cute little tag in the middle of the book was perfect for a little pile of ephemera & embellishments!


For the back of the tag, I chose a little vellum sentiment and a couple puffy silver stars. The stars are from a yard of trim I bought at a local fabric store. (Mill End, if you're looking in the Portland area.)
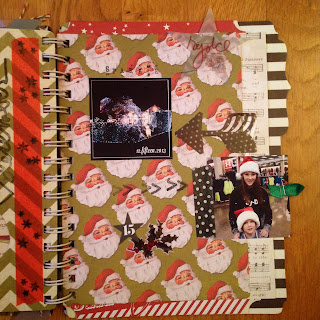

I was super excited about this bracket page with the little window for Day 10.
Since I hadn't used any garden type twine yet, I added some here in a little pile, under my acrylic "joy" piece from the ephemera pack. I think it's a little unexpected to mix such a slick, shiny, clear piece with a tangled pile of twine...that's why I LOVE it!


When you open the little flap, you find some fun photos & my journaling card with its Countdown topper for Day 10.


Day 11 has a fun little stack of photos...a selfie...trying to get myself in my albums...a photo of our backyard on this cold, icy and SUNNY day! Plus, a shot of my Christmas mantel.  Each day I'm including photos from the #heidiholidayfotofind. This is a little photo scavenger hunt, where we had a different theme each day and posted our photos on Instagram everyday. Today's clue was #wrapping paper. This year, I covered the frames on the wall above my mantel with kraft wrapping paper. I borrowed this idea from a friend who's a Super Star decorator!


On the next little tag, I added some really old ribbon and a little piece of ephemera.
I ALWAYS keep ribbon. Ribbon from packages, gifts, store packaging...anywhere really. I have two wire farm baskets on the wall above my desk in my studio. I just toss whatever I find in there & dig around whenever a project comes up. I almost always have a ribbon that will work for my project!


On the backside of the little tag, I placed my journal card & overlay.


Somehow I only had a couple photos for this day...and my kid are perfect examples of the Heidi foto find...#naughtyornice. You'll see I'm using a lot of washi in this album. This is a concerted effort to use some of those rolls I've been collecting.


This page has some stamps from the Technique Tuesday Ali Edwards December Daily collection from 2012 and also some of her new flair, just for Christ.


In addition to the Ali stamps, I have a cute little tags from Chic Tags here too!
Just a little tip...that tag is covering a stamp that didn't come out perfectly the first time! Don't forget, you're tiny tags are perfect for occasions like this! Don't forget...there are no mistakes, just opportunities to improve your project! 

Such a busy day...our 5 store tour, Passport to Creativity's holiday party was on the 14th and I had to leave early to get Delaney and some of her friends to the zoo in time for the flash mob proposal they were dancing in! Oh and Dave took Jake to watch a Duck basketball game at the arose Garden, the rode Max & got to see the tree at Pioneer Square too!


I used a super festive digi scrap kit from The Daily Digi's November collection to create this flier that was also printed as a poster.


I stamped some solid red Target washi with black Stayz On ink and some little stars from the 2013 Project Life class at Studio Calico.


For a change of pace, I hung this photo off the edge, just so you'd see the kids faces as you looked at a few pages before this one. I added a little green tab with ribbon & my trusty stapler.

Small projects like this are some of my favorites!
I love the feeling of accomplishment I feel when I actually FINISH a project!
So, don't just look at this album as exclusively for December.
You could put together a small album for all sorts of occasions...trips, anniversaries, birthdays, family, friends. The possibilities are endless, just be sure to limit your color palette and gather just a few embellishments in that palette and you're ready to add them to a small album, along with a few sheets of coordinating paper.

Until next time, don't forget to #makeityourown!

Tuesday, April 16, 2013

Layout of the Week - Me & My Peeps

I know that no matter how hard we try to "keep up" with our scrapbooking, there are so many things in life that "get in the way".  Actually, it's all the amazing things we strive to record that "get in the way".  I willingly admit that I am YEARS behind in scrapbooking, if keeping up is measured chronologically....  I'm not sure when this "being behind" started.  Over the years, I have gotten less and less concerned with "keeping up".  The very first time I remember realizing that being "current" with my scrapbooking is not important was reading about the scrapbooking philosophy of Cathy Zielske.  Cathy was a big part of Simple Scrapbooking magazine and has a great philosophy of keeping things simple and following your own path as far as scrapbooking is concerned.  Read some of Cathy's idea's in a blog post about "Taking the 'Crap' Out of Scrapbooking".  After you read it,  you'll see some of the reasons why I'm not concerned with "keeping up" any more.

I love creating and scrapbooking is a way for me to create and working in a scrapbook store, doing this blog, teaching classes and giving advice are all parts of the creative process for me.  So, if you have always stressed about "keeping up" with your scrapbooking, take this opportunity to think about what it might be like to let go and concentrate more on being creative and telling the important stories.

But, as a nod to my family who loves to browse through their photos, I've found a way to combine my simple, non-chronological style with a new-to-me way to create a very simple, chronological albums.  I plan to continue using Cathy's philosophy of telling my family's stories when I create layouts.  I love the idea of choosing which stories I create whole page layouts for.  As far as regular, everyday life and creating albums that my family can sit and flip through, I plan to create a 2013 album using the Project Life system by Becky Higgins when it arrives in our store.  I love the idea of sticking my photos into divided page protectors, journaling on a card and having that be it...unless I decide to get creative with it, which I'm sure I'll do from time to time.  I love how I can stick a layout or two in between the divided page protectors whenever I feel like it.  Using the idea of combining both types of scrapbooking, I can cater to my philosophy of creating whole page layouts whenever I choose and also, please my husband and kids by providing actual books of their photos for them to look through and share.  (Yes, my husband has been known to comment "If you spend so much time scrapbooking, where are the scrapbooks?  I'd like to SEE our photos!")

I'm really excited about creating an album that combines the philosophies of both Cathy & Becky!  I think this will be perfect for me and my family.  They will have something to look at filled with their memories and I  will be able to create a fun, story telling layout whenever I find the perfect paper or embellishment...or inspiration strikes!

As far as those of you who really are keeping up :), I thought I'd share a layout I created a couple of weeks ago.  It's an Easter layout, so it's perfect, since you'll be working with this most recent holiday now.... ;)  And for those of us who are not so caught up, feel free to be inspired to create a layout for any Easter you have photos for!  That's what I did.  I used photos from a couple of Easters ago, since that's when Delaney created her "Peep Army."  Seeing this cut on the Silhouette Online store inspired me on this one.  I remembered taking photos of Delaney dipping tons of Peeps in chocolate and lining them up on a plate.  We all know there are times when a product or memory inspires us to create a page.  So, when I have time to go back & create a Project Life album for 2011, I can slip this layout in the Easter section.  Until then, I'll happily slide it into my family's album of miscellaneous memories...after it comes down off the wall at the store, anyway!

Here's some Easter inspiration for you...


For this layout, I used a bright, "Spring-y" paper with a pattern for my background.  The glazed & glittered paper from Best Creations gave a pop to my simple layout and perfectly matched my Peeps die cut.  When I saw the "Me & My Peeps" cut in the Sihouette store, I knew just which photos I had to go with it.  I cut the title out of some deep dark chocolate paper from American Crafts and found some super bright, non-textured cardstock in my stash to match the colors of actual Peeps.  I added an outline to the cut in order to have a place to mount the peeps and cut it from non-textured white cardstock.  After cutting the cute little Peeps, I inked the entire surface of each one with Versamark watermark ink and embossed with an old jar of embossing powder that says "turquoise sparkle" on the label.  I'm not going to lie, embossing the entire surface of the little guys was a challenge...I ended up with a couple burned fingers...but the overall look was worth my pain...cute little sparkly, sugared Peeps!

With such a large embellishment and four large photos, I decided on a step by step sort of layout, I put the photos on my layout in a clockwise fashion after mounting them on white non-textured cardstock, to help them stand out.  At this point, I thought my layout needed a little extra something...so I used one of my favorite stamps right now, the arrow from Technique Tuesday's "Awesome" stamp set to help guide the eye through my sequence of photos.


I ended up with a little extra space on the right side and decided to add a turquoise vellum tag stamped with the date of my photos as a finishing touch.


So, whether this layout inspires you to create pages for Easter 2013 or another holiday entirely, remember that however you choose to scrapbook your memories is the "right" way!  Really, the choices are endless...chronological albums, albums for each member of your family, digital albums, photobooks, Project Life, mini albums for special events...they are all ways of recording our memories to share with others!!!

Check out my fun idea and TONS of other amazing ideas over at the link party on Today's Creative Blog!  Tuesday is 'Get Your Craft On' day!  You'll find SO many cool ideas there every week, you'll wonder why you hadn't found it before!  Oh, be sure to tell Kim (Creator & Diva of TCB) HI and that Julie from JulieChats sent you!

Today's Creative Blog

Friday, February 17, 2012

One Little Word 2012

Hi!  After sharing my 'One Little Word' for this year...LEARN, I dove into the videos and materials included in the class of the same name by Ali Edwards that I'm taking over at Big Picture Scrapbooking.  I still have to do some of the January work and the February work too, but I have really enjoyed listening to Ali explain her prompts and the ways we can interact with our word this year and use it to motivate ourselves.


When I chose the word LEARN in January, I saw myself learning all sorts of new things this year.  In addition to learning to complete some of the projects piled in my studio, I am working on learning more about the software for my new Silhouette and of course finally taking the Jessica Sprague PhotoShop courses I purchased last summer.  In January, I embarked on a path to teach myself to knit.  Now, at that time, I wasn't too busy with my jobs and the kids were out of school.  Every night I see that bag with my little tiny piece of knitting in it, sitting next to my bed, begging me to learn my second knitting stitch.  But every night, I have to tell it, "Not tonight!"  Working late into the night with my transcription job doesn't give me much time to sit and teach myself to knit.  But I do have more time during the days for Jake and other projects when I can finish the typing at night, so I guess I'm just prioritizing.

After listening to Ali talk about the different ways our words may surprise us, I realized that I am not the only one around here who is learning this year.  Jake is in his first year of preschool and is learning how to write his name, what all the letters are, what a tornado is, how to get along with other kids his own age and maybe, if we're lucky, he's learning that we aren't trying to poison him every time we gently coax (force) him to try new foods that he ends up loving...the Tomato Basil Soup from Costco is now a favorite, even with the "little green things."

And then there's Delaney, sadly, a big learning point for her this year is disappointment.  She is learning to deal with not being chosen for things and how to deal with being left out.  I know that these lessons will serve her well, especially with middle school just around the corner.  But as a mom, I'd rather have my teeth pulled without anesthetic than hear that she has another disappointment this year.  She is so strong and is dealing very well with all this stuff.  For her, art is a calming distraction from real life.  In November, she began taking art lessons and it has been a great experience.  Her teacher, Jen, is a professional artist who has taught art to kids for years.  She just opened her in-home studio and Delaney was one of her first students.  Delaney has loved learning, in an in depth way, sketching, painting and mixed media.

After listening to Ali, I thought more about my word, LEARN!  As Ali said, we should all look around us and see how our word works in the world.  Now, I'm only looking around my own home, but I can see my word touching all of us!

Thanks, Ali!  And if any of you would like to join in the One Little Word class, just click the button above for more information.  You can join anytime until December 2012, and it isn't difficult to catch up on the prompts.   But don't feel like you have to cram them all in, it's a self paced class and I'm trying to remember to take my time and enjoy my word and the slivers of time that I carve out to spend on this project....

Thursday, October 14, 2010

Welcome Back...Special Announcement from JulieChats

Welcome back to my blog!

After taking a break for summer and a major absence of creativity over the summer, I'm back.  I worked a crop at Whimzee's the other night and started working on a fun new banner project for my studio space.  I'll share it as soon as it's finished!

I'm not exactly sure of the reason behind my break from blogging.  I guess it started after my 40th Birthday Mexico trip with two of my closest friends.  Before that, I had been working very hard since January, at blogging, working at the store, volunteering at Delaney's school, house sitting for my neighbors and being a mom-wife-friend to those around me.  I was also forcing myself to complete creative projects in order to submit them for design team consideration.

Thinking about my "Words" for 2010, see post about that HERE, made me rethink what I was doing and how I was going about it.  My "Words" are BELIEVE and ACHIEVE.  After spending countless hours over about six months and not being chosen for any of the design teams I had submitted creations for, I thought I should reconsider what I was doing.

First of all, I love creating!  I love sharing my creations with friends, family and blog readers.  Also, not all of my creations are scrapbook pages.  I love creating beautiful things for my home and as gifts for others.  I love how the papers & embellishments originally created for scrapbooks can be used to create things that I enjoy seeing hanging on my walls and adorning my surfaces everyday in my home.

One day it occurred to me that no one was paying me to write my blog or create projects for it.  I knew that there were a few who would miss my posts, but I had to start thinking again about my goals for this year.  One of them was to make some money to contribute to my family's expenses each month. The more I thought about it, the more I realized that I needed to separate my creative projects from my desire to make money.  Being totally honest with myself, I had to admit that it would be very difficult (or next to impossible) to make much money as a scrapbook blogger.  I know that people do use their blogs to make money and I give lot's of kudos to them for their efforts.  But with all my other responsibilities, I didn't have the amount of time I thought I would need to devote to making my blog a money maker.

So while I took a "Summer Break" from my blog and enjoyed the long days at home with Delaney and Jake and also some summer travel, I thought about how I could help my family and get my "creative mojo" back.  I think that turning 40 this summer was also a part of my re-examination of my choices. 

Speaking of turning 40, I decided to throw myself a Willow House home decor birthday party.  I invited friends and had them skip the gifts and get something for themselves.  My gift was all the great free items I received as the hostess.  My consultant, Darby, is also a friend of mine from the scrapbook store and a mom at Delaney's school.  She's great at her business, starting out 7 years ago with Willow House's predecessor, Southern Living at HOME, Darby retired from teaching a couple years ago to concentrate on Willow House full time.  She's now a Director, inspiring a team of more than 40 women, and making a great living, even earning a couple free vacations each year.  So I listened when she suggested, nonchalantly, that I would make the perfect Willow House Design Consultant.


My love of home decor, design, color and creating, along with my retail background (I have sold so many pairs of jeans at The Gap, that it would make your head spin...along with 1,000's & 1,000's of pieces of scrapbook paper.) all combined with my desire to help out with the finances at home, all contributed to my decision to join Willow House as a Design Consultant.

Into my second month with Willow House, I'm very happy with my decision.  This job allows me to be home with my two year old, volunteer at school, be a good wife-mom-friend, make some money and even have some time left for my creative endeavors.  I'm still house sitting for the neighbors and working part time at the scrapbook store, so I'm a pretty busy lady.  But I'm now able to separate my desire to help out with the home finances and from my blogging and my creativity.

So, yes, I'M BACK!  I'm excited to create again and share some fun home decorating items with you!  So join me here at JulieChats, as I embark on a new journey in my life!  Of course, I welcome you to join me on Facebook, where I keep a Willow House Julie business page.  And also on my Willow House website.  I promise not to be one of those pushy sales people, but to share things that I think will help bring beauty, creativity, simplicity and organization to your life!  When you see something you like, you're able to order it on my website where the entire Willow House catalog is available for purchase, along with our bargain-priced outlet for those among you looking for a deal...I love a deal, so I'll be sure to share as many of those with you as I can!

I'll try to post some new ideas each week, check back here for posts to inspire your creativity and home decorating in the coming holiday season.  But I'm not going to push myself over the edge trying to be sure I post something each and every week, so if you'd like to receive an email reminder when I post something new, be sure to click subscribe to JulieChats over in the right side column of this page.

I look forward to sharing my creativity and passion for decorating with you!  Thanks for sticking with me through this long break!  I look forward to communicating with you through comments here and messages on my Willow House Julie page.  Let me know what you're interested in seeing here or things that you need help with around your home, I'd be happy to help!!!! :)

LinkWithin

Related Posts Plugin for WordPress, Blogger...