Showing posts with label boy. Show all posts

Tuesday, January 28, 2014

DIY Lego Valentine Hearts to Exchange


Jake will be six this week and he's obsessed with Lego's.  While helping him put sort his pieces the other day, I had a thought that it would be cool to go non-traditional for class Valentines this year.    It's funny how I sometimes get these bright ideas without actually realizing a million people have probably had this idea before.  Wouldn't it be cool to make little hearts out of Legos for the kids in Jake's kindergarten class?!?!  Of course, I tried to make one from scratch and shockingly, I am not the best Lego creator ever!  So, I went to my trusty Google, where I realized quite a few people have gone before me in this quest.  I found a few ideas and after trying them decided on this pattern from instructables.com.


Jake wanted to help, so we sorted through his red Legos and didn't have enough to make the entire heart red, so a few of our pieces were white.  We liked the shape and the combination of colors, so we decided to make them for Jake's class and a couple other friends.


Then my daughter Delaney & I made a quick trip to the mall.  Having a Lego store with a "fill your bucket" area was super cool for this project.  You pick a large or small container (They probably measure about a 16 oz for a large cup and 8 oz for a small cup, but don't quote me on that! Price is about $7.50 for the small and $14 for the large.).  Then fill your cup with bricks of all sizes & colors from bins that cover the back wall of the store.  The employees are super helpful and shake your container or rearrange the bricks for you, so you can fit a couple more.  The trick is to put in a few large bricks and fill the wholes with little ones.  We counted the pieces in our sample and then chose red & white bricks to create that shape.  We did end up with different bricks because of what was available in our store, but the final product will be the exact same shape.  We are making 22 Lego hearts, after a 50 cent deposit credit for reusing one of our own containers and putting a $5 credit from my Lego VIP card toward the purchase, our total ended up being around 70 cents each.  If you don't have a Lego store near you, I did check the Lego website and found that you can order individual bricks HERE.  I am not sure exactly which bricks are available or how much the little hearts would cost doing it this way, but it looks like a good option.  There are 157 pages of individual bricks to explore and you can narrow that number by entering information such as category and color.


After making some of the hearts, I looked around the internet and ended up combining a few of the ideas I found and adding a little touch of my own.  I searched for free Lego clip art and came up with some fun little minifigure faces and a stack of bricks.  Being a self confessed hoarder of fonts, I searched for a Lego font and came up with Legothick from Urbanfonts.


I used my trusty Photoshop Elements to come up with my design for the tags and some cellophane bags I use for my custom Project Life cards.  And we're all ready for Valentine's Day!


I had planned on using the same little minifigure head on all four of my tags but then I came across the cute little girl with the eyelashes & red lips and couldn't pass it up.  So the little girls will get a girl and the boys will get the little smiling face.  Jake loved the one with the sunglasses, so I put that one next to his name on all the tags.  Download the FREE printable tags for your Lego Valentines HERE!


Don't worry, if you're in a hurry or can't find the bricks to create the hearts for your Valentines.  This idea works just as well with a little bag filled with miscellaneous bricks.  Buy a bin at Target or just grab some from your kids' stash...chances are they won't miss a few (maybe...)!

Happy Valentine's Day!


Check out this post and tons of other great Valentine ideas over on InspirationDIY.com:

Inspiration DIY

And, of course, don't forget to stop by my friend Kim's link party for
all sorts of inspiration...Valentine & otherwise!
Find it over at Today's Creative Blog

Friday, April 2, 2010

Layout of the Week - FRIEND chipboard mini album


I'm excited to share this week's Layout of the Week with you!  But first, I want to apologize for missing all sorts of blogging opportunities last week.  It was Spring Break here and we took Jake in to have hernia surgery on Tuesday.  We were expecting to be home that day, but our wise surgeon advised us to stay overnight in the hospital just in case the little guy needed some extra pain meds.  And thank goodness we did, those extra pain meds let him sleep through just a few of the MANY interruptions...I know that the wonderful nurses & residents have to check in on patients all night long, but boy, it sure would be nice if patients could get more sleep in the hospital.  So my schedule was thrown for a loop last week.  But I'm bouncing back this week, just like Jake...baby steps for both of us!  If you're in the Portland area & in need of an excellent Pediatric Surgeon, I highly recommend Dr. David Bliss.  He's done surgery twice now on Jake and he's a great listener, explains everything so even people who aren't medical geniuses (like he is!) can understand and he's saved the lives of countless preemies, infants, toddlers & kids!

So back to my project!  I created this mini album to celebrate Delaney's 8th birthday.  I did actually get it done a couple months ago, so she did get to see it before her 9th birthday!  I used Bo Bunny's My Word Chipboard FRIEND album and Basic Grey's Lime Rickey collection pack, plus a ton of fun embellishments to create a fun, bright colored album, perfect for Delaney's Tie Dye Slumber Party Photos. (Read all about our Tie Dye Slumber Party activities HERE.)

I used one of my favorite tips to squeeze a ton of photos into this small book.  I created photo collages with Costco's photo organizer program so I could cut them apart and put all different sizes of the tiny photos on my pages.  I love being able to create these collages and use so many photos in such a small format album.

Here are all the fun inside pages!


Of course, since it's Friday, you can join me over at Ann's for her Virtual Girls' Night Out!  I'll be celebrating mine by working the crop tonight at Whimzee's Scrapbook Studio in Beaverton...if you're in the area, call to sign up (we have a couple spots left) or stop by & shop, I'd love to meet you!  Be sure to check out our online community if you're in need of some extra inspiration, we have 300 project photos for you to enjoy!

Tips

Use Costco's photo collages to squeeze a few more photos into your projects!

Don't be afraid to mix it up with bright colors & patterns, it creates a whimsical page!

Use paint to coat the edges of your chipboard albums, it covers up any number of flaws in your (or my) paper cutting skills!

Supplies

Basic Grey Lime Rickey collection pack paper & stickers

Bo Bunny My Word Chipboard Album - FRIEND

So many embellishments...it would take a year to list them all, if you have a few you're wondering about, leave me a comment & I'll get you the manufacturer info.

Sunday, March 21, 2010

Happy 9th Birthday Sweet Delaney!


Happy Birthday Delaney!

My sweet, loving daughter turns 9 today!

I want to wish a very Happy Birthday to this wonderful, creative, athletic, intelligent, compassionate, thoughtful girl.  She makes a great daughter, big sister, friend, granddaughter...and so much more!

Your dad & I are so proud of everything you do!
And Jake, well, he says, "PLAY DEE DEE!!  PLAY DEE DEE!!"
:)

Have an awesome day and never forget how special you are!

PS-Kudos to Brooke at the Washington Square Sears Portrait Studio!  She took these wonderful photos of Delaney and so many more...of Jake also, even though it seemed we were pulling out all his teeth without anesthesia.  She somehow manage to make the phots look like they were both having a great time, not just Delaney!  So if you're in need of a photographer, give Brooke a call!

I'll share more photos & tell you more about Jake's fun Saturday in another post.
Wish us luck on Tuesday, Jake's having his second surgery for an inguinal hernia...first was at 5 weeks.

Friday, March 19, 2010

Layout of the Week - Family with Graphic 45 Papers & A Special Annoucement!


This week, as the sun shines outside here in Oregon, I want to share my family with you.  Dave, my wonderful husband,  is a sports fanatic who loves to play with his kids.  He managed to combine those this week...he got Delaney to fill out an NCAA bracket and then had Jake do one too.  Dave used blocks with the first letter of each team and had Jake pick his favorite of the two.  Yes, it took quite a while and Jake's bracket is full of M-named teams (his current favorite letter).  Poor Jake didn't fare well with Montana last night, but he still has a chance to beat his Daddy.  I keep telling Dave that knowing about sports really has nothing to do with winning with these tourney brackets.  On to Delaney, my beautiful, talented, creative daughter, will be 9 on Sunday.  Delaney is so well-rounded, she loves participating in all sorts of sports (those talents come from Dad), creating original, eye-catching art pieces and she's a "bit" of a perfectionist (that, I'm sorry, comes from me!).  She is thoughtful and loving, especially to her little brother.  So that makes Jake last.  Mr. Jake is now two and FULL of ENERGY!  He loves the movie "Cars," any every character in it.  We're missing Sally right now and he asks for "Yaddy" every chance he gets...I'm sure she's around somewhere, probably in one of Delaney's shoes.  We all love to hang out together and are very excited that the weather's warming up here!

So that's a bit of our story!  On to my layout...this design idea came to me a bit backwards.  Usually I have a photo and then come up with a layout.  OK, sometimes I have a paper collection that I love and take photos to go with it.  This time, I was inspired by a pile of mismatched Graphic 45 papers laying all over my counter while I was creating projects for the Graphic 45 design team call.  Seeing these papers, most are the backsides, reminded me of a patchwork quilt.  I thought & thought about how to combine them and came up with using a brown background and my favorite sepia tone photos.  I didn't shoot a new photo for this page, I remembered that my mother-in-law shot some photos of us when she was visiting in early December.  This one was almost our Christmas card photo, but it didn't quite make the cut.  We were very excited at the time, being huge Duck fans and having just attended one of our most exciting games ever...the Civil War win over the dreaded Beavers!  So we decided to have a Duck theme Christmas card.  Even though we didn't use this photo, we found some even more fun Duck photos of all of us.  My trusty sepia tone came into play because dark green and almost neon yellow don't exactly match the Graphic 45 color scheme.

Since I had been thinking of this project as a patchwork quilt, I searched the internet for patchwork quotes.  I found a few that combined the quilt idea with the family idea.  I didn't find one that fit my thoughts exactly so I made up my own.  I didn't want a big wordy journal box or title on this one, so I used photoshop to print my quote right on top of my photo.

For the patches, I cut my papers to 2 1/2" square and then used a ruler to gently fold the edges in 1/4" on each side.  I tore upward along these folds so the white would show on the edges.  Next I inked the edges with brown ink.  I used one little Hermafix square on the back of each square and placed them on the brown background, leaving an area in the bottom right corner for the photo.

This was my very first attempt at machine stitching on a layout.  I'm pretty excited with the results.  I had been planning to give it a try.  Dave put a table in the laundry room for my sewing machine and I dug the poor thing out of one of the "holes" or storage closets in the bonus room.  It had been in there more than 5 years.  I was surprised it worked at all.  I searched the internet for ideas on machine stitching and found tons of them.  So I experimented with an extra sheet of my background paper and extra little squares.  I adjusted the tension, stitch width and lenght, writing each of the number combinations next to that particular stitch on my sample sheet.  When I found one I liked, I used it.  I chose ivory thread for this project.

After sewing around the page twice, I decided to create my own embellishment for my title.  I cut a piece of patterned paper twice as long as my photo, tore it leaving a white edge, inked it with the brown and folded it into pleats.  I used the same straight stitch I used on the whole page to stitch my pleats together.  I went over the pleats twice.  Next I stitched down my brown ball fringe ribbon.  For the title, I inked the edges of the Graphic 45 letters with black and adhered them with pop dots.  To attach my homemade embellishments, I used glue dots.

I was very happy with how this layout turned out.  I loved machine stitching and can't wait to use it again!  Next time you're together with your family, shot a photo and remember to create a layout to celebrate these special people!

*   *   *   *   *   *   *   *   *   *   *   *   *   *   *   *   *   *   *   *   *   *   *   *   *   *   *   *   *   *   *
SPECIAL ANNOUNCEMENT!

I want to share some exciting news with my readers!  I am now a featured writer on the Oregon Women's Report website.  I am writing a series of fun, anecdotal stories about scrapbooking.  I'd love it if you'd stop by over there and read my first one!  I'm planning to post each article here also.  I'll post one in both places every two weeks or so.  If you're from Oregon or just interested in all the cool women writers on the site, sign up to receive updates from OWR in your inbox.  Thanks! :)

Don't Forget!  Join me at Ann's tonight for Virtual Girl's Night Out!  Stop by to join in the fun, meet lot's of great women bloggers (and sometimes some male bloggers too!), hop around the internet leaving comments and getting some for yourself too!

Tips

Of course, use sepia tone or black & white to help your photos blend with your chosen papers.

If you're looking for a new way to include journaling in your layouts, give photoshop a try!

Look at the backsides of your papers, they might inspire a layout all by themselves.

Think about creating your own embellishments.

If you've got a sewing machine, try machine stitching!

Supplies

Graphic 45 papers...from all different collections, most are the backsides.

Graphic 45 alphabet letters

Bazzill brown ball fringe ribbon

Dark Brown Ink - Cat's Eye ink pad

Ivory thread for machine stitching

Wednesday, December 23, 2009

Layout of the Week - 'Tis the Season!


I'm so sorry I missed posting this layout as my Layout of the Week for last week!  Forgive me!  I was 'a bit' crazy trying to send out packages, cards & deal with Delaney's class party.  Oh, gee, I can hear so many of you who know me saying, "Shocking, Julie took on too many things at once!"  OK, I admit it, YES I DID!  But it's all over now & I'm on to taking on too many baking projects in one week!  But boy those cookies sure taste good!  Apparently my problem with not knowing how to say NO extends to cookies too!

Well, this layout is one of my favorite recent projects.  It's a photo taken last Christmas of Jake in his Christmas jammies just after he opened his Toy Story phone.  He was SO excited!  Who knew he would later eat off the number sign & I would have it handed to me by the nice lady who works in the nursery at our church.  She just laughed, having a little guy just a month older than Jake.  Then she told me what Delaney had said when she found the rubber key in his mouth, "You know, I told Mommy that the phone says it's for ages 3 and up!"  Out of the mouths of babes....  But still, his expression and those two teeth are priceless.

As far as the layout goes, the wood background is from LUXE (which sadly has closed up shop) and the other papers are new this year from Creative Imaginations.  I used three colors & two sizes of the Mark Richards mosaic tiles on this one, along with two different sets of THICKERS.  I'm always trying to create just one more title out of a set of these and darn if I don't use each set on 3 or 4 layouts!  Just mix & match if you don't have enough to write out your whole title.  And if you're, just a bit psycho, about color like I am, don't be afraid to paint them or just add a coat of glitter glue to them.  On the " 'tis," I used red paint & red glitter.  On the "season," I left them brown & added a coat of red glitter.  The "the" is created from Mrs. Grossman's stickers, an old set I have used many times.  The cute little letters at the bottom are some of my current faves from My Little Shoebox.

And do take a look again at Mr. Jake's darling smile, my next post will be yesterday's visit to Santa and he certainly isn't the one smiling!

Tips

Again, I'm mentioning Costco, but they really do make great large prints, like this 8 x 8 one.  Give them a try for your next printing job.

Don't be afraid to mix your font styles in your titles.  Just stay with one or two bold ones and try to stay with the same color or coat of glitter.

When mixing patterns, try a few large rectangle blocks on your page and round the corners for a unique look.

Supplies

Background paper - LUXE Designs - :( not around anymore
Patterned papers - Creative Imaginations
Tiles - Mark Richards
Titles - THICKERS - American Crafts
            Mrs. Grossman's
            My Little Shoebox

Thursday, October 22, 2009

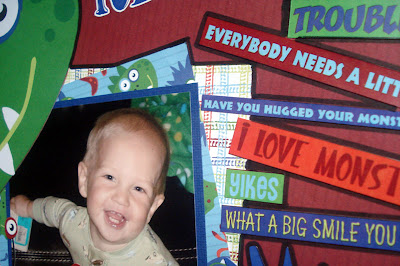
Layout of the Week - Our Little Monster


When I first saw the new Monster collection from Reminisce, I just knew I had to use it for a new Jake page. I had just taken some funny photos of him. Our own little monster turns into a tornado every day. The little tornado moves quickly across the living room to the hearth, where we store his toys, grabs things and starts dumping, tossing, throwing them across the room. He plays & plays in the middle of this mess. We reorganize & straighten up his stuff about five times everyday. All the little cars in their container, books stacked nicely, balls in the toy box, etc. And then he wakes up! And it's back to tornado mode! So one day, I decided to take photos of all the little messes he made that day, all over the room. Of course when I looked at the photos, the room didn't really look as messy as I thought it did. But still, picking up the same toys so many times everyday, I guess it just adds up!


I used my new favorite embellishment on these pages! I outline the edges of paper, stickers & photos with the thick end of my black Zig Writer. I love how the black helps make things on my pages stand out.


The pages have so much going on with all the color & pattern of the paper and stickers. And then there is also the size of the stickers to take into consideration. I wanted to add a little more embellishment, so I added a ribbon to the tag sticker on this page. It gives a little more dimension to the page, while not competing with all my other elements.


That day, as I was photographing his disaster, he just stood, leaning against the couch, smirking at me, as if to say, "Look how cute I am! There's no way you can be made at me about this!"

But wait...could he be turning over a new leaf? As I'm writing this, he just brought me the Swiffer Sweeper, out of the coat closet & had me turn it on so he could vacuum...we'll see...

Tips

After you finish a layout, add a thick black outline to some of your page elements to help them stand out from a busy background. I use the thick end of a black Zig Writer.

Try adding a thin solid color ribbon to your page, for a little extra dimension that won't take away from your page design.

Don't be afraid to cover up portions of your photos with large scale stickers.

Use a few smaller photos or wallets (as I've done here) grouped together. They give the feeling of one large photo, while telling more of the story than one photo would.

Supply List

Reminisce Monsters collection papers and 3 different sheets of Monsters self adhesive stickers: words, tags & journal boxes & large monsters

Thin Grosgrain ribbon, navy & orange

Zig Writer, black

Friday, September 18, 2009

Layout of the Week - Tropical Jake


The photo on this page is the best one I've ever taken of Jake. I knew it was as soon as I saw it on the digital camera screen. Such a cute little boy! I wanted to create a special page for this photo and when these Best Creation papers came in, I knew they were the ones to use. A little sparkle & glaze adds a fun dimension even to a "boy page". I mounted the photo on two layers of cardstock, turquoise and dark brown. I wanted to draw extra attention to the photo with the busy-ness of the photo. I couldn't find an embellishment that really spoke to me. But I did find some pop out die cuts of arrows from Scenic Route. The color palette of the arrows didn't match my papers or photo, which went with each other very well. So I traced my favorite arrow onto the striped paper and cut it out. Then I used my exacto knife to cut a slit along the circle just large enough to slip the end of the arrow through it.

I really liked how the layout looked but something was still missing. I needed to draw a little attention to the arrow, so I drew an outline around it with my dark brown Zig pen.

Even though this layout was very simple and quick to complete, I think it has a bold modern look. So when you're looking for papers for a "boy" page, don't overlook the sparkly, glazed ones...they may be perfect for your project!

Don't forget to snap tons of photos! It will increase the odds of getting just the shot you're looking for!

Tips

Use cardstock mats and arrows to set your photo apart.

Try outlining your photos or embellishments with a thick pen. They'll stand out quickly and for FREE!

Don't dismiss sparkly, glazed papers for your boy pages, take a second look.

Supplies

Best Creation paper

Friday, September 11, 2009

Layout of the Week - Kraft Kuts Boy Layout


I created this week's Layout of the Week as the right half of my last Layout of the Week. I wanted to have pages of both my kids on their swings. The two layouts make a nice double page spread. But either layout could also stand on its own.

For Jake's page, I used the same basic layout as Delaney's: a gold background for the Kraft Kuts bracket die cut paper, a single tinted 4 x 6 photo, matted, journal strips and silver nailhead accents. I really like how the Fancy Pants Kraft Kuts collection has both girl and boy papers.

I printed the photo for this page in color, sepia & blue tint. I really liked how the blue tint looked with the papers used on this page.

I used the same journal strips on this page, but at first, I wasn't sure what to write on them. When I thought about writing on Jake's page, I knew I wanted to write something about his swing. Since he's too young to interview about it himself, I thought it would be fun to ask Delaney his questions. It was a lot of fun to listen to her answers about her little brother.

Tips

Use one of the large die cuts that are all the rage right now and center it on a solid cardstock background. These die cuts can also be cut in half or quarters and placed on a solid background.

Create a cohesive layout across two pages by placing the same embellishments on both pages. Nailheads are used in the center of the shapes in the die cuts on both pages.

For a new twist on journaling, try interviewing a sibling of a child too young to talk for himself. It's a lot of fun to hear another point of view, especially one of a chatty little kid!

Supply List

Fancy Pants Kraft Kuts Collection Star Bracket die cut paper
Cardstock in Gold
Cardstock in Navy & Green
Silver Nailheads from Mark Richards
Tinted Photo printed in pink at Costco.com

Don't forget to check out Ann's Virtual Girls' Night Out! My favorite place to party on Friday nights...at home in my pj's anyway! :)

Tuesday, June 2, 2009

Layout of the Week - Balls, Balls, Bouncy Balls


OK, I know I've been a slacker for the last couple weeks! Sorry about that, after everyone was sick, we had a huge garage sale last week! I promise to try to keep up!

Here's the layout of the week I started working on on May 20....

Hi there! Just a quick note to say sorry for not getting a Layout of the Week published last week! We had a lot of sickies around here, starting with little Jake last Wednesday. I think we're out of the woods now. I'm ready to get back to my schedule this week...if I can get all the laundry that's been piling up done!

I LOVE this photo! This was Jake's first experience with grass. On a warm, sunny day, he wandered all around the yard. Then when he just sat down. He reached out to get up and as soon as he felt the grass, he looked back & forth between each hand. We watched as he sat in the same spot for about 20 minutes.

It was so cute to watch him think about what it was that he was touching and how he was going to get himself up. Of course he didn't end up getting himself up, he screamed and we came to his rescue.

While Jake sat for so long, I had the perfect chance to snap some photos of him and his beloved ball. He's all about the balls, footballs, soccer balls, basketballs. This one is one of Delaney's wallball balls. It's the perfect size for him, so he carries it all around when we're outside.

This photo will always remind me of him sitting in the grass for the first time and how he is obsessed with balls. I wanted to do a layout with just this photo to show how important it is to me. I knew the layout would be all about balls. So I looked around the store. I searched for paper with all sorts of sports balls and paper with circles. Since I know I will have many chances over the next few years to do sports pages for him, I chose paper with circles. These papers are from the Celebration Collection from American Crafts. Their names are DJ and Disco Ball. I liked the primary colors and the arrangements of the circles on each paper.

After choosing the printed papers, I chose coordinating solid textured cardstock from American Crafts. I used it to mat my photo and then cut some fun circles from it on the Cricut. I used a small circle (made of smaller circles) stamp from Technique Tuesday and a Versamark Stamp Pad to create a little extra dimension on the circles. Then I arranged them in a kind of hap-hazard / planned way. I like to mix their colors and sizes in a layout like this. I used the Pooh Font and cut my title on the Cricut. And to make application of the letters easy, I ran them through my Xyron adhesive machine. I have the 2.5" one, it's awesome! I find I use it more & more....always being in such a hurry when I'm working on my projects!

I do apologize it's taken me so long to get back to my "Layout of the Week" series. Maybe I should call it "A Layout Every Once in a While!"

Wednesday, May 6, 2009

Layout of the Week - All Boy / All Girl


For this week's Layout of the Week, I thought I'd share my samples for the kits I put together last Friday. After my crazy morning Friday, I managed to squeeze a couple layout samples into my day. I wanted the layouts to be very simple & quick. I finished these two double page spreads in just under an hour, including running upstairs to get my xyron adhesive create a sticker machine & chatting with Dave when he came home from work. So if you've got all your supplies ready & no family interruptions, you could complete these layouts quicker than I did. I'm planning to use sepia tone photos on these layouts. Using sepia or black & white photos is handy when you're putting together your layouts without knowing which photos you'll be putting on them. I'll probably use a large, possibly square photo on the left side of each layout. Then on the right side, I'm thinking that 4 smaller photos (possibly square also) would look nice arranged closely together.


For those of you in the Portland area, the kits are available at Whimzee's Scrapbook Studio in Beaverton. Check our blog for more information & directions to the store. While there, you can sign up to receive our bi-monthly email newsletter filled with new products, tips & events at the store. The kits are filled with $10 worth of products that you can use to create 2 double page spreads or 4 individual pages for ONLY $5! The printed papers are by My Mind's Eye. The kits include 4 double-sided printed My Mind's Eye papers, 4 coordinating die cuts, 4 pieces of cardstock, 4 ft of coordinating ribbon & 4 buttons.


For my sample layouts, I used the cardstock as my background and cut the printed paper into 1, 2 or 3 inch pieces. I used my QuicKutz die cutting system and its Diesel font & shadow for my title. Using the strips to create the same layout for each double page spread allowed me finish it quickly. I looked at the papers and quickly decided which pattern to cut into each size, I cut the largest pattern into the 3" strips and then cut both the 2" & 1" strips from the other patterned piece (I used one pattern for the 2" pieces and then the pattern from the reverse of that sheet for the 1" strips.)


Give the strip technique a try in your next layout for a quick & easy page.

Monday, May 4, 2009

What a morning...

OK, I didn't mean to leave everyone hanging with my "almost lit the house on fire" comment on Friday. Well, maybe I did, just a little!

Friday morning was just one of those mornings. Jake woke up at 6am, ready to roll. He & I hung out a while and then I took him in the bathroom, closed the closet door, gave him tons of toys & took a quick shower. After my shower, Jake & I went and woke up Delaney. She & Jake watched TV while I dried my hair. It was getting a little late when we headed down for breakfast. Toast was on the menu and everyone was hungry. I popped a couple pieces of bread in the toast, grabbed plates & toppings. Jake is a cinnamon toast guy and Delaney changes her mind a lot. Friday was a Nutella day for her. I try to switch her to peanut butter on school days, it just seems a little healthier, no chocolate.... But being in a hurry, I just said, "Fine."

While Delaney & I discussed toast toppings, Jake sat in his high chair screaming for his breakfast. So when the toast popped up, I grabbed his, buttered it, put the cinnamon sugar on top & cut it into little squares. I smelled something funny and thought maybe the toaster had overheated, so I unplugged it. I ran Jake's toast over to Delaney who was sitting by the screaming little guy, ready to toss him one piece at a time, so we wouldn't have a choking incident in the middle of our rush to get to school on time. Jake quieted down with the first bite of toast in his mouth and I headed back to the toaster to get Delaney's piece.

While at the toaster, out of the corner of my eye, I caught a glimpse of a big black circle. (Here's a little background info: I have one of those flat top, ceran stoves. It's black and seeing it dirty all the time, even right after cleaning it, drives me crazy. So my solution to this has been to put a nice clean, crisp white towel from Williams-Sonoma on it. This solution has worked perfectly, for almost three years.) Back to my big black circle....I quickly turned & saw that my clean, crisp white towel had a big black circle in it. Suddenly there were glowing orange embers inside the circle. I grabbed the towel, threw it toward the back of the stove, turned off the burner. Then I snatched the towel and ran out to the garage. In the garage, the towel burst into flames, I dropped it and stomped on it. Then I picked it up, took it outside, put it on the back sidewalk and ran water over it with the garden hose. I'm not sure how the burner got turned on, I guess I bumped up against it. The huge dual burner had been turned on high when I got to it. I'm so thankful that I caught the soon to be on fire towel before it burst into flames in my kitchen. At least I made it outside and hosed it down before any damage was done. Problem solved.

Or so it seemed. I headed back in to finish Delaney's toast & the house was full of smoke. Poor Delaney was coughing and asking what was wrong. I explained the near kitchen fire, as I opened all the windows. Finally I finished her toast and she was able to start eating breakfast. Needless to say, we left for school much later than usual! But somehow, Delaney made it to class without a "red slip" (tardy slip).

I could finally relax for a minute and take some deep breaths on my way to get groceries for my Cinco de Mayo enchiladas. It turned out I really needed those deep breaths. I didn't think my morning could get worse until the Starbucks guy told me, "We're all out of coffee!" Seriously, Starbucks is out of coffee?

Then, after filling up my grocery cart & entertaining little Jake all through the store, Safeway could only manage to have one checkout line open with the 8 people & their full carts in line. Leave it to me....I marched down the aisle and asked the two obviously Safeway employees if they worked there. And embarrassed supervisor answered, "Yes," as I explained the customer service faux pas I was stuck in....

Really, was this my morning, yes, doesn't it make everyone want to be one of those "Work At Home Moms"? Stressed out & tired already at 10am, I headed home to deal with my over-tired little guy, car full of groceries, house full of smoke, scrapbook kits to put together, layout samples to create and 2 pans of enchiladas to make. If only I could just sit & watch soap operas & eat bon bons all day! A girl can dream!

Monday, March 30, 2009

I need a vacation from my vacation...

After our trip to the Seattle area, the kids & I finally made it home late Saturday night. It didn't take too long into the trip for me to start wondering whether I was the one who was on vacation. Maybe it was Dave...home alone after work watching all the games of the NCAA tournament, quiet house, sleeping however many hours in a row he chose...yes, Dave was the one on vacation! I did learn that traveling with a 14 month old and an 8 year old has its challenges. Like getting them both breakfast at my friend's house, while listening to Jake scream! Like being responsible for packing & unpacking everything, while hoping Delaney & my friend Laura could keep the little guy happy & away from the sorts of dangers a curious boy can find in a new place! I could go on & on...but then it would seem like the vacation wasn't any fun. We definitely had lot's of fun! I'll fill you all in on the details later...I've gotta go get the vacation laundry started.

OH, and there is some NEWS...Jake started walking all over the place during the trip. He LOVED the ferry trips and I think the rocking & vibrations of the boat really helped him keep his balance and have the confidence to toddle all over the boat making lot's of new friends!

Off to the laundry! :)

Wednesday, February 18, 2009

Wordless Wednesday


One of the MANY pictures from the kids' "photo shoot" at Sears. We had them taken right in between his 1st Birthday and her 8th Birthday. I love this one! He's really excited that sissy is kissing him, even if it doesn't look that way. He gets that look on his face just before he does the Cabbage Patch with his arms....it's his way of showing how excited he is about just about everything! I'll post a slide show of these pictures soon, they're just all so cute I can't seem to whittle them down to a manageable amount!

Happy Wednesday!

LinkWithin

Related Posts Plugin for WordPress, Blogger...