Tuesday, January 28, 2014

DIY Lego Valentine Hearts to Exchange


Jake will be six this week and he's obsessed with Lego's.  While helping him put sort his pieces the other day, I had a thought that it would be cool to go non-traditional for class Valentines this year.    It's funny how I sometimes get these bright ideas without actually realizing a million people have probably had this idea before.  Wouldn't it be cool to make little hearts out of Legos for the kids in Jake's kindergarten class?!?!  Of course, I tried to make one from scratch and shockingly, I am not the best Lego creator ever!  So, I went to my trusty Google, where I realized quite a few people have gone before me in this quest.  I found a few ideas and after trying them decided on this pattern from instructables.com.


Jake wanted to help, so we sorted through his red Legos and didn't have enough to make the entire heart red, so a few of our pieces were white.  We liked the shape and the combination of colors, so we decided to make them for Jake's class and a couple other friends.


Then my daughter Delaney & I made a quick trip to the mall.  Having a Lego store with a "fill your bucket" area was super cool for this project.  You pick a large or small container (They probably measure about a 16 oz for a large cup and 8 oz for a small cup, but don't quote me on that! Price is about $7.50 for the small and $14 for the large.).  Then fill your cup with bricks of all sizes & colors from bins that cover the back wall of the store.  The employees are super helpful and shake your container or rearrange the bricks for you, so you can fit a couple more.  The trick is to put in a few large bricks and fill the wholes with little ones.  We counted the pieces in our sample and then chose red & white bricks to create that shape.  We did end up with different bricks because of what was available in our store, but the final product will be the exact same shape.  We are making 22 Lego hearts, after a 50 cent deposit credit for reusing one of our own containers and putting a $5 credit from my Lego VIP card toward the purchase, our total ended up being around 70 cents each.  If you don't have a Lego store near you, I did check the Lego website and found that you can order individual bricks HERE.  I am not sure exactly which bricks are available or how much the little hearts would cost doing it this way, but it looks like a good option.  There are 157 pages of individual bricks to explore and you can narrow that number by entering information such as category and color.


After making some of the hearts, I looked around the internet and ended up combining a few of the ideas I found and adding a little touch of my own.  I searched for free Lego clip art and came up with some fun little minifigure faces and a stack of bricks.  Being a self confessed hoarder of fonts, I searched for a Lego font and came up with Legothick from Urbanfonts.


I used my trusty Photoshop Elements to come up with my design for the tags and some cellophane bags I use for my custom Project Life cards.  And we're all ready for Valentine's Day!


I had planned on using the same little minifigure head on all four of my tags but then I came across the cute little girl with the eyelashes & red lips and couldn't pass it up.  So the little girls will get a girl and the boys will get the little smiling face.  Jake loved the one with the sunglasses, so I put that one next to his name on all the tags.  Download the FREE printable tags for your Lego Valentines HERE!


Don't worry, if you're in a hurry or can't find the bricks to create the hearts for your Valentines.  This idea works just as well with a little bag filled with miscellaneous bricks.  Buy a bin at Target or just grab some from your kids' stash...chances are they won't miss a few (maybe...)!

Happy Valentine's Day!


Check out this post and tons of other great Valentine ideas over on InspirationDIY.com:

Inspiration DIY

And, of course, don't forget to stop by my friend Kim's link party for
all sorts of inspiration...Valentine & otherwise!

Find it over at Today's Creative Blog

Tuesday, January 14, 2014

December Daily 2013 with the Heidi Swapp Believe Memory File Album Days 6-15


As always, for me, creativity is messy!
I got to work catching up on my December Daily today.  I have all the photos edited and uploaded and most are printed.  All but a couple journal cards are written on.  Pretty good, since I'll be sharing my 2012 December Daily soon (just finished it in December 2013).  So, you see why I'm so happy with how much I have done this year!  I keep my supplies in a couple little bins and a ziplock bag.  I chose everything to match my Believe collection from Heidi Swapp...red, lime-ish green, black, white, and some gold & silver thrown in for good measure...stamps, ink, ribbon, twine, stickers, washi, whatever I could find in those colors went into the little containers or baggie.  Then I knew it wouldn't be too difficult to throw together a few pages when I had time.  Of course, my time didn't free up until the second week in January.  But, I think that's how it is for a lot of us.  We're so busy with family, friends, parties, making gifts, cleaning house, etc. during the holidays that these projects can easily get tossed into that box of 1/2 finished projects.  I did really try to keep up on the photos this year though, so at least I'd have the photos to go by when the time came around.  So, here's what I have for days 6-15. I get to work on the rest and be back to share soon!


I'm continuing to use the cute little countdown cards that Heidi posted FREE on her blog this year as overlays, printed on vellum, topping my Technique Tuesday Story cards. I love seeing all the Christmas prettiness on my pages before seeing the handwritten cards. And maybe people will have to stop & look around a bit before they find the journaling.


I added a cute little word grain tag to this one! And I love the die cut, so my photo from Day 7 can peek through.


The 7th was a fun day! My daughter, Delaney, teaches a monthly kids class at the scrapbook store where I work, here in Beaverton, Oregon. She has a great time! Then after, we snuck out for some Christmas shopping & lunch, just us girls.


I added some sequins and silver ink to give this page a little flair. I attach my sequins with mini glue dots. Wet glue might work too, but I design these pages quickly & move on to the next...no time for glue to dry.


I'm having fun using Heidi's little ephemera pack in this album!  It's SO nice to have all my embellishments ready & waiting in a little baggy! I poured all the ephemera into a baggy and separated the black number stars, just so it's easier to find the number I need for each page without going through the entire bag!


What goes with December more than a blinking Rudolph nose...


Or a neon green wig!?
For the main embellishment on this page, I used one of Heidi's Freebie tags I had printed from last year. I trimmed it and adhered it to my very favorite red...Kisses from the Vintage Collection by Core'dinations. Then I left a little border and trimmed around the tag. Kisses matches tons of reds from many designers and adds just the right amount of texture to my projects even without sanding or tearing it.


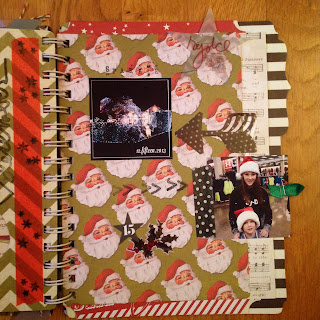
We had the tiniest dusting of snow late at night on the ninety...it just so happens that was the week Delaney's dance studio was holding secret practices until 10pm every night for flash mob at Zoo Lights Saturday night. So, she had to make a barely visible snow angel in the driveway before going to bed with her clothes on inside out while praying for a snow day!


This cute little tag in the middle of the book was perfect for a little pile of ephemera & embellishments!


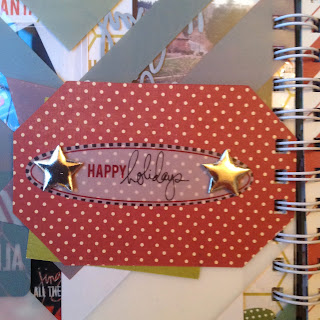
For the back of the tag, I chose a little vellum sentiment and a couple puffy silver stars. The stars are from a yard of trim I bought at a local fabric store. (Mill End, if you're looking in the Portland area.)


I was super excited about this bracket page with the little window for Day 10.
Since I hadn't used any garden type twine yet, I added some here in a little pile, under my acrylic "joy" piece from the ephemera pack. I think it's a little unexpected to mix such a slick, shiny, clear piece with a tangled pile of twine...that's why I LOVE it!


When you open the little flap, you find some fun photos & my journaling card with its Countdown topper for Day 10.


Day 11 has a fun little stack of photos...a selfie...trying to get myself in my albums...a photo of our backyard on this cold, icy and SUNNY day! Plus, a shot of my Christmas mantel.  Each day I'm including photos from the #heidiholidayfotofind. This is a little photo scavenger hunt, where we had a different theme each day and posted our photos on Instagram everyday. Today's clue was #wrapping paper. This year, I covered the frames on the wall above my mantel with kraft wrapping paper. I borrowed this idea from a friend who's a Super Star decorator!


On the next little tag, I added some really old ribbon and a little piece of ephemera.
I ALWAYS keep ribbon. Ribbon from packages, gifts, store packaging...anywhere really. I have two wire farm baskets on the wall above my desk in my studio. I just toss whatever I find in there & dig around whenever a project comes up. I almost always have a ribbon that will work for my project!


On the backside of the little tag, I placed my journal card & overlay.


Somehow I only had a couple photos for this day...and my kid are perfect examples of the Heidi foto find...#naughtyornice. You'll see I'm using a lot of washi in this album. This is a concerted effort to use some of those rolls I've been collecting.


This page has some stamps from the Technique Tuesday Ali Edwards December Daily collection from 2012 and also some of her new flair, just for Christ.


In addition to the Ali stamps, I have a cute little tags from Chic Tags here too!
Just a little tip...that tag is covering a stamp that didn't come out perfectly the first time! Don't forget, you're tiny tags are perfect for occasions like this! Don't forget...there are no mistakes, just opportunities to improve your project! 

Such a busy day...our 5 store tour, Passport to Creativity's holiday party was on the 14th and I had to leave early to get Delaney and some of her friends to the zoo in time for the flash mob proposal they were dancing in! Oh and Dave took Jake to watch a Duck basketball game at the arose Garden, the rode Max & got to see the tree at Pioneer Square too!


I used a super festive digi scrap kit from The Daily Digi's November collection to create this flier that was also printed as a poster.


I stamped some solid red Target washi with black Stayz On ink and some little stars from the 2013 Project Life class at Studio Calico.


For a change of pace, I hung this photo off the edge, just so you'd see the kids faces as you looked at a few pages before this one. I added a little green tab with ribbon & my trusty stapler.

Small projects like this are some of my favorites!
I love the feeling of accomplishment I feel when I actually FINISH a project!
So, don't just look at this album as exclusively for December.
You could put together a small album for all sorts of occasions...trips, anniversaries, birthdays, family, friends. The possibilities are endless, just be sure to limit your color palette and gather just a few embellishments in that palette and you're ready to add them to a small album, along with a few sheets of coordinating paper.

Until next time, don't forget to #makeityourown!

LinkWithin

Related Posts Plugin for WordPress, Blogger...