I know most of you probably read my post about my husband Dave's best friend, Brent. Brent passed away 6 years ago from Non-Hodgkins Lymphoma. He was passionate about raising money to help others with the disease and so we participated & fundraise for the Leukemia & Lymphoma Society's Light the Night Walk. Our local walk is held here in Portland each October. I typically fundraise for a few months before the walk and then put it out of my mind for another year. This year, however, I have a special reason for sending out one last fundraising reminder. An anonymous donor has stepped up and offered to match all donations received by LLS by December 31st, up to $100,000! I'm very excited about the prospect of such a wonderful organization receiving such a generous gift! So if there is any way you can donate, in any amount, no matter how large or small, your gift will be doubled this year!
Please take a look at my fundraising page for a bit of Brent's story and to see the last photo of he & Dave. And click HERE to read the flyer about the anonymous donor's offer.
Thanks so much for taking a few minutes to learn about our friend and the organization he was so passionate about! Enjoy your family and friends, and take a moment to remember those close you who are no longer with you, this New Year!

Tuesday, December 29, 2009


Wednesday, December 23, 2009
Layout of the Week - 'Tis the Season!

I'm so sorry I missed posting this layout as my Layout of the Week for last week! Forgive me! I was 'a bit' crazy trying to send out packages, cards & deal with Delaney's class party. Oh, gee, I can hear so many of you who know me saying, "Shocking, Julie took on too many things at once!" OK, I admit it, YES I DID! But it's all over now & I'm on to taking on too many baking projects in one week! But boy those cookies sure taste good! Apparently my problem with not knowing how to say NO extends to cookies too!
Well, this layout is one of my favorite recent projects. It's a photo taken last Christmas of Jake in his Christmas jammies just after he opened his Toy Story phone. He was SO excited! Who knew he would later eat off the number sign & I would have it handed to me by the nice lady who works in the nursery at our church. She just laughed, having a little guy just a month older than Jake. Then she told me what Delaney had said when she found the rubber key in his mouth, "You know, I told Mommy that the phone says it's for ages 3 and up!" Out of the mouths of babes.... But still, his expression and those two teeth are priceless.
As far as the layout goes, the wood background is from LUXE (which sadly has closed up shop) and the other papers are new this year from Creative Imaginations. I used three colors & two sizes of the Mark Richards mosaic tiles on this one, along with two different sets of THICKERS. I'm always trying to create just one more title out of a set of these and darn if I don't use each set on 3 or 4 layouts! Just mix & match if you don't have enough to write out your whole title. And if you're, just a bit psycho, about color like I am, don't be afraid to paint them or just add a coat of glitter glue to them. On the " 'tis," I used red paint & red glitter. On the "season," I left them brown & added a coat of red glitter. The "the" is created from Mrs. Grossman's stickers, an old set I have used many times. The cute little letters at the bottom are some of my current faves from My Little Shoebox.
And do take a look again at Mr. Jake's darling smile, my next post will be yesterday's visit to Santa and he certainly isn't the one smiling!
Tips
Again, I'm mentioning Costco, but they really do make great large prints, like this 8 x 8 one. Give them a try for your next printing job.
Don't be afraid to mix your font styles in your titles. Just stay with one or two bold ones and try to stay with the same color or coat of glitter.
When mixing patterns, try a few large rectangle blocks on your page and round the corners for a unique look.
Supplies
Background paper - LUXE Designs - :( not around anymore
Patterned papers - Creative Imaginations
Tiles - Mark Richards
Titles - THICKERS - American Crafts
Mrs. Grossman's
My Little Shoebox
Friday, December 11, 2009
Layout of the Week - Christmas Past
Sorry I've been away so long! In the middle of my holiday prep and school holiday party prep that I haven't posted a Layout of the Week yet. I have a couple Christmas projects all ready to go, just haven't written anything about them. Time sure flies by this time of year. And maybe I forgot because my fingers have been too cold to type! It finally "warmed up" this morning...my car said it was 15, for the last few days it's said 12 on the way to school. I know that many of you are laughing at me right now, you know who you are...you're from the Midwest, Canada or maybe Antarctica! But really, I'm in Portland and it doesn't get cold like this here for this long! OK, we did have snow on the ground for 3 weeks last year, but that was a fluke...or climate change. Of course just as many of you just ran to get your coats when you read 12, you're from SoCal, Australia or maybe the Sahara! But I'm tired of pasting my daughter with Burt's Bees Lip Balm & that smelly, but wonderful hemp cream from The Body Shop. And who wants to wear long johns under their clothes to school everyday? I'm sure some of your kids do, but they probably also get to play in the snow at recess, we have no snow, just cold and a pond that's frozen over in our backyard.
Well, that's enough of me complaining, it certainly isn't that I'd like rain better, no way! I just want summer back whenever it's convenient for me!
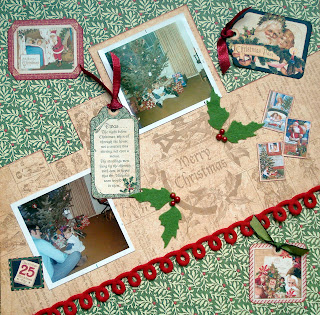
I think it's time to share one of my recent creations! I created this layout with Graphic 45's Christmas past collection. My mom recently gave me an envelope full of photos of me that she saved from photos she had sent my grandma over the years. Grandma Muriel passed away a few years back and she had saved photos of all her grandchildren from the time when we were born. I found these photos in my envelope. They were taken when I was about 2 1/2, a few months before my brother was born and I didn't get all the attention any more! :) I love how these old photos are square with white borders and the dates stamped on them. I thought that they went perfectly with Graphic 45's style. To me their retro papers go perfectly with sepia tone photos and the slight natural yellowing of these photos looks great with them. I didn't want to crop the photos at all, so I let their shape dictate my layout and how I cut the yellowed catalog page to back them. It's so fun to see my clothes and little pig tails, but my favorite part is seeing how my dad dressed in 1972! I guess style really does come around again...check out those sideburns! I can also see a few ornaments on this tree that I still hang on my tree!

I wanted to keep this layout from being very sparkly...I've been using tons of sparkle lately. So I used a pack of Little Yellow Bicycle's felt die cuts along with felt ribbon from Creative Cafe and a few red pearls from Kaisercraft. The next time you're scrapping photos from your childhood, or someone else's, check out Graphic 45's wonderful retro papers. I've got a great project using their Transatlantique papers to show you soon! (probably after Christmas)

Don't forget to stop by Ann's Virtual Girls' Night Out, to get a few more comments for your blog, meet some new bloggy friends and maybe learn something new!
Tips
If you've got some older, maybe slightly yellowed, photos you want to scrap, check out the beautiful retro papers from Graphic 45. Sepia tone photos look great with their papers too!
Remember not to crop all the background out of your photos! Choose a few photos where you will leave in some of the background, especially if it's your home or shows a little slice of how life was at the time. It's fun to look back & remember what life was like for you as a child or for your kids to see how life was for their grandparents.
Supplies
Graphic 45 Christmas Past paper collection (Graphic 45 Blog)
Creative Cafe red felt ribbon (Creative Cafe's Blog)
Little Yellow Bicycle self adhesive felt die cuts
Kaisercraft red pearls (Kaisercraft's Blog)
Well, that's enough of me complaining, it certainly isn't that I'd like rain better, no way! I just want summer back whenever it's convenient for me!

I think it's time to share one of my recent creations! I created this layout with Graphic 45's Christmas past collection. My mom recently gave me an envelope full of photos of me that she saved from photos she had sent my grandma over the years. Grandma Muriel passed away a few years back and she had saved photos of all her grandchildren from the time when we were born. I found these photos in my envelope. They were taken when I was about 2 1/2, a few months before my brother was born and I didn't get all the attention any more! :) I love how these old photos are square with white borders and the dates stamped on them. I thought that they went perfectly with Graphic 45's style. To me their retro papers go perfectly with sepia tone photos and the slight natural yellowing of these photos looks great with them. I didn't want to crop the photos at all, so I let their shape dictate my layout and how I cut the yellowed catalog page to back them. It's so fun to see my clothes and little pig tails, but my favorite part is seeing how my dad dressed in 1972! I guess style really does come around again...check out those sideburns! I can also see a few ornaments on this tree that I still hang on my tree!

I wanted to keep this layout from being very sparkly...I've been using tons of sparkle lately. So I used a pack of Little Yellow Bicycle's felt die cuts along with felt ribbon from Creative Cafe and a few red pearls from Kaisercraft. The next time you're scrapping photos from your childhood, or someone else's, check out Graphic 45's wonderful retro papers. I've got a great project using their Transatlantique papers to show you soon! (probably after Christmas)

Don't forget to stop by Ann's Virtual Girls' Night Out, to get a few more comments for your blog, meet some new bloggy friends and maybe learn something new!
Tips
If you've got some older, maybe slightly yellowed, photos you want to scrap, check out the beautiful retro papers from Graphic 45. Sepia tone photos look great with their papers too!
Remember not to crop all the background out of your photos! Choose a few photos where you will leave in some of the background, especially if it's your home or shows a little slice of how life was at the time. It's fun to look back & remember what life was like for you as a child or for your kids to see how life was for their grandparents.
Supplies
Graphic 45 Christmas Past paper collection (Graphic 45 Blog)
Creative Cafe red felt ribbon (Creative Cafe's Blog)
Little Yellow Bicycle self adhesive felt die cuts
Kaisercraft red pearls (Kaisercraft's Blog)
Friday, November 27, 2009
Layout of the Week - Christmas DVD Case

If you're a reader of my scrapbook store blog Whimzee's Girls Online, you may have already read about this Christmas DVD case. But since I've been "a little busy" this week, getting ready for Thanksgiving and because more of you read this blog than that one, I thought I'd cheat a bit and post the same project on each blog. Hope you all had a wonderful Thanksgiving! We had dinner at our house this year, it was great having all the kids' grandparents here. We hope to spend Thanksgiving with even more of our family next year. We're thankful for all our family and great friends this year!
This DVD case is a fun holiday project if you're looking for a great way to package those DVD's of photos you're sending to the relatives this year. I created this project in the EK Success Craft Fest I attended a couple weeks ago. Don't worry, if you aren't sending out photo DVD's this year, our instructor had a great idea for this case. She said that she uses it to house a special holiday music CD she creates each year for family and friends. Not being a big baker, she uses gives it as a hostess gift when others might give baked bread or goodies. And if you aren't looking to give DVD's or CD's this year, take a close look at the project and 'scraplift' it into a card or scrapbook page.

The DVD case project features K & Company's new Christmas collection Evergreen by designer Brenda Walton (I saw a few of the items we used in Michael's this week). We used the small paper pad from this collection which is perfect for card makers and those of you who create albums smaller than 12 x 12. Another winner is the adhesive border pack, this pack is full of borders that are great for trimming to the size you need or using as is. While we didn't order from this collection, you may be able to find it elsewhere. We did order the small paper pads and adhesive borders from a couple other collections, so be on the look out for those in the store. We loved using these products in creating the DVD case and we're sure you'll love them too!
One last thing...if you're looking for more scrapbooking inspiration, stop by the ning.com site I'm moderating for the store. I've set it up as a place for our customers & fans to share their creations and chat about scrapbooking and papercrafting. Come on by the Whimzee's Scrapbook Studio online scrapbooking community and check out all the new projects that our members are uploading daily. If you're in the Portland area, you'll find the site especially helpful, we have an event calendar over there with all our crops & events listed!
I'm ready to have a fun weekend, my sweet husband's birthday is tomorrow and I'm all ready to decorate for Christmas! Hope you all enjoy your weekends and be sure to join me at Ann's Virtual Girls' Night Out! Ann's a fellow Portlander (not sure if that's the correct word), but it's been great to meet someone cool from my area who understands the whole "Oregonian" thing! Meet tons of other cool bloggers and get lot's of those precious comments we're all looking for! Oh, that reminds me, I'd love it if you'd leave comments for me, even if you're not a blogger! I love to see what everyone has to say about my posts. Happy Friday!
Wednesday, November 18, 2009
Layout of the Week - Christmas Folding Mini Album

I've been busy this last week working on tons of different things for the store and trying to sneak in a few holiday projects. In between working on the email newsletter and trying to get the Pazzles cutter working, I created this cool little folding mini album. I'm teaching a workshop on this format on December 5th from 10am to 1pm, in case you're in the Portland area and want to learn to create these fun albums. The scrapbook store where I work is Whimzee's Scrapbook Studio, check out the blog I write for them, if you're looking for more scrapbook inspiration. I do occasionally post some of the same projects on both blogs, but I have created some step by step classes over there, so click on Classes in the list of labels.

OK, back to this project! Using 6 12 x 12 cardstock pieces, up to 14 different coordinating patterned papers (I used doubled sided sheets), a yard of ribbon and lot's of adhesive, these little albums go together quickly. I used a grassy green Bazzill cardstock and the Season's Greetings patterned papers from 3 Bugs in a Rug in my project. This album is a great way to finally use that little black blade that came with your Fiskars cutter! (That's a scoring blade!) Or you can use one of those cool new scoring boards. I saw one at the EK Success workshop last week, putting it on my Christmas list!

I used the Cricut at the store and the Stretch Your Imagination cartridge to create the little die cut holly for the album cover.

I plan to create a couple more of these albums to display during the workshop. These would be great to make to commemorate a special vacation or birthday!
Thursday, November 12, 2009
Happy 100th Post to Me!...and boy, did I have fun being creative this week!
As I came to the blog to write this post I realized that it's my 100 Post! YEAH me! (as London Tipton says...if you're forced to watch Disney Channel as much as I am, you'll know just what I'm talking about, if not...count yourself among the lucky ones!) Help me celebrate my 100th post by signing up to be a follower while you're here! I'm hoping to get to 200 followers by the end of the year, so tell all your scrapbooking friends, bloggers or not, to stop by JulieChats. I promise to bring you all the greatest new scrapbooking products & techniques. And of course, if you're looking for more inspiration, be sure to check out my "Get Your Creative On" section, for links to other creative blogs all around the world & the web!
You'll probably notice that I don't have a Layout of the Week this week! Well, it wasn't because I wasn't creative...I did create a Christmas layout, it is quite cute, if I do say so myself. But since I submitted it in Ella Publishing's December cover contest, I can't share it right now! Hopefully I'll be back to tell you that it's going to be on their cover...if not, I'll share it with you soon! I used LUXE's wood design paper for the background and Creative Imaginations' bright new Christmas paper, a couple types of American Crafts' THICKERS, 6 different mosaic tiles from Mark Richards, those cute little black letters that look like they came from my mom's Dymo Labeler, my large corner rounder and an 8 x 8 photo of the cutest boy in the world...you want to see it, don't you! Well, soon you will, one way or the other, did I say to wish me luck! Oh, and be sure to stop by Ella Publishing's blog and website to check out all their great scrapbooking ebooks available for download, they're only $5.99! I just downloaded two and can't wait to share all the great layouts I create with them!
But even though I can't inspire you with my Layout of the Week this week...don't fret! :) I was lucky enough to attend a fun creative workshop put on by EK Success and Petersen Arne this week here in Portland. The event was for scrapbook & craft stores and Twila, the owner of Whimzee's Scrapbook Studio, where I work, invited me! And boy did I have fun! We got to create some wonderful things with products that aren't available in stores yet and some that we just hadn't gotten a chance to try out! After getting our kids off to school & driving across town, we were a little late, but arrived just in time to create THE cutest canvas bags with Jolee's Jewels and the Hotfix tool. The bags, even without all the bling, are so cool. And I mean COOL, my 8 1/2 year old was so sad, as she grabbed the bag & started carrying it around, showing it off to her friend....I had to tell her, "You know, Delaney, that bag is Mommy's!" So when I say cool, I mean it, just check it out for yourself:

Cool...right??? :) Well, I wasn't really so mean, I did tell her that we'd have these pink bags designed by Carolyn Gavin and the other cool turquoise ones in the store soon and she can make her own. The crystals are kind of difficult to see on the first photo, so I did take a second close up photo. But really, the photos don't do the crystals justice! They certainly aren't your run of the mill rhinestones! So if you're looking for a way to put some bling in your life, don't miss the Jolee's Jewels Swarovski crystal collection and be sure to pick up EK's Hotfix tool too! We'll have them at Whizmee's soon, so if you're in the Portland area, stop by the store to see our cool bags!

I promise to share more of the cool projects I made next week! Just let me tell you, we were all VERY excited to find out we could take home the new Martha Stewart Around the Page Punches that we made one of our projects with! I'm ADDICTED to them now, I MUST have them all!
You'll probably notice that I don't have a Layout of the Week this week! Well, it wasn't because I wasn't creative...I did create a Christmas layout, it is quite cute, if I do say so myself. But since I submitted it in Ella Publishing's December cover contest, I can't share it right now! Hopefully I'll be back to tell you that it's going to be on their cover...if not, I'll share it with you soon! I used LUXE's wood design paper for the background and Creative Imaginations' bright new Christmas paper, a couple types of American Crafts' THICKERS, 6 different mosaic tiles from Mark Richards, those cute little black letters that look like they came from my mom's Dymo Labeler, my large corner rounder and an 8 x 8 photo of the cutest boy in the world...you want to see it, don't you! Well, soon you will, one way or the other, did I say to wish me luck! Oh, and be sure to stop by Ella Publishing's blog and website to check out all their great scrapbooking ebooks available for download, they're only $5.99! I just downloaded two and can't wait to share all the great layouts I create with them!
But even though I can't inspire you with my Layout of the Week this week...don't fret! :) I was lucky enough to attend a fun creative workshop put on by EK Success and Petersen Arne this week here in Portland. The event was for scrapbook & craft stores and Twila, the owner of Whimzee's Scrapbook Studio, where I work, invited me! And boy did I have fun! We got to create some wonderful things with products that aren't available in stores yet and some that we just hadn't gotten a chance to try out! After getting our kids off to school & driving across town, we were a little late, but arrived just in time to create THE cutest canvas bags with Jolee's Jewels and the Hotfix tool. The bags, even without all the bling, are so cool. And I mean COOL, my 8 1/2 year old was so sad, as she grabbed the bag & started carrying it around, showing it off to her friend....I had to tell her, "You know, Delaney, that bag is Mommy's!" So when I say cool, I mean it, just check it out for yourself:

Cool...right??? :) Well, I wasn't really so mean, I did tell her that we'd have these pink bags designed by Carolyn Gavin and the other cool turquoise ones in the store soon and she can make her own. The crystals are kind of difficult to see on the first photo, so I did take a second close up photo. But really, the photos don't do the crystals justice! They certainly aren't your run of the mill rhinestones! So if you're looking for a way to put some bling in your life, don't miss the Jolee's Jewels Swarovski crystal collection and be sure to pick up EK's Hotfix tool too! We'll have them at Whizmee's soon, so if you're in the Portland area, stop by the store to see our cool bags!

I promise to share more of the cool projects I made next week! Just let me tell you, we were all VERY excited to find out we could take home the new Martha Stewart Around the Page Punches that we made one of our projects with! I'm ADDICTED to them now, I MUST have them all!
Thursday, November 5, 2009
Layout of the Week - Children of the Corn

In honor of Halloween, I created this fun layout last week. Our first outing of the Fall was a trip to The Pumpkin Patch on Sauvie's Island, just outside of Portland. If you're in the area, you should definitely add it to your Fall list next year. They've got a great maze, farmer's market, lot's of food booths...elephant ears, corn on the cob, carmel apples, sausage, burgers, loaded baked potatoes...animal barn, gift shop, hayride to the pumpkin patch (or skip it if it's too muddy & pick one from the huge pile next to the market) and of course a HUGE maze. This year's maze was a tribute to the Portland Trail Blazers, check out the photo in my layout.
This layout was my first effort at designing to someone else's sketch. I have all sorts of sketches & sketch books in my inspiration pile, but this is the first one I've done right to the sketch...pretty much, anyway. I created it for a layout call from Ella Publications. It was a lot of fun to try a technique that I've recommended to so many people, but haven't tried myself. I'm near the end of a set of 6 beginning scrapbooking classes where I've designed the layout, then created a sketch and kit for the participants. We'll be starting the classes again in January if you're in the Portland area and in need of some scrapbooking support! They're at the Hillsboro Library and they're FREE! I'll post about them when we've got the dates firmed up.
I was excited to use the Eerie collection from Basic Grey. I'm a big fan of using all sorts of patterns together in my layouts and Basic Grey's collections are some of my favorites. This layout features black vinyl THICKERS from American Crafts, I was excited to be able to create this title from a set I've used for two other layouts. That just shows you that the packs of THICKERS really give you a great selection of letters. My journal box is a tag from 7 Gypsies, I filled in the blanks and then wadded it up and stretched it out again, inking the edges & creases. I inked the outside edge of the layout with black ink to bring everything together. I put my little spin :) on the sketch, by tilting my layout, trimming the edges & mounting it on one last patterned paper...sneaking in another pattern...YEAH! My favorite embellishments on this page are my trusty garden twine (seem to be using it a lot recently) and the little black spiders were in a pack in my Halloween decorations, so they practically "jumped" onto the page as I created it!
I hope you're inspired to design your next layout from a sketch! Check out these cool sites for some great sketches:
52 Sketches ... a new sketch every week
got sketch? ... they've got 92 sketches on their site right now!
Creating Keepsakes Magazine ... all sorts of FREE sketches to download and also lot's of other cool downloads, brushes for you digital scrappers, journal boxes & tons more!
Tips
Give the sketch technique a try. Maybe keep to the original sketch your first time, if you're nervous. Then let your creativity go wild! Rotate the sketch 90 degrees, flip it over for a mirror image on the facing page, set your design askew on another piece of paper (what I did on this one), use journal boxes, embellishments or patterned paper in place of some of the photos...the ideas go on & on!
Use a tag instead of a journal box on one of your layouts.
Check out your gardening supplies, use twine instead of ribbon on your next project.
Supply List
Basic Grey Eerie collection papers
American Crafts THICKERS - Daiquiri black vinyl letters
Thick Twine (not sure of manufacturer)
Mini GlueDots
7 Gypsies Tag
Small plastic spiders (not sure of manufacturer) - found them in my Halloween decorations
Wednesday, November 4, 2009
I've Been Published!
I'm happy to announce the publication of my first article! Please click on the following link to read my article from the November issue of Scrapbooking.com Magazine
Scrapbooking.com -- Article - H-O-M-E Project
Posted using ShareThis
This article describes two Fall theme projects that I recently created. The two projects were created using one Rusty Pickle chipboard letter set and the same Bo Bunny papers & stickers. I created the first project for my home and then used the leftover chipboard pieces to create a second project.
Check out Scrapbooking.com Magazine's site and sign up to have their newsletters delivered to your inbox here:
Scrapbooking.com Magazine
I am honored to have my work recognized by Scrapbooking.com Magazine and hope to be published in other magazines soon!
Scrapbooking.com -- Article - H-O-M-E Project
Posted using ShareThis
This article describes two Fall theme projects that I recently created. The two projects were created using one Rusty Pickle chipboard letter set and the same Bo Bunny papers & stickers. I created the first project for my home and then used the leftover chipboard pieces to create a second project.
Check out Scrapbooking.com Magazine's site and sign up to have their newsletters delivered to your inbox here:
Scrapbooking.com Magazine
I am honored to have my work recognized by Scrapbooking.com Magazine and hope to be published in other magazines soon!
Tuesday, October 27, 2009
Layout of the Week - I Love Your SMILE!

I was so excited to see the challenge handed out by the ladies at the Ella Publishing blog. They were looking for layout submissions with the title, "I Love Your Smile." That was the only criteria, just use that title. I think karma brought me to this gleeful photo of Delaney. For the past couple weeks, I've been designing baby layouts for my next beginning scrapbooking class, so I had a pack of photos of Jake when he was first born right there on the table. When I saw this page call, I flipped through the photos to see if any of them fit the title. And boy, this one jumped right out at me. This is THE happiest I have ever seen Delaney in a picture. It was taken, probably by Dave, just after Jake was born. We gave her this great I'm the Big Sister t-shirt and she was so excited, she put it right on. She was over flowing with joy that her little brother, whom she had waited so long for, was finally here! It brings tears to my eyes to look at it, when I think of how happy she was.
Her reaction to the photo, while I was creating this page, cracks me up! She looked at it and asked if it was taken when Jake was born. I said yes and that she was so happy. Being 8 1/2 now and having her brother be almost 2, she said, "I love him, but I don't know if I'm that happy about him now....he did cry a lot and...you know, mom, he's Jake." So that makes this picture that much more special to me, what a beautiful innocent smile, so excited that her baby brother is finally here. Unbeknownst to this sweet little girl are all the things about babies that aren't so fun, the SCREAMING (you have to know Jake to know I'm NOT kidding), the wet & poopy diapers, the hitting, throwing & destroying, etc. Of course she is still the happiest big sister in the world, when her little guy says her name, "Dee Dee, Dee Dee" or when he walks up to her, tilts his head, puckers his lips, closes his eyes, and cranes his neck toward her just hoping for a kiss.
Those are all reasons that this photo makes me a very happy mom! I hope you all create layouts showing something that makes you happy!
As far as the layout, I used the Cricut to cut the circles, placing my matted photo inside the largest circle to draw attention to it. I placed the title around the circle, also in an effort to draw attention to the photo. I chose journal strips for this page because a journal box might draw attention away from my photo. Inside the strips is my jounaling, "a girl was never so happy to have a little brother." I think that all the elements of this page help draw attention to Delaney's photo. I think it's important for her to have some pages in her album commemorating her brother's birth that show her reaction. He will have tons of blue pages showing all the exciting happenings after he was born and big sister needs a little attention too!
Tips
Try mixing chipboard styles when creating your titles. The mix will give your layouts a whimsical look.
If you aren't happy with the color of your chipboard, so ahead & paint it. Here I painted chipboard with both paint and glitter glue.
Don't be afraid to add other embellishments to your chipboard. Here I added ribbon, rhinestones & stickers to my chipboard shapes.
Supply List
Basic Grey June Bug collection papers
Admiral: used the back side
Park Bench: used the back side
Picket Fence: used the back side
Prizm light & medium pink textured cardstock
Pink Metallic Ribbon
KaiserCraft Basics: Rhinestones - light & dark pink and Rhinestone strips - pink
Creative Cafe pink chipboard shapes
Circle shapes all cut with the Cricut
"I" - Tim Holtz Grungeboard harlequin alphas
"your" - American Crafts THICKERS hat box plain chipboard
"SMILE" - Die Cuts with a View foil chipchatter uppercase - pink
Mrs. Grossman's casual alphabet stickers
American Crafts Memory Marker pen - soft black
Paint
Scrapbook Shades by Li'l Davis Designs - marshmallow
Ranger Adirondack Brights Acrylic Paint Dabber - raspberry
Sunday, October 25, 2009
Finding Inspiration with Photography
After a morning of trying to get some creative work done, but not being able to become inspired, I headed out to my backyard with my camera. I left my steaming cup of coffee on the end table next to my laptop. I had just been reading my bloggy friend Yaya's great blog post about her favorite color, orange. I noticed that the sun was peaking out from behind a cloud shining dappled sun down on my newly orange Japanese maple. I decided to take a photo of it to email to Yaya, her favorite color & all.
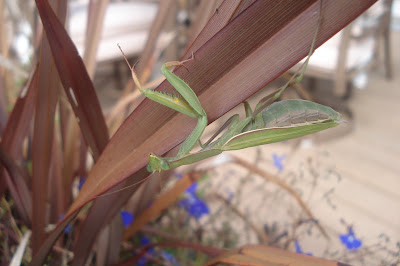
After I shot numerous photos of Leafy (Delaney named the tree when we planted it), I glanced around the yard. Although it's a pretty gray day, here in Oregon, the sun would peak out for a few moments here & there. I wandered the yard, purposefully looking at everything I could find. I shot photos of my maples turning on their Fall best. I shot photos of some strange mushrooms growing in the yard. Yes, Dave, I know this is strange, but their color & shape was interesting. I shot the ducks sleeping on the island in the middle of the pond behind our yard. I shot a huge yellow zucchini flower growing through the fence from the neighbor's yard. I shot the swings, lonely & empty, barely moving in the light breeze. I noticed how quiet it was for almost noon. All the neighborhood kids back to school & Jake napping upstairs. I shot my last bright red & orange cherry tomatoes of the year. Then I started to realize that I had just taken a rainbow of photos from around my yard. I was just missing the color blue. I stopped to take one last photo of the blue lobelia, still hanging on in my summer containers. As I shot the photo, I noticed one more harbinger of Fall. There was a Preying Mantis, hanging upside down,from the lobelia, watching me. After shooting her photo (Delaney & I always call them girls), I headed back inside to my now cold cup of coffee.
Who cares about warm coffee, when you can spend half an hour outside with your camera finding the inspiration to create all sorts of wonderful projects. So next time you find yourself needing inspiration, grab your camera & head outside. Shoot photos of whatever interesting things you find. You may find beautiful Fall leaves, white drifts of snow, gray puddles of newly fallen rain or just the shape your boot makes in the mud. But if you look at them with a creative eye, you will find the beauty in the simple creations of nature.
Try it sometime & let me know what you find!
(I wrote this last Monday and have just had the time to attach all these photos to it! Hope you enjoy them!)



By the way, I shot all these with my little Sony Cybershot digital camera, I don't own a DSLR, but it's on my wishlist! Almost all the photos were shot in the "soft snap" setting, where you shoot the subject with a soft background & no flash. Your camera might have a portrait setting, try it for your photos. I love the camera knowing to focus on my subject & then blurring out the background.
After I shot numerous photos of Leafy (Delaney named the tree when we planted it), I glanced around the yard. Although it's a pretty gray day, here in Oregon, the sun would peak out for a few moments here & there. I wandered the yard, purposefully looking at everything I could find. I shot photos of my maples turning on their Fall best. I shot photos of some strange mushrooms growing in the yard. Yes, Dave, I know this is strange, but their color & shape was interesting. I shot the ducks sleeping on the island in the middle of the pond behind our yard. I shot a huge yellow zucchini flower growing through the fence from the neighbor's yard. I shot the swings, lonely & empty, barely moving in the light breeze. I noticed how quiet it was for almost noon. All the neighborhood kids back to school & Jake napping upstairs. I shot my last bright red & orange cherry tomatoes of the year. Then I started to realize that I had just taken a rainbow of photos from around my yard. I was just missing the color blue. I stopped to take one last photo of the blue lobelia, still hanging on in my summer containers. As I shot the photo, I noticed one more harbinger of Fall. There was a Preying Mantis, hanging upside down,from the lobelia, watching me. After shooting her photo (Delaney & I always call them girls), I headed back inside to my now cold cup of coffee.
Who cares about warm coffee, when you can spend half an hour outside with your camera finding the inspiration to create all sorts of wonderful projects. So next time you find yourself needing inspiration, grab your camera & head outside. Shoot photos of whatever interesting things you find. You may find beautiful Fall leaves, white drifts of snow, gray puddles of newly fallen rain or just the shape your boot makes in the mud. But if you look at them with a creative eye, you will find the beauty in the simple creations of nature.
Try it sometime & let me know what you find!
(I wrote this last Monday and have just had the time to attach all these photos to it! Hope you enjoy them!)


By the way, I shot all these with my little Sony Cybershot digital camera, I don't own a DSLR, but it's on my wishlist! Almost all the photos were shot in the "soft snap" setting, where you shoot the subject with a soft background & no flash. Your camera might have a portrait setting, try it for your photos. I love the camera knowing to focus on my subject & then blurring out the background.
Thursday, October 22, 2009
Layout of the Week - Our Little Monster

When I first saw the new Monster collection from Reminisce, I just knew I had to use it for a new Jake page. I had just taken some funny photos of him. Our own little monster turns into a tornado every day. The little tornado moves quickly across the living room to the hearth, where we store his toys, grabs things and starts dumping, tossing, throwing them across the room. He plays & plays in the middle of this mess. We reorganize & straighten up his stuff about five times everyday. All the little cars in their container, books stacked nicely, balls in the toy box, etc. And then he wakes up! And it's back to tornado mode! So one day, I decided to take photos of all the little messes he made that day, all over the room. Of course when I looked at the photos, the room didn't really look as messy as I thought it did. But still, picking up the same toys so many times everyday, I guess it just adds up!

I used my new favorite embellishment on these pages! I outline the edges of paper, stickers & photos with the thick end of my black Zig Writer. I love how the black helps make things on my pages stand out.

The pages have so much going on with all the color & pattern of the paper and stickers. And then there is also the size of the stickers to take into consideration. I wanted to add a little more embellishment, so I added a ribbon to the tag sticker on this page. It gives a little more dimension to the page, while not competing with all my other elements.

That day, as I was photographing his disaster, he just stood, leaning against the couch, smirking at me, as if to say, "Look how cute I am! There's no way you can be made at me about this!"
But wait...could he be turning over a new leaf? As I'm writing this, he just brought me the Swiffer Sweeper, out of the coat closet & had me turn it on so he could vacuum...we'll see...
Tips
After you finish a layout, add a thick black outline to some of your page elements to help them stand out from a busy background. I use the thick end of a black Zig Writer.
Try adding a thin solid color ribbon to your page, for a little extra dimension that won't take away from your page design.
Don't be afraid to cover up portions of your photos with large scale stickers.
Use a few smaller photos or wallets (as I've done here) grouped together. They give the feeling of one large photo, while telling more of the story than one photo would.
Supply List
Reminisce Monsters collection papers and 3 different sheets of Monsters self adhesive stickers: words, tags & journal boxes & large monsters
Thin Grosgrain ribbon, navy & orange
Zig Writer, black
Monday, October 19, 2009
Layout of the Week Bonus - Girlfriends

This week I have two layouts to share with you. Today I'm featuring one of my favorite layouts using the American Crafts Teen collection papers. I created this layout for Delaney, as a way to remember a fun day out with her girlfriends. Some moms & I got together and planned a little surprise for the girls. We took them out for lunch and to see the very first showing of the Hannah Montana movie. The girls were lucky enough to be out of school that Friday and they LOVED getting to see the movie before any of their other friends.
I chose to print this photo in black & white because lunch that day was at Red Robin and their restaurant colors didn't coordinate well with my paper choice. This is one of the reasons I love black & white photos...they go with EVERYTHING!
I love the bold papers of the Teen collection and it was fun to combine them with American Crafts' THICKERS vinyl letters and accents. I framed my photo with Prizm cardstock and added black & white floral papers from LUXE and black rhinestones from Kaisercraft.
I know that I have featured this layout before without the photo. I thought it might be fun to have an extra Layout of the Week this week so I could share the finished product with you.
Enjoy your week!
Subscribe to:
Posts (Atom)
LinkWithin
