Thursday, April 8, 2010

Layout of the Week - Spring Mini Album Project & a Punky Sprouts Sneak Peek

I've been a little busy lately to finish any actual layouts to feature as my "Layout of the Week," so I'm sharing what I have been working on.  This Saturday I'm teaching a class at the scrapbook store where I work, Whimzee's Scrapbook Studio in Beaverton, Oregon....in case you're in the area & want to sign up!  I taught this class at Christmas and a few people asked me to do it again.  I thought a Spring theme would be fun for the little mini album.  You could use it for a great Mother's Day gift or maybe for a special friend's birthday.

This project takes 3 pieces of cardstock, up to 14 different patterned papers, a couple feet of ribbon, lot's of adhesive and TONS of patience.  In just a couple hours you too can have a fun little album with lot's of little doors to hide all your photos & journaling.

I hope you're in the area so you can sign up for my class!  It really is much easier to make the album with a little help from someone who's done it before.  The instructions are kind of confusing, but if you're handy, you can probably make one up from my photos.  Give it a try when you have a couple hours & want to try something new.

I've got to get back to my projects for this week, two Punky Sprouts albums.  I've been very excited about Punky Sprouts for a few weeks now.  I had the chance to crop with one of the owners, Doralisa, and we had so much fun that I left pumped to give one of her albums a try.  It's so fun to be able to share a local Portland area scrapbook manufacturer with all of you.  Keep reading for links to the Punky Sprouts site & Facebook page, so you can ask your local scrapbook store to carry these awesome albums!

Here are a couple sneak peeks at my first project, using Chatterbox papers & embellishments, along with some great Kaisercraft paint colors!

Here's a quick look at the pages included in the Punky Posh album....

I'll share my take on this great album concept next week!

Head on over to the Punky Sprouts site to check out all their great albums!  I'm working on Punky Posh and Prim & Punky right now.  Punky Sprouts is on Facebook too & looking for a few more fans, tell them Julie sent you!

Just a little reminder to join me over at my fellow Portlander, Ann's, Virtual Girls' Night Out.  Join the party, every Friday night!  Ann's got a great music video, a yummy drink recipe and lot's of fun bloggers to hang with!  Get & Give tons of comments and find more followers for your blog!  Of course, you can visit Ann anytime...it doesn't have to be a Friday for you to get a laugh out of her adventures!

I also hang out every Tuesday at Today's Creative's Get Your Craft On party.  Head on over to another of my Pacific Northwest peeps' blog to find a huge list of links to other creative blogs.  Kim features a new creative blogger almost everyday and the huge Get Your Craft On blog hopping party every Tuesday.


Hey all you Mom Bloggers!!!!  Don't forget to head on over & check out all the fun, prizes & friends at 5 Minutes for Mom's Ultimate Blog Party 2010!

Ultimate Blog Party 2010

Join me & enter to win! I'm hoping to win #6 The Double Stacked a lot of Love Necklace, #11 $100 Gift Certificate to Restaurant.com and #17 The Books Found Art and Real Women Scrap!!!! Wish me luck!!!!!!!!!!!

Friday, April 2, 2010

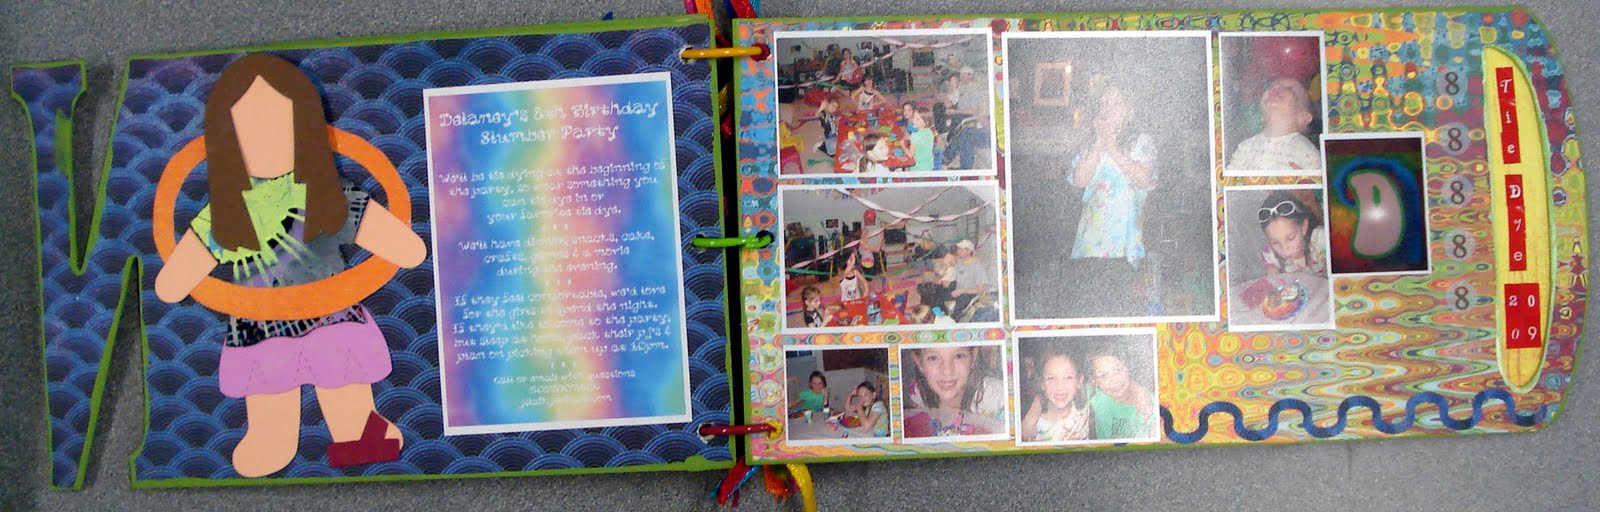
Layout of the Week - FRIEND chipboard mini album


I'm excited to share this week's Layout of the Week with you!  But first, I want to apologize for missing all sorts of blogging opportunities last week.  It was Spring Break here and we took Jake in to have hernia surgery on Tuesday.  We were expecting to be home that day, but our wise surgeon advised us to stay overnight in the hospital just in case the little guy needed some extra pain meds.  And thank goodness we did, those extra pain meds let him sleep through just a few of the MANY interruptions...I know that the wonderful nurses & residents have to check in on patients all night long, but boy, it sure would be nice if patients could get more sleep in the hospital.  So my schedule was thrown for a loop last week.  But I'm bouncing back this week, just like Jake...baby steps for both of us!  If you're in the Portland area & in need of an excellent Pediatric Surgeon, I highly recommend Dr. David Bliss.  He's done surgery twice now on Jake and he's a great listener, explains everything so even people who aren't medical geniuses (like he is!) can understand and he's saved the lives of countless preemies, infants, toddlers & kids!

So back to my project!  I created this mini album to celebrate Delaney's 8th birthday.  I did actually get it done a couple months ago, so she did get to see it before her 9th birthday!  I used Bo Bunny's My Word Chipboard FRIEND album and Basic Grey's Lime Rickey collection pack, plus a ton of fun embellishments to create a fun, bright colored album, perfect for Delaney's Tie Dye Slumber Party Photos. (Read all about our Tie Dye Slumber Party activities HERE.)

I used one of my favorite tips to squeeze a ton of photos into this small book.  I created photo collages with Costco's photo organizer program so I could cut them apart and put all different sizes of the tiny photos on my pages.  I love being able to create these collages and use so many photos in such a small format album.

Here are all the fun inside pages!


Of course, since it's Friday, you can join me over at Ann's for her Virtual Girls' Night Out!  I'll be celebrating mine by working the crop tonight at Whimzee's Scrapbook Studio in Beaverton...if you're in the area, call to sign up (we have a couple spots left) or stop by & shop, I'd love to meet you!  Be sure to check out our online community if you're in need of some extra inspiration, we have 300 project photos for you to enjoy!

Tips

Use Costco's photo collages to squeeze a few more photos into your projects!

Don't be afraid to mix it up with bright colors & patterns, it creates a whimsical page!

Use paint to coat the edges of your chipboard albums, it covers up any number of flaws in your (or my) paper cutting skills!

Supplies

Basic Grey Lime Rickey collection pack paper & stickers

Bo Bunny My Word Chipboard Album - FRIEND

So many embellishments...it would take a year to list them all, if you have a few you're wondering about, leave me a comment & I'll get you the manufacturer info.

Sunday, March 21, 2010

Happy 9th Birthday Sweet Delaney!


Happy Birthday Delaney!

My sweet, loving daughter turns 9 today!

I want to wish a very Happy Birthday to this wonderful, creative, athletic, intelligent, compassionate, thoughtful girl.  She makes a great daughter, big sister, friend, granddaughter...and so much more!

Your dad & I are so proud of everything you do!
And Jake, well, he says, "PLAY DEE DEE!!  PLAY DEE DEE!!"
:)

Have an awesome day and never forget how special you are!

PS-Kudos to Brooke at the Washington Square Sears Portrait Studio!  She took these wonderful photos of Delaney and so many more...of Jake also, even though it seemed we were pulling out all his teeth without anesthesia.  She somehow manage to make the phots look like they were both having a great time, not just Delaney!  So if you're in need of a photographer, give Brooke a call!

I'll share more photos & tell you more about Jake's fun Saturday in another post.
Wish us luck on Tuesday, Jake's having his second surgery for an inguinal hernia...first was at 5 weeks.

Friday, March 19, 2010

Layout of the Week - Family with Graphic 45 Papers & A Special Annoucement!


This week, as the sun shines outside here in Oregon, I want to share my family with you.  Dave, my wonderful husband,  is a sports fanatic who loves to play with his kids.  He managed to combine those this week...he got Delaney to fill out an NCAA bracket and then had Jake do one too.  Dave used blocks with the first letter of each team and had Jake pick his favorite of the two.  Yes, it took quite a while and Jake's bracket is full of M-named teams (his current favorite letter).  Poor Jake didn't fare well with Montana last night, but he still has a chance to beat his Daddy.  I keep telling Dave that knowing about sports really has nothing to do with winning with these tourney brackets.  On to Delaney, my beautiful, talented, creative daughter, will be 9 on Sunday.  Delaney is so well-rounded, she loves participating in all sorts of sports (those talents come from Dad), creating original, eye-catching art pieces and she's a "bit" of a perfectionist (that, I'm sorry, comes from me!).  She is thoughtful and loving, especially to her little brother.  So that makes Jake last.  Mr. Jake is now two and FULL of ENERGY!  He loves the movie "Cars," any every character in it.  We're missing Sally right now and he asks for "Yaddy" every chance he gets...I'm sure she's around somewhere, probably in one of Delaney's shoes.  We all love to hang out together and are very excited that the weather's warming up here!

So that's a bit of our story!  On to my layout...this design idea came to me a bit backwards.  Usually I have a photo and then come up with a layout.  OK, sometimes I have a paper collection that I love and take photos to go with it.  This time, I was inspired by a pile of mismatched Graphic 45 papers laying all over my counter while I was creating projects for the Graphic 45 design team call.  Seeing these papers, most are the backsides, reminded me of a patchwork quilt.  I thought & thought about how to combine them and came up with using a brown background and my favorite sepia tone photos.  I didn't shoot a new photo for this page, I remembered that my mother-in-law shot some photos of us when she was visiting in early December.  This one was almost our Christmas card photo, but it didn't quite make the cut.  We were very excited at the time, being huge Duck fans and having just attended one of our most exciting games ever...the Civil War win over the dreaded Beavers!  So we decided to have a Duck theme Christmas card.  Even though we didn't use this photo, we found some even more fun Duck photos of all of us.  My trusty sepia tone came into play because dark green and almost neon yellow don't exactly match the Graphic 45 color scheme.

Since I had been thinking of this project as a patchwork quilt, I searched the internet for patchwork quotes.  I found a few that combined the quilt idea with the family idea.  I didn't find one that fit my thoughts exactly so I made up my own.  I didn't want a big wordy journal box or title on this one, so I used photoshop to print my quote right on top of my photo.

For the patches, I cut my papers to 2 1/2" square and then used a ruler to gently fold the edges in 1/4" on each side.  I tore upward along these folds so the white would show on the edges.  Next I inked the edges with brown ink.  I used one little Hermafix square on the back of each square and placed them on the brown background, leaving an area in the bottom right corner for the photo.

This was my very first attempt at machine stitching on a layout.  I'm pretty excited with the results.  I had been planning to give it a try.  Dave put a table in the laundry room for my sewing machine and I dug the poor thing out of one of the "holes" or storage closets in the bonus room.  It had been in there more than 5 years.  I was surprised it worked at all.  I searched the internet for ideas on machine stitching and found tons of them.  So I experimented with an extra sheet of my background paper and extra little squares.  I adjusted the tension, stitch width and lenght, writing each of the number combinations next to that particular stitch on my sample sheet.  When I found one I liked, I used it.  I chose ivory thread for this project.

After sewing around the page twice, I decided to create my own embellishment for my title.  I cut a piece of patterned paper twice as long as my photo, tore it leaving a white edge, inked it with the brown and folded it into pleats.  I used the same straight stitch I used on the whole page to stitch my pleats together.  I went over the pleats twice.  Next I stitched down my brown ball fringe ribbon.  For the title, I inked the edges of the Graphic 45 letters with black and adhered them with pop dots.  To attach my homemade embellishments, I used glue dots.

I was very happy with how this layout turned out.  I loved machine stitching and can't wait to use it again!  Next time you're together with your family, shot a photo and remember to create a layout to celebrate these special people!

*   *   *   *   *   *   *   *   *   *   *   *   *   *   *   *   *   *   *   *   *   *   *   *   *   *   *   *   *   *   *
SPECIAL ANNOUNCEMENT!

I want to share some exciting news with my readers!  I am now a featured writer on the Oregon Women's Report website.  I am writing a series of fun, anecdotal stories about scrapbooking.  I'd love it if you'd stop by over there and read my first one!  I'm planning to post each article here also.  I'll post one in both places every two weeks or so.  If you're from Oregon or just interested in all the cool women writers on the site, sign up to receive updates from OWR in your inbox.  Thanks! :)

Don't Forget!  Join me at Ann's tonight for Virtual Girl's Night Out!  Stop by to join in the fun, meet lot's of great women bloggers (and sometimes some male bloggers too!), hop around the internet leaving comments and getting some for yourself too!

Tips

Of course, use sepia tone or black & white to help your photos blend with your chosen papers.

If you're looking for a new way to include journaling in your layouts, give photoshop a try!

Look at the backsides of your papers, they might inspire a layout all by themselves.

Think about creating your own embellishments.

If you've got a sewing machine, try machine stitching!

Supplies

Graphic 45 papers...from all different collections, most are the backsides.

Graphic 45 alphabet letters

Bazzill brown ball fringe ribbon

Dark Brown Ink - Cat's Eye ink pad

Ivory thread for machine stitching

Friday, March 12, 2010

Layout of the Week - Believe Achieve (my words for 2010)

I just have to say, I love this layout.  It isn't very often as scrapbookers that we create layouts about themselves.  At the beginning of this year, I read a lot of different blog posts about finding a word for yourself for the year.  The word would be your theme word, giving you something to focus on throughout the year.  I started to think about myself and all the things I've done in my life and the things I'd like to do in the future.  Being the mom of a two year old, it has been a while since I've thought about my own goals or even thought much about myself at all.  I was just starting to get back to thinking about me when Delaney turned 6 and was at the end of her year of 1/2 day kindergarten.  It was nice to look ahead at the things I could start to do for me once she started school full time in September of 2007.  And then suddenly my world was turned upside down.  I found out I was pregnant with Jake in June of 2007, just a week before Delaney was done with kindergarten.  It was quite a shock after about 5 years trying to conceive and then coming to terms with our being a 3 person family.  I still can picture the look on Dave's face when Delaney & I told him we'd be having a baby.  I'll tell you more of this story another time, but suffice it to say, shock doesn't even come close.  So my thoughts took an about face, away from what I wanted to do with the "rest of my life" and toward raising another little one.

As I was reading these "word of the year" blog posts in January, I thought maybe I should think about me a little sooner this time and not wait until Jake was going to be in first grade...for goodness sake, I'll be 43 by then.  Here's my first Believe Achieve blog post.  And the thought of turning 40 this year also added to my eagerness to make plans that were mine alone.  For years, I've been involved in scrapbooking in some way, working on albums at home, helping my friend with projects, working at Whimzee's, writing my blog.  I also began another of my efforts at being healthier and losing weight this year.

Being someone who isn't short on words, I couldn't narrow my choices down to just one.  For my 2010 words of the year, I chose Believe and Achieve.  I chose them even before I walked into Jake's room to get him up from his nap and saw those exact words stenciled on a plaque on the wall in his room.  Dave chose it at a baby boutique when we were shopping for bedding & decorations for his room.  It hangs over his crib and someday we'll explain to him what they mean...right now, he just enjoys pointing out that there is an "A" on the sign.

These words are important for me to remember this year, because I have a few goals for myself.  I want to expand my blog and find a sponsor or two (if anyone has any suggestions, bring 'em on!) and I hope to be chosen for a Design Team of some sort in 2010.  I also want to continue with my efforts to work out, eat healthier and by doing those things, lose some weight.  One more important goal, for the whole family really, is to make smart money choices.

I think that I am moving toward all these goals, but I do have to remind myself everyday, that I have to Believe in myself and make efforts in order to Achieve them this year.  I created this layout to highlight my words and remind myself everyday of what I am working toward.  I challenge you to find a theme word or two, even three or four, who's counting.

In creating a layout that highlights my words, I wanted to use some of my favorite products.  The papers are from Lily Bee and the embellishments are from all sorts of places.  I wanted to show contrast in this layout.  Not only am I a mom and wife, I also have personal and professional goals outside of my family.  These goals will benefit my family in many ways, but they are my goals.  I chose to create contrast in my layout by placing the rhinestone "BELIEVE" on a distressed piece of corrogated cardboard.  The rhinestone title also contrasts nicely with the slick orange "ACHIEVE."  I created depth by using a cardboard circle covered with word filled paper.  I used pop dots to raise my photo above the background.  Again highlighting my words, I used Photoshop to print them on my photo.

I love this photo of me.  I asked my friend, Pandra, to shoot a photo of me to send in with a design team application.  I was planning on changing & doing my hair first, but she just got out her camera one night when we were hanging out with friends.  They started telling jokes & I couldn't keep a straight face.  It just all went downhill from the very beginning....  This first photo was the best of the bunch!  Thanks P! :)

Tips

Think of a theme word for the year & remind yourself of it everyday!

Create a layout or project highlighting your word and place it somewhere you will see it everyday!

Don't be afraid to create contrast with by using totally different embellishments in your layouts.  Rhinestone & cardboard...glitter & slick plastic.

Have a friend shoot some photos of you and create a layout that shows your personality or how you felt that day!

Supplies

Patterned Paper - Lily Bee
Rhinestone Title - Kaisercraft
ACHIEVE & 2010 - THICKERS by American Crafts
Paint - a variety of craft paints

This post shared on Today's Creative!  Be sure to check them out for links to all things creative and the best features of creative blogs on the internet!


Thursday, March 4, 2010

Meet my 200th Follower! And the Layout of the Week - Friends


WOO - HOO!

200 followers!

YEAH!

OK, you can tell I'm SO excited to have my 200th follower!  And since 200 is a pretty big milestone, I want to share my 200th follower with you.

Meet Adrienne from Kitschalicious!  She has one of the cutest blogs I've seen, all covered with polka dots, little cherries and a splash of glitter.  But that's not the only reason why I love it....the craft ideas & projects are wonderful!  If you've got tons of little Happy Meal toys underfoot, just check this out....a Happy Meal Toy Wreath!  Boy I wish I hadn't give ours all to Goodwill after they didn't sell in the quarter box at the garage sale!  So click on over to Kitschalicious, be sure to leave a comment to say HI, sign up to follow Miss Adrienne's adventures & tell her Julie sent you! :)

I met Adrienne on a great blog hop adventure sponsored by Today's Creative.  I've been participating for a few weeks now and I've met so many awesome bloggers.  I'm pretty sure that Today's Creative is now responsible for my last 20 or so followers!  ThAnKs! :)


Every week there are between 100 and 300 crafty blog posts listed for you to check out.  I have tons of awesome ideas for my scrapbooking, decor and organizing, so many that I'll never have time to get to all of them, but still, so much fun to hop around & see who's over there.  So click on over to Today's Creative to see the "Get Your Craft On" post.  And be sure to see whose crafty blog is being featured today.  Kim created Today's Creative & she's also got a personal blog loaded with funny stories & crafty ideas, so skip on over to Scrap to My Lu!
to see what's up with Kim.


OK, now on to this week's Layout of the Week!


This is one of my favorites that I've made in the last few months!  I really LOVE Lily Bee, who made this cool paper!  Their die cuts are to DIE for...is that a pun??? :)  I knew I'd save this paper for something special and this photo of me & two of my bestfriends is just the thing.  That's me, Amy & Julie.  We've been friends since freshman year in college, wow, 22 years, say it isn't so!  We've been through all sorts of things together good, bad & ugly, but we're still together, well, Amy lives all the way out in Denver, but as together as you can be across a few states.  Julie & I really are together, I bought her house and when she moved a few blocks away, that's pretty together for two almost 40 year olds!  Every time we are lucky enough to be together, we take a self portrait.  Now, we've been doing this since college and even with the introduction of digital cameras into our lives, we still do it the old fashioned way...no, not with real film, but without anyone standing there looking at the screen to see if we're really in the photo!  It's a tradition, even the order we stand in is always the same.  There have been many special occasions when Julie & I (yes, we're the 2 Julie's) have taken a self portrait, just the two of us with a space in the middle, to let poor Amy know she's missed!  This photo was taken last fall when Amy came out to visit for a Duck football game...we're all University of Oregon Alumni and fanatically proud of our school & just about everything related to it.  It's Oregon, afterall, no NFL here!  So GO DUCKS!

I knew I'd have to print this one in my old standby sepia tone if it was going to work with the cream/brown/pink color scheme.  There's no way dark green and neon yellow would match with this subdued color scheme.  I kept the photo 4 x 6 so I'd have plenty of space for lot's of fun embellishments.  I added some cute ball fringe ribbon and a couple other pink & brown ribbons.  I love the Mark Richards Mosaic Tiles, cute little pink squares.  This was my first layout using them & I just can't stop!  For a some more bling, I added a little field of pink & brown Prima flowers.  For the centers of the flowers, I looked for tiny bronze brads.  Not finding any in my HUGE stash up in my studio, I settled for some copper ones.  Then I dipped them into some G Studio glitter glue and then my favorite brown Pink Paislee glitter.  I think they turned out great!  I also used the G Studio glitter glue & brown glitter to add a little flourish to the brown birdie paper near the top of the layout, a little difficult to see in the photo, sorry!

I used brown ink on the edges of my papers in this layout, I love the added texture it gives.  For my title, I chose some brown THICKERS.  I painted "3" & "us" with pink G Studio glitter glue and sanded the letters for "of".  I like the juxtaposition of the soft pink glitter and the roughed up word in between.  Hey, aren't we all soft & glittery sometimes and just a little rough around the edges other times!

I did enter this layout in Lily Bee's Design Team contest this week, so wish me luck!

Hopefully I'll see you Friday, over at Ann's, for her Virtual Girls' Night Out!  Such a great place to meet other cool bloggers, get & leave a few comments and see what's going on in the blogging world! :)

Tips

Of course, print your photos in sepia if it will help them blend better with your papers.

Don't be afraid to use one 4 x 6 on a layout, it will give you lot's of room for embellishments!

Ink the edges of your papers & embellishments for a little added texture and it's free to boot!

Chipboard letters, dress them up with glitter glue or down by sanding them.

If you're brads don't match your layout, dip them in glue & coat with opaque glitter, no one will ever know what color they really are!

Supplies

Patterned papers & die cuts - Lily Bee
Mosaic Tiles - Mark Richards
Glitter Glue - G Studio
Glitter - Pink Paislee
Ribbon - Creative Imaginations, American Crafts
Flowers - Prima
Brads - Making Memories
Ink - Creative Cafe
Alphabet - THICKERS by American Crafts

Wednesday, February 24, 2010

Layout of the Week - Graphic 45 Transatlantique & Grandma's Train Case

Yes, I tried to create some hype last week for this project. But I think it’s worthy! It’s definitely my favorite of all the projects I’ve ever worked on! So maybe I’m not being completely objective (ha!), I did start with my Grandma Muriel’s old train case.


I remember my grandma coming to visit us carrying all her essentials…hair & makeup stuff in this very train case. She never would have left home without being prepared to fix her hair or makeup. And as the years went on, I’m pretty sure most of it was filled with different sorts of medication. But what I remember most about this train case, is that grandma always had little surprises for my brother and I hidden inside, so she could get to them easily as soon as we picked her up at the bus station. Even though she had to switch buses a couple times on her 14 hour journey, she refused to fly. Airplanes just weren’t her thing.


So when my mom gave the train case to me, a few years after grandma passed away, I knew I had to do something special with it. And when the Transatlantique paper collection arrived from Graphic 45 last year, I knew just what that “something” was.


Right when I saw Transatlantique, I knew the blues would match the train case perfectly. And the graphics on the paper drew me to it even more so than the colors. The travel scenes from the early 20th century couldn’t be more fitting for this train case. My grandma grew up in New Jersey, just outside Manhattan. Her father worked for the railroad. Grandma’s family traveled to the Jersey Shore each summer, spending time relaxing at the beach, while my great grandfather took the train to meet them every weekend. Grandma’s parent were from England and Germany. Her German grandmother traveled across the Atlantic by ship to visit her when, as a child, she was stricken with polio. Of course, Grandma survived and later went to school to become a hair stylist. After she married, her husband traveled the world in the Navy during World War II. An independent lady always, Grandma received a letter from her husband that his ship would be coming to port in San Diego, and she set out alone to travel across the country by train. I can’t imagine what determination and bravery it must have taken her to pack her things and get on that train, alone, not knowing where she would stay or what she would do once she arrived in faraway California. Thank goodness, she met a nice family on the train who took her into their home when they arrived in San Diego, for her husband’s ship would not come to port until much later. When the ship finally did come in, in San Francisco, not San Diego, Grandma had fallen in love with another man, who would later become my Grandpa. But that’s a story for another time….

As for the train case, it has also traveled many miles during its lifetime. I thought you might appreciate it and the papers I chose to cover it with, if you knew a little about the travels of my grandmother. So many of the scenes on the Transatlantique papers show trains and ships, while many of the locations mentioned, like New York and Atlantic City, were special to my grandma. I just wish there had been a graphic showing the Hotel Del Coronado in San Diego. But I’m so happy with how the project turned out, I’ll let it slide!

I’m sure you’re waiting for me to talk about the project, so enough of my grandma’s story. I started by choosing one of each of the papers in the Transatlantique collection, along with the matching die cut tag sheet. I used Modge Podge to attach the papers to the train case.


I started on the bottom of the case, by measuring the distance between the top and bottom trim pieces. I chose a paper with a larger pattern to cover this section, planning to use individual travel “stickers” placed randomly over the top of the paper later in my project. (Many of the papers in this collection show graphics for the travel stickers collected all over the world in times past, and stuck onto the suitcases, trunks and train cases of the travelers.) Once I had cut my paper to the correct height, I folded it around the case, being especially careful to press around the edges of the hardware. I used short tipped, very sharp scissors to cut around the creases the hardware made in my paper. Next, I painted the bottom of the case with Modge Podge and carefully laid my paper in its place. After the paper was laid down, I coated the surface with Modge Podge, using care to avoid getting the Modge Podge on the hardware.


For the strip around the lid, I cut a sheet of paper, covered with travel stamps, in vertical strips and applied it in the same way as I had for the bottom part of the case. Before cutting the strips, I measured the space between the trim pieces on the lid and found that I would not be able to place the stamps in that area laying vertically. I was disappointed, but decided to cut the sheet of stamps in columns and lay them down horizontally. In the end, I think it looks just fine.


Next I looked at the lid and decided to use individual travel “stickers,” cut out of another sheet of paper. I cut out all the “stickers” first, looking to see which ones might have had significance to my grandma. I set these aside. Then I chose large “stickers” to put down first. For the curves in the corners, I carefully pressed the paper pieces down, creating creases to use as cutting lines. I used Modge Podge to apply each layer of “stickers,” putting those I thought my grandma would have liked best on last. After applying all the “stickers,” I applied one more coat of Modge Podge.


For one last touch, I chose some of the tags from the die cut sheet and tied them onto the handle using garden twine and kitchen string. These two items seemed more old fashioned than ribbon. I could see Grandma grabbing them out of the drawer at the last minute before her trip and using them to attach a luggage tag.


I haven’t shared the inside of the case, because I haven’t decided what I should do with it. Right now, it’s a little worn and waiting for a special use. I think I’ll use the case for carrying some of my scrapbooking supplies. It only seems right to use it to carry things that are important to me, just the way Grandma always did.


I hope this project inspires you to create a special memory for yourself! Grab that Modge Podge and a stack of your favorite Graphic 45 papers and get to work!  For more Graphic 45 inspiration, don't forget to check their blog!


Supplies

Graphic 45 – Transatlantique double sided papers and tags
Modge Podge
Garden Twine & Kitchen String

Thursday, February 18, 2010

Layout of the Week - Graphic 45's Fashionista & My Mom's Wedding Dress


When I came across these photos, in a stash my mom had given me when my grandmother died, I just knew I had to create a special layout for them.  While I'm not sure of the exact date of the photos, I am sure that I was in high school at the time.  My Grandma Muriel was visiting.  She and my mom had decided to pull my mom's wedding dress and veil out of the hope chest, where they'd been my whole life.  They thought it would be fun for me to try on the dress my mom made herself for her wedding.  It was a fun day and I remember thinking, "Wow, my mom was sure young when she got married!"  She was only 17 years old at the time, barely.  But it was the 60's and people were doing all sorts of things very young back then!  This year my parents will celebrate their 44th wedding anniversary this year, so I guess everything worked out just as it was supposed to!


Looking through Graphic 45's beautiful Fashionista collection made me think of all the beautiful things my mom has sewn over the years, including a few of my prom dresses and most importantly, my wedding dress.  I thought these papers would help tell the story of her creations.  I love the idea of creating a fashion board, like the designers do, and set about creating one for my page.  I stayed with the blacks & ivories of the papers and combined them with white from the wedding dress.  I used odds & ends of ribbons that I felt had a retro feel.  With the neutral palette, I chose papers and ribbons with lot's of different textures.  I love the lacy-ness (not sure if that's a word, but I like it) of the black die cut paper from Creative Imaginations, mixed with the softness of the felt ribbon, combined with the distressed look I gave the papers, tearing and inking them before adhering them to the page.  The little "pop" of black glazed paper is from SEI and helps balance the layout when set opposite the satin ribbon across the bottom of the page.


I love how this layout turned out!  For a finishing touch, I used a 7 Gypsies journal card to tell a little bit about the time I tried on my mom's wedding dress.  I really like how Graphic 45 papers help me tell the stories from my past.  I find that the colors from their collections always combine with my photos and let them stand out.  I can't wait to share another Graphic 45 project with you next week.  I'll give you a little hint and be sure to check back next week, it's a doozy!  I completed my next project back in November and have been waiting for the perfect time to share it with you.  It also has to do with my Grandma Muriel, if you've been in the store, you've probably already seen it, but I've got quite a few photos of the process I used to create it, so see you back here next week for the big unveil....


Tips

Use my "fashion board" idea to create a layout of your wedding or prom dress.  You could also use this idea to document the process you used to redecorate a room, using the fabrics & embellishement pieces in your layout.

Don't be afraid to distress some of your papers, while keeping others crisp & fresh looking.

Not every layout has to be thought of as part of a double page spread, some pages just stand on their own when placed in your album.

Supplies

Patterned Papers - Graphic 45, SEI
Die Cut Paper - Creative Imaginations
Journal Card - 7 Gypsies
Ribbon - Various Manufacturers

Monday, February 15, 2010

JulieChats - Featured Craft Blogger @ Scrapaholic Studio

I have some exciting news!

I'm the Featured Craft Blogger on the Scrapaholic Studio blog by Mrs. Licky.  Along with the features, she shares her layouts, cards, and all sorts of things she creates with her Cricut in her posts.  Be sure to check out her other Featured Craft Bloggers, down in the "Interview with Crafty Bloggers" section.

It was a lot of fun thinking about all the questions and getting my answers together.  I had the chance to think about how I got into scrapbooking and crafting in general.  It was fun to chat about my favorite scrapbooking supplies and tools.  I also got a chance to revisit my goals in blogging and scrapbooking.

I am trying to remember my words for 2010, BELIEVE & ACHIEVE, each and every day.  I try to do a little work toward my goals each day.  And the honor of being featured on another blog is a big part of my goal of bringing my blog to more readers in the scrapbooking community!

Thank You, Mrs. Licky!!! :)

Thursday, February 11, 2010

Layout of the Week - Bo Bunny's Love Bandit

I hope everyone is all prepared for Valentine's Day! I still have a few cards to make & projects to finish. I've been a very busy girl for the last week or so. I've finished quite a few projects. One for Delaney, this Valentine layout and one to submit for an Ella Publishing contest...if it wins, I'll share it with you when it's published and if not, it will make a fun Layout of the Week. I'll share the others with you soon.

I created this week's layout with my favorite Valentine collection of the season, Love Bandit by Bo Bunny. (Check out Bo Bunny's Blog for lot's more Valentine inspiration!)  I love the use of color on these papers. It's refreshing to get away from just red & pink papers for this holiday. Not that I don't love all the hearts & sparkle Valentine's brings, but too much of anything can be overkill. So this cute collection full of little racoons & bugs jumped out at me.


Once I chose the paper, I happened upon a sketch contest on Ella Publishing's blog. When I looked over the sketch, I thought it was the perfect layout for my papers & the photos of my kids. Since brown is one of my favorite colors, I love to use sepia tone photos. These photos are from Jake's 2nd Birthday a couple weeks ago. He's wearing his red Christmas "mun-in" (monkey) jammies and they certainly didn't complement the Love Bandit papers at all. So I printed them in sepia which looks great with the browns & other colors of these papers.

Lately it seems like I've been making a lot of single page layouts.  In the past, I was a total double page spread (DPS) girl.  My love of symmetry always led me to create two pages for each layout.  But I have started to find more value in one nice large photo for a single page layout, you know,  a picture is worth a 1,000 words & all.  But I love this Love Bandit paper collection so much, that I decided to add a right side page to my sketch for the Ella contest.  I chose the blue patterned paper, I like how it coordinates with the brown background of the left side without being exactly the same.  See what you think....


And here the two layouts are side by side, just like they'll look in my album...


I hope everyone enjoyed my Valentine layout!  And I hope you enjoy your long weekend...hopefully it is a long one for you like it is for us!

Happy Valentine's Day!

See you back here tomorrow for Ann's Virtual Girls' Night Out!  All you bloggers out there really should check out Ann's party!  We have a lot of fun every Friday night, meeting & greeting bloggers from all around the web and the world!  I wonder if Ann's theme will be Valentine's Day or the Olympics or a combo of the two.  Those of us on the West Coast are very excited that they Olympics are in our time zone this year, maybe we'll catch more of the action!

Tips

Use sepia tone photos to easily coordinate a layout with brown tones.

Use 7 Gypsies buckles to hold just one little knot of ribbon instead of on ribbon running all the way across your page.

Don't be afraid to use two different background papers on one DPS.  Do try for a solid or unobtrusive background if one side is a pattern.

Don't let your photos hide your pattern.  Get out that craft knife & use it to trim around part of your pattern.  Check out the right side layout.  I used the craft knife to cut around the portion of the tree that would have been hidden under my photo mat.  Then I stuck my photo mat under that portion of the tree, letting the tree pop out over my photo.

Don't let those extra dots that come in the packs of THICKERS go to waste, use them as mock brads!  I put them on my tags on the left side layout.


Supplies

Bo Bunny:  Love Bandit patterned papers, chocolate dot paper, stickers, ribbon
7 Gypsies:  Pink Buckle
American Crafts:  Green Glitter THICKERS-dots & bracket
Martha Stewart:  Punch Around the Page Punch


Monday, February 8, 2010

My Words for 2010

I've been seeing so many scrapbooking bloggers who have chosen their "theme words" for this year.  I find tons of inspiration in the blogs by Ali Edwards and Katie the Scrapbook Lady.  Click on their names to read about their words for 2010.  I started wondering what type of word I might choose that would embody my goals for this year.  I thought about all the goals I've set for myself in 2010.  One of the big ones is to get my act together & get back into exercising...OK, it has been a few years, but I still call it getting "back" into it.  Along with the exercising, I'm working on eating less & healthier foods.  Of course these two things add into another big goal of losing weight.  Those three are my personal goals for my body in 2010.  Then I have an entirely different set of goals for myself in 2010.  These goals concern my love of scrapbooking and this blog.  My biggest goal for the blog is to eventually, hopefully in 2010, begin to gather some sponsors.  I am still relatively new to blogging, starting about a year and a half ago.  So I have some research to do to even start out toward that goal.  But I think that setting big goals gives me something to work toward.  A smaller, probably more attainable goal, is to find more followers who are interested in scrapbooking and papercrafting.  I'm taking some steps to reach that goal already.  And of course I'd appreciate it if any of you could pass along a link to my blog, or grab my button to jazz up your blog!  Thanks in advance! :)

So after considering these goals, my word, or words just jumped right out at me last week when I was putting away Jake's laundry.  Hanging on the wall in his room is a saying that Dave chose when we decorated Jake's room.  It says, "BELIEVE and ACHIEVE."  Reading it that day made me think of my goals and I realized that these two words would help me reach my goals for 2010.

So along with eating healthy & working out, I'm going to BELIEVE I can ACHIEVE my goals in 2010!  I'd love to hear your word(s) for the year...or just get you started thinking about what they might be!  It isn't only in January that we can resolve to strive for something special for ourselves and our families this year!

Friday, February 5, 2010

Layout of the Week - Valentine Card #2


Well, it's finally Friday!  It's sure been a busy week around my house...Jake's birthday last Sunday and our niece visiting for the weekend...Delaney out of school on Monday and lunch with my parents...Lot's of homework, housework, preparing for my Valentine card class on Sunday...And then last night two burglaries in our neighborhood.  I'm housesitting for my neighbors, who are on vacation this week, and someone broke down their door, but didn't end up stealing anything.  At least the alarm was set and seems to have stopped the guy at the door.  But just knowing that someone was next door to my house, breaking down the door is unnerving!  The police officer who responded last night and the detective I spoke with today said that both houses were dark with outside lights on.  So now I'll be sure to leave lights on inside my house whenever we are gone at night.  Sure hope they catch the guy soon.  I was asked recently if I thought of my neighborhood as safe and I said yes.  It sure seems safe to live in a nice neighborhood with nice houses and nice yards, close to a nice school.  But I guess I would have to answer differently the next time I'm asked....

OK, I'm going to force myself to think about something more fun right now!  I'm getting ready to teach my Valentine card class on Sunday at the Hillsboro Library.  If you're in the area, it's free and we'll take the first 15 people who come to make 3 cards, a gift tag and a gift box.

I hope you are all getting into the Valentine spirit, making Valentine's, helping your kids with theirs, or maybe picking out fun decorations for their Valentine boxes.  At Delaney's school, the kids make their boxes at home and bring them on Valentine's Day.  I'll have to share a photo of hers with you, once she's done with it!  If you're looking for Valentine ideas, there are some very cute ones that you can download, just check down the right column of my blog in the "Get Your Creative On" section for some of the latest Valentine blog posts.

I'm in the middle of a lot of great projects right now!  I can't wait to share them with all of you!  I should have some fun Layout of the Week features over the next few weeks.  I'll share some fun details with you, so you have something to look forward to...I'm making Delaney a Bo Bunny Chipboard album full of memories from her last birthday party...I'm creating 2 travel layouts with Reminisce's new Passport collection...I'm putting together a layout about me, yes ME, we really do need to have a photo or two of ourselves in our albums every so often...and for one last Valentine's Day surprise, I'm excited about a layout featuring photos of my two sweeties and Bo Bunny's Love Bandit Collection, one of the sweetest Valentine collections out there!

So if you're a scrapbooker or papercrafter, or if you know someone who is one, please sign up to follow my blog or subscribe to my feed to get my latest posts in your inbox!  I'm on a quest to get to 200 followers, and I'd appreciate any help you can give me!

In a trend I've seen on tons of other scrapbooking blogs, I've chosen 2 words to be my Theme for 2010.  I'll share them with you in my next post!  But part of choosing these 2 specific words, is that I have to put myself out there and ask for what I want.  One of my goals for 2010 is to become part of a design team and another is to find scrapbook related sponsors for my blog!  If you have any ideas to help me reach my goals, please leave me a comment!  And thanks for helping me attain my goals in 2010!


Card Supplies

Patterned Papers - 3 Bugs in a Rug, Smitten Collection
Cardstock - World Win, Bazzill
Sticker - 3 Bugs in a Rug, Smitten Collection
Cardstock Strip - Bazzill, Just the Edge

PS-If you're looking for a fun party tonight where you can hang out in your pj's & meet some other fun bloggers, join me at my friend Ann's Virtual Girls Night Out!  Ann is certainly the Hostess with the Mostest...and she needs a little company while she's home tending to a sick little one tonight!  As usual, she's sharing a yummy drink, some party music and a little game...just for fun and perfect for the chilly middle of our Oregon winters.

My Mighty 3

3 places I'd rather be right now:

1-Mexico....can't wait, I'm lucky enough to be spending a few days down there with some friends celebrating our 40 birthdays!!!!!! YEAH!  More on this later!
2-Sunriver, Oregon....the thought of a little snow and a toasty drink in the lodge...ahhhhhhh
3-Kauai....the Grand Hyatt, a lounge chair & the red dirt margarita, I'm drooling!


3 things I'll never drink again:

1-Boones Farm Wine....freshman year in college, YIKES!
2-Cream Soda
3-OK, this isn't a drink exactly, but never and I mean NEVER EVER consider trying a Cuban cigar when you've had too much rum or any other liquor for that matter...worst Jamaican memory!


3 people I'd like to have dinner with, not necessarily all at once:

1-Patrick Dempsey...you know why...
2-George Clooney...duh!
3-Rachel Ray...she'd be fun at a party and she could cook for me!
(I wasn't sure if the people had to be living or not, if they don't have to be, I'd put my Grandma Muriel at the top of the list.  I'd love to get a chance to ask her all about her life and being a mom!)

OK, now head on over to Ann's, join the party and let me know your Mighty 3!

LinkWithin

Related Posts Plugin for WordPress, Blogger...